Description
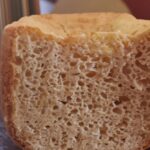
This Bob’s Red Mill 1:1 Bread Machine Recipe is a total game-changer. It’s specifically designed to work with that popular blue bag of flour, creating a tender, moist, and delicious sandwich bread with an open crumb. This is the simple, “dump and go” gluten-free bread machine recipe you’ve been searching for. Get ready to enjoy real, homemade bread again!
Ingredients
- 1 teaspoon Apple cider vinegar
- 1 1/2 tablespoons Oil (vegetable, canola, or olive)
- 3 Large eggs, room temperature
- 8 ounces (1 cup) Water, room temperature
- 4 ounces (1/2 cup) Milk (almond, coconut, or dairy), room temperature
- 1 teaspoon Kosher salt
- 1 tablespoon Granulated sugar
- 17 ounces (about 3 3/4 cups + 1 tbsp) Bob’s Red Mill 1:1 Gluten Free Flour
- 1 tablespoon Active dry yeast
Instructions
-
Add Wet Ingredients and Seasonings: Place the bread pan from your machine on the counter. Add the first seven ingredients in the order listed: apple cider vinegar, oil, room-temperature eggs, room-temperature water, room-temperature milk, salt, and sugar. Gently stir this wet mixture together.
-
Add Dry Ingredients: Carefully spoon the 17 ounces of Bob’s Red Mill 1:1 Gluten Free Flour on top of the liquid mixture, creating a “float” on top.
-
Use your finger or a spoon to make a small well or indent in the center of the flour. Pour the 1 tablespoon of active dry yeast into this well.
-
Program Your Bread Machine: Place the pan into your machine. Use a custom program if available (Preheat: 20 mins, Knead: 20 mins, Rise: 70 mins, Bake: 75 mins at 375°F).
-
If a custom program is not possible, your next best options are the “Gluten-Free” setting or the shortest “White Bread” setting.
-
Scrape the Corners: Set a timer for 5 minutes after the machine’s knead cycle begins. Use a rubber spatula to go around the corners of the pan and scrape down any dry flour, pushing it into the wet dough ball.
-
Cool the Loaf Completely: Once the baking cycle is complete, let the bread sit in the pan (removed from the machine) for 10 minutes.
-
After 10 minutes, carefully transfer the loaf to a wire rack. You must let the bread cool completely until it is at room temperature (this can take 1.5 to 2 hours) before slicing.
Notes
- Yeast Separation: The goal in Step 3 is to keep the yeast dry and separate from the wet ingredients until the machine’s cycle begins.
- Scraping is Key: Gluten-free flour is heavy and sometimes needs the help in Step 6 to fully incorporate.
- Cooling is Essential: Do not skip the 1.5-2 hour cooling time! Gluten-free bread continues to set its starches as it cools. If you cut it while it’s warm, it will be a gummy, dense mess.
- Prep Time: 10 minutes
- Cook Time: 3 hours 5 minutes
- Category: Bread, Gluten-Free
- Method: Bread Machine
- Cuisine: American
Nutrition
- Serving Size: 1 slice
- Calories: 160 kcal
- Sugar: 2 g
- Sodium: 160 mg
- Fat: 4 g
- Saturated Fat: 0.5 g
- Unsaturated Fat: 3.5 g
- Trans Fat: 0 g
- Carbohydrates: 28 g
- Fiber: 2 g
- Protein: 4 g
- Cholesterol: 35 mg