Is there anything more quintessentially British than a proper Traditional Pork Pie? It’s a culinary icon—a sturdy, crisp hot water pastry crust encasing a solid, peppery, and richly flavored pork filling, all held together by a savory jelly. Many bakers are intimidated by the unique pastry or the jelly-making process, assuming it’s a lost art.
- Ingredients for Your Pork Pies
- Recipe Timing
- Step-by-Step Instructions
- Step 1: Prepare the Hot Water Pastry
- Step 2: Knead and Rest the Pastry
- Step 3: Mix the Pork Filling
- Step 4: Assemble the Pie Bases
- Step 5: Fill and Cap the Pies
- Step 6: Egg Wash and Bake
- Step 7: Cool the Pies
- Step 8: Prepare and Add the Jelly
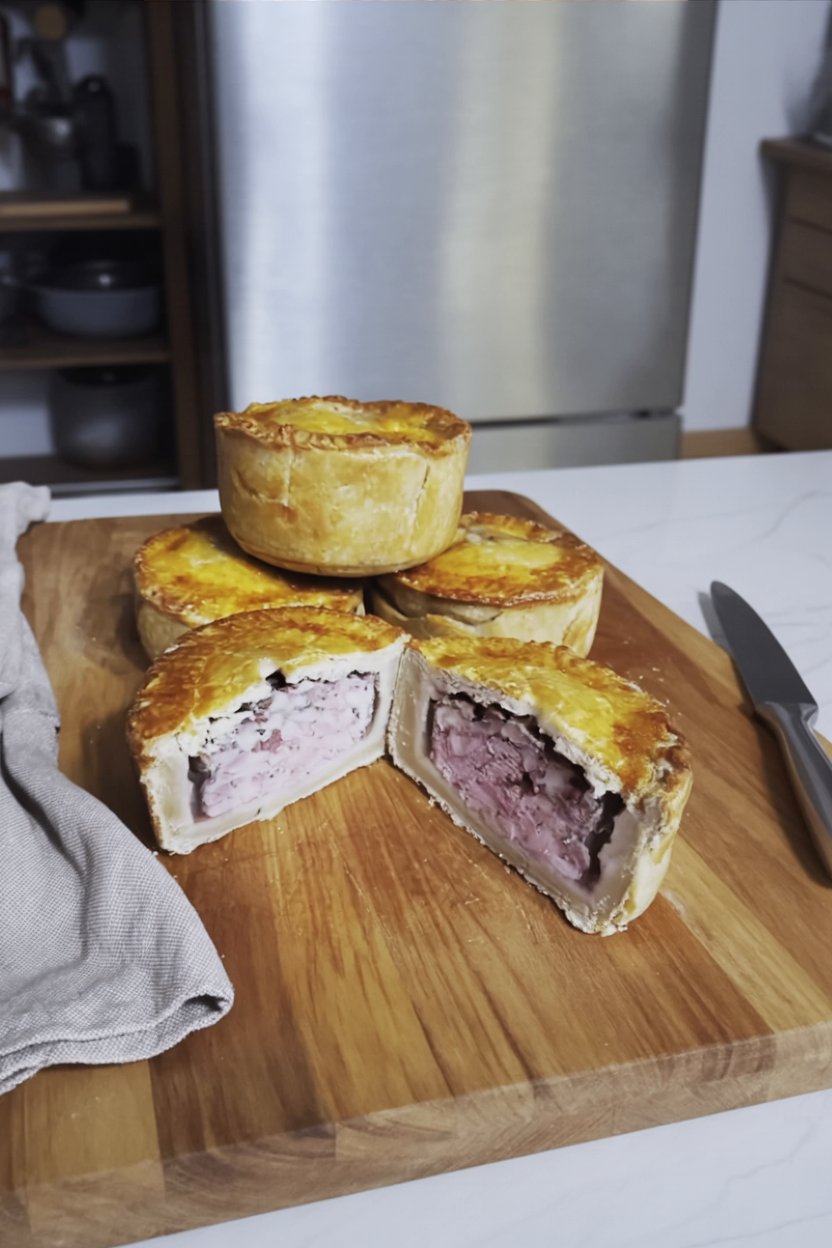
- Step 9: Unmold and Serve
- Nutritional Information (Estimate)
- Healthier Alternatives & Variations
- Serving Suggestions
- Common Mistakes to Avoid
- Storing Your Pork Pies
- Conclusion
- Frequently Asked Questions
- Q1. What is hot water pastry and why is it used?
- Q2. Why is bread flour better than all-purpose flour for the pastry?
- Q3. Can I use all butter instead of lard in the pastry?
- Q4. My jelly didn’t set! What happened?
- Q5. Can I make one large pork pie instead of six small ones?
- Best Traditional Pork Pie Recipe (Authentic Flavour)
What if I told you that you could create a truly authentic, bakery-quality pork pie at home? This recipe demystifies the process, guiding you through creating a strong, crisp pastry and a perfectly seasoned, moist filling. We’re even skipping the part where you boil pig’s trotters for hours! Get ready to bake a batch of these timeless, savory pies that are worlds better than any store-bought version.
Ingredients for Your Pork Pies
This recipe is broken into three key components: the sturdy Hot Water Pastry, the savory Pork Filling, and the essential Jelly.
| Component | Ingredient | Amount/Quantity |
| Hot Water Pastry | Bread Flour | 600g (Plain flour can be used, but bread flour is best) |
| Butter | 115g | |
| Lard (or Crisco) | 115g | |
| Water | 285g | |
| Salt | 1 tsp | |
| Beaten Egg | 1 (Optional, but recommended for flavor and color) | |
| Egg Wash | 1 beaten egg | |
| Pork Filling | Ground Pork | 480g (Choose one with some fat) |
| Pork Loin & Shoulder Mix | 480g | |
| Ground Pepper (black or white) | 1 tsp | |
| Salt | 1 tsp | |
| Dried Sage | 1 tsp | |
| Dried Thyme | 1 tsp | |
| Diced Bacon (Optional) | A few slices | |
| Jelly | Water (or Chicken Stock) | 8 oz. |
| Chicken Stock Cube | 1 or 2 | |
| Gelatin Powder or Leaf | As needed |


Recipe Timing
This is a classic “project bake,” perfect for a weekend. The active time is manageable, but the pastry and the final pie require resting.
- Preparation Time: 45 minutes
- Pastry Resting Time: 30 minutes (minimum)
- Baking Time: 50-60 minutes
- Jelly & Setting Time: 1 hour cooling + 4 hours (or overnight) chilling
- Total Time: Approximately 7 hours (mostly hands-off resting and chilling)
Step-by-Step Instructions
Step 1: Prepare the Hot Water Pastry
In a large bowl, add the bread flour, 1 teaspoon of salt, and the optional (but recommended!) beaten egg. Mix them well with a fork until the egg is mostly incorporated.
In a small saucepan, combine the butter, lard, and water. Heat this over medium-high heat, stirring, until it comes to a rolling boil and all the fats have completely dissolved into the water.
Actionable Tip: Be very careful! You are working with boiling hot liquid fat. Pour this hot liquid immediately into the flour mixture. Stir vigorously with a wooden spoon until the dough starts to come together and is cool enough to handle.
Step 2: Knead and Rest the Pastry
Tip the warm dough out onto a lightly floured surface. Knead it briefly for 1-2 minutes, just until it becomes a smooth, elastic dough. Wrap the dough ball tightly in plastic wrap and let it rest in the fridge for at least 30 minutes (or a few hours).
- Actionable Tip: This pastry is unique because it’s meant to be worked while warm, but it must be rested. This rest allows the gluten to relax, making it easier to roll without it shrinking back.
Step 3: Mix the Pork Filling
While the pastry rests, prepare your filling. Remove any large, undesirable pieces of fat from your pork loin or shoulder and dice the meat into small, roughly 1/4-inch pieces. If you’re using the optional bacon for extra flavor and fat, dice it up now.
In a large bowl, combine the ground pork, the diced pork mixture, and the diced bacon (if using). Add the salt, pepper, sage, and thyme. Use your hands to mix everything together until the seasonings are just evenly distributed.
- Actionable Tip: Do not overmix! Just like making meatballs, overworking the meat will result in a tough, dense filling. Mix only until combined.
Step 4: Assemble the Pie Bases
Divide your chilled pastry dough into two-thirds (for the base) and one-third (for the lids). Roll out the larger 2/3 portion on a floured surface until it’s about 3/16-inch (3mm) thick.
This recipe makes 6 individual pies, so you’ll need six 4-inch (10cm) springform tins. Cut your dough into 6 pieces and line each tin. Let a little pastry hang over the top edge.
- Actionable Tip: This pastry is very forgiving. If it cracks or breaks, just patch it up with a spare piece of dough and press it into place. You want the bases to be leak-proof, so pay special attention to the sides. Use your thumb and fingers to squeeze the pastry around the tin, ensuring it’s an even thickness and not too thick in the folds.
Step 5: Fill and Cap the Pies
Divide your meat filling into 6 equal amounts (approx. 160g each). Gently roll each portion into a ball and place one into each pastry-lined tin. Press the meat down to fill the bottom corners.
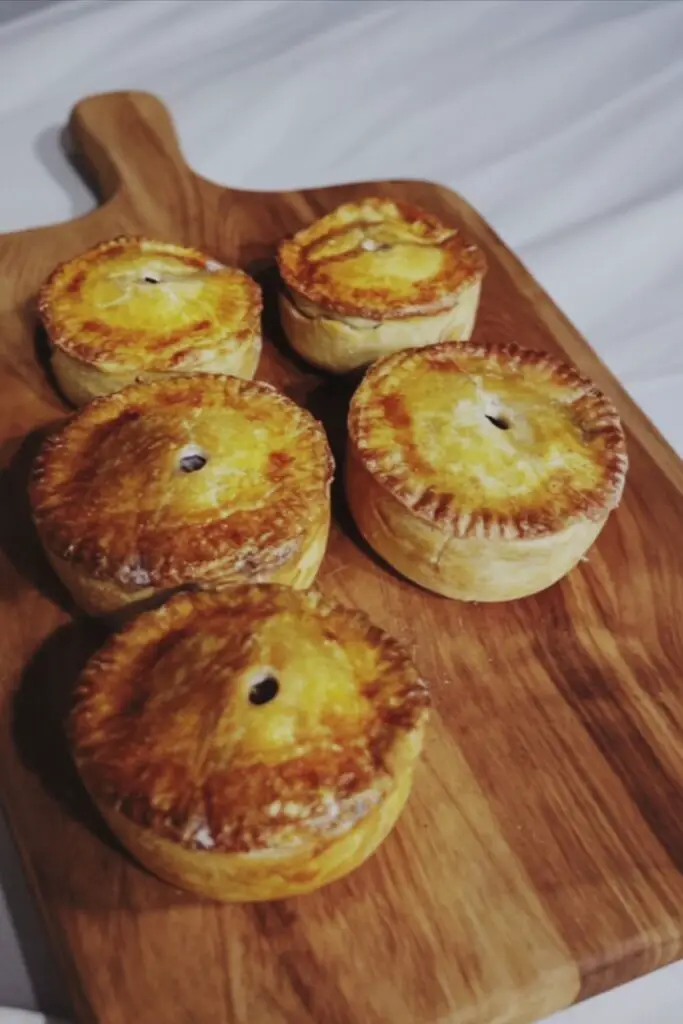
- Actionable Tip: Try to make the top of the meat filling flat, not domed. A domed top can seal the steam hole in the lid, making it impossible to add the jelly later.Roll out the remaining 1/3 of the pastry for the lids. Use the tin as a template to cut 6 lids. In the center of each lid, make a decent-sized hole (at least 1/4 inch) with a small cutter or the back of a piping tip. This steam hole is essential!Wet the top edge of the pastry base with a little water. Place the lid on top. Crimp the edges together using your fingers or the tines of a fork to seal it. Trim any excess pastry.
Step 6: Egg Wash and Bake
Preheat your oven to 350°F (175°C). Prepare your egg wash by beating the remaining egg. For a really deep golden-brown top, add only a tiny splash of water or milk.
Carefully brush the tops of the pies with the egg wash (avoiding the steam hole). Let it dry for a minute, then apply a second coating. Place the pie tins on a parchment-lined baking tray to catch any drips.
Bake on the middle rack for 50 to 60 minutes, or until the pastry is a deep, beautiful golden brown.
- Actionable Tip: Rotate the baking tray after 30 minutes to ensure all the pies cook evenly. If you’re worried the pork isn’t cooked, a digital probe thermometer inserted through the hole should read over 155°F.
Step 7: Cool the Pies
Remove the pies from the oven and let them cool in their tins on a wire rack for at least 1 hour. As the pies cool, the meat filling will shrink, creating the all-important gap that you will fill with jelly.
Step 8: Prepare and Add the Jelly
Traditionally, this jelly (or aspic) was made from boiling pig’s trotters. We’re using a much easier, modern method!
Prepare your gelatin (powder or leaf) according to the package instructions, using the 8 oz. of hot chicken stock (made with the water and stock cubes).
Using a small funnel, carefully and slowly pour the hot gelatin mixture into the steam hole of each cooled pie.
- Actionable Tip: Pour a little at a time, as it may overflow. If the jelly won’t flow in, the hole might be sealed. Try making a second, small hole near the side with a skewer to let air escape, which helps the jelly flow in.Place the jelly-filled pies in the fridge overnight (or for at least 4 hours) for the gelatin to set completely.
Step 9: Unmold and Serve
Once the jelly is firm, carefully release the springform tin from around your Traditional Pork Pie. Serve it chilled or at room temperature.
Nutritional Information (Estimate)
This is a very rich, dense, and hearty pie. This estimate is per pie, assuming the recipe makes 6 individual pies.
- Calories: 850 kcal
- Protein: 36 g
- Carbohydrates: 58 g
- Fat: 52 g
- Saturated Fat: 24 g
- Sodium: 1450 mg
Healthier Alternatives & Variations
This is a very traditional recipe, so “healthy” is relative! But you can make a few tweaks.
- Leaner Filling: You can use all pork loin for the diced meat and a very lean ground pork (90% or leaner) to reduce the fat. However, fat equals flavor and moisture in a pork pie, so be aware this will result in a drier, more crumbly filling.
- Bacon: As the recipe notes, adding diced bacon is a great way to add a different, smoky layer of flavor and ensure the filling is moist.
- Pastry Fat: You can make the pastry with all lard or all shortening (like Crisco) for different textures. Lard provides the best flavor, while shortening can make it slightly flakier.
Serving Suggestions

A Traditional Pork Pie is a classic centerpiece for a British-style lunch, picnic, or “ploughman’s” board.
- The Classic Pairing: This pie is meant to be served with a dollop of strong English mustard (like Colman’s) and a scoop of Branston Pickle (a chunky, tangy chutney). The sharp, tangy condiments cut through the rich, fatty pastry and pork perfectly.
- Ploughman’s Lunch: Serve a wedge of the pie with a good sharp cheddar cheese, some pickled onions, a salad, and crusty bread.
- On the Go: These pies are the original “hand pie” and are fantastic for picnics, as they are sturdy, portable, and delicious when eaten cold.
Common Mistakes to Avoid
This recipe requires attention to detail. Here’s what to watch out for.
- Leaky Pies: If your pastry has cracks or isn’t sealed well at the bottom, the hot filling will leak out during baking, or the hot jelly will leak out during filling.
- Solution: Patch all holes! This pastry is very forgiving. Use scraps of dough and a little water to patch any cracks you see, especially in the corners of the tin.
- Doughy Pastry: If your pastry is undercooked or soggy, it’s a major disappointment.
- Solution: Use bread flour as recommended. The higher protein content creates a stronger, crisper pastry that can stand up to the dense filling. Also, ensure your steam hole is large enough!
- A Hollow Pie: The gap left by the shrinking meat is traditional, but it must be filled.
- Solution: Do not skip the jelly! The jelly (or aspic) is not optional. It fills that gap, keeps the meat moist, adds flavor, and is the signature of an authentic pork pie.
- Pastry is Too Thick: If you roll the pastry too thick, it will be doughy and unpleasant.
- Solution: Follow the 3/16-inch (3mm) guide. Use your fingers to squeeze and thin out the pastry once it’s in the tin, especially at the folded corners, to ensure an even thickness.
Storing Your Pork Pies
These pies are designed to be preserved by their pastry and jelly, so they keep very well.
- Refrigerator: This is the best place to store them. Once the jelly is set, keep the pies in an airtight container or well-wrapped in the fridge for up to 5 days.
- Serving: They are traditionally served cold or at cool room temperature, not hot.
- Freezing (Baked): You can freeze the fully baked and jelled pies. Wrap them tightly in plastic wrap, then a layer of foil, and freeze for up to 3 months. Let them thaw overnight in the refrigerator.
- Freezing (Unbaked): You can also assemble the pies completely (up to the egg wash stage) and freeze them unbaked. Bake them directly from frozen, adding about 20-30 minutes to the baking time. You will need to cool them and add the jelly after baking as usual.
Conclusion
Making a Traditional Pork Pie from scratch is a true labor of love, but it’s one of the most satisfying bakes you will ever attempt. The combination of that crisp, savory hot water pastry and the peppery, herb-flecked pork filling is a taste of pure culinary history. It’s so much better than any store-bought version, and it’s a skill that’s bound to impress.
We hope you take on this rewarding baking project! Try it out and let us know in the comments how your pies turned out. Did you master the jelly? We’d love to hear all about it! Don’t forget to rate the recipe and share your success!
Frequently Asked Questions
Q1. What is hot water pastry and why is it used?
Hot water pastry is a traditional English pastry made by melting fat (like lard and butter) into boiling water and mixing it into flour. Unlike cold butter pastry (like for a fruit pie), this creates a strong, sturdy, and pliable dough that can be molded by hand and is strong enough to hold a heavy, wet meat filling without collapsing. It bakes up crisp and savory, not flaky.
Q2. Why is bread flour better than all-purpose flour for the pastry?
Bread flour has a higher protein content than all-purpose (plain) flour. This higher protein (gluten) creates a stronger, more elastic dough. For a pork pie, this is ideal. It makes the pastry less likely to tear when you’re lining the tins and results in a crisper, sturdier final crust that can hold the heavy filling.
Q3. Can I use all butter instead of lard in the pastry?
You can, but you will lose some of the traditional texture. Lard has a different melting point and crystal structure, which gives hot water pastry its signature “short,” almost crumbly-yet-crisp texture. All butter will still work, but it may be slightly less traditional. Crisco or other vegetable shortening is a common substitute for lard.
Q4. My jelly didn’t set! What happened?
This can happen for two reasons: 1) You didn’t use enough gelatin for the amount of liquid, or 2) You poured the jelly in while the pie was too hot. Gelatin can be “killed” by boiling temperatures.
Solution: Always follow the gelatin package instructions for the 8 oz. of stock. Most importantly, let the pie cool for at least one hour before adding the hot (but not boiling) jelly mixture.
Q5. Can I make one large pork pie instead of six small ones?
Yes, absolutely! You can use this recipe to make one large pie in a 9-inch springform pan. The assembly is the same. The baking time will be significantly longer, likely around 1.5 to 2 hours at 350°F. You must use a meat thermometer to ensure the center of the large pie has reached a safe internal temperature (155°F or higher).
Print
Best Traditional Pork Pie Recipe (Authentic Flavour)
- Total Time: 7 hours
- Yield: 6 Individual Pies 1x
Description
This recipe demystifies the process of making an authentic, bakery-quality pork pie at home, guiding you through creating a strong, crisp hot water pastry and a perfectly seasoned, moist filling. We’re even skipping the part where you boil pig’s trotters for hours! Get ready to bake a batch of these timeless, savory pies that are worlds better than any store-bought version.
Ingredients
Hot Water Pastry:
- 600g Bread Flour (Plain flour can be used, but bread flour is best)
- 115g Butter
- 115g Lard (or Crisco)
- 285g Water
- 1 tsp Salt
- 1 Beaten Egg (Optional, but recommended)
- 1 beaten egg, for Egg Wash
Pork Filling:
- 480g Ground Pork (Choose one with some fat)
- 480g Pork Loin & Shoulder Mix
- 1 tsp Ground Pepper (black or white)
- 1 tsp Salt
- 1 tsp Dried Sage
- 1 tsp Dried Thyme
- A few slices Diced Bacon (Optional)
Jelly:
- 8 oz. Water (or Chicken Stock)
- 1 or 2 Chicken Stock Cube
- Gelatin Powder or Leaf (as needed per package for 8 oz. liquid)
Instructions
Prepare the Hot Water Pastry:
- In a large bowl, add the bread flour, 1 teaspoon of salt, and the optional beaten egg. Mix with a fork until the egg is mostly incorporated.
- In a small saucepan, combine the butter, lard, and water. Heat over medium-high heat, stirring, until it comes to a rolling boil and the fats are dissolved.
- Carefully pour the hot liquid immediately into the flour mixture. Stir vigorously with a wooden spoon until the dough starts to come together and is cool enough to handle.
Knead and Rest the Pastry:
- Tip the warm dough onto a lightly floured surface. Knead briefly for 1-2 minutes, just until smooth and elastic. Wrap tightly in plastic wrap and rest in the fridge for at least 30 minutes.
Mix the Pork Filling:
- While the pastry rests, dice the pork loin/shoulder into small 1/4-inch pieces. If using, dice the bacon. In a large bowl, combine the ground pork, diced pork, optional bacon, salt, pepper, sage, and thyme. Use your hands to mix gently until just combined.
Assemble the Pie Bases:
- Preheat your oven to 350°F (175°C). Divide the chilled pastry into 2/3 (base) and 1/3 (lids). Roll out the larger portion on a floured surface to about 3/16-inch (3mm) thick.
- Line six 4-inch (10cm) springform tins with the pastry, leaving a slight overhang. Use your fingers to ensure the pastry is an even thickness, patching any cracks.
Fill and Cap the Pies:
- Divide the meat filling into 6 equal portions (approx. 160g each). Roll each into a ball and place one in each pastry-lined tin, pressing it into the corners. Keep the top flat.
- Roll out the remaining 1/3 of the pastry for the lids. Cut 6 lids using the tin as a template. Make a 1/4-inch hole in the center of each lid.
- Wet the top edge of the pastry base with water and place the lid on top. Crimp the edges with your fingers or a fork to seal. Trim excess pastry.
Egg Wash and Bake:
- Prepare the egg wash. Brush the tops of the pies (avoiding the steam hole). Let dry for a minute, then apply a second coating. Place the tins on a parchment-lined baking tray.
- Bake on the middle rack for 50 to 60 minutes, until deep golden brown. (Rotate the tray after 30 minutes). The internal temperature should be over 155°F.
Cool the Pies:
- Remove the pies from the oven and let them cool in their tins on a wire rack for at least 1 hour. The meat will shrink, creating a gap for the jelly.
Prepare and Add the Jelly:
- Prepare the gelatin according to its package instructions, using the 8 oz. of hot chicken stock.
- Using a small funnel, carefully and slowly pour the hot gelatin mixture into the steam hole of each cooled pie.
- Place the pies in the fridge overnight (or at least 4 hours) for the gelatin to set completely.
- Unmold and Serve: Once the jelly is firm, carefully release the springform tin from around each pie. Serve chilled or at room temperature.
Notes
- Step 1 Tip: Be very careful! You are working with boiling hot liquid fat. Pour it immediately into the flour and stir.
- Step 2 Tip: This pastry is unique; it’s worked warm but must be rested. This rest allows the gluten to relax, making it easier to roll.
- Step 3 Tip: Do not overmix! Overworking the meat will result in a tough, dense filling. Mix only until combined.
- Step 4 Tip: This pastry is forgiving. If it cracks, just patch it up with a spare piece of dough. You want the bases to be leak-proof.
- Step 5 Tip: Try to make the top of the meat filling flat, not domed. A domed top can seal the steam hole, making it impossible to add the jelly later.
- Step 6 Tip: Rotate the baking tray after 30 minutes to ensure all the pies cook evenly. A digital probe is the best way to check for doneness.
- Step 8 Tip: Pour the jelly a little at a time, as it may overflow. If it won’t flow in, try making a small hole near the side with a skewer to let air out.
- Prep Time: 45 minutes
- Cook Time: 60 minutes
- Category: Main Course, Pie, Savory Baking
- Method: Baking
- Cuisine: British
Nutrition
- Serving Size: 1 pie
- Calories: 850 kcal
- Sugar: 2 g
- Sodium: 1450 mg
- Fat: 52 g
- Saturated Fat: 24 g
- Unsaturated Fat: 28 g
- Trans Fat: 0 g
- Carbohydrates: 58 g
- Fiber: 2.5 g
- Protein: 36 g
- Cholesterol: 160 mg