The Secret to a Better-Than-Store-Bought Ice Cream Cake?
Did you know that the average American consumes ice cream approximately 23 times a year? For many, the ultimate frozen treat is the iconic Dairy Queen ice cream cake. But what if the secret to an even more delicious, customizable, and budget-friendly version was waiting in your own kitchen? This is your ultimate guide to creating a spectacular Copycat Dairy Queen Ice Cream Cake. Forget the last-minute store runs for birthday parties and celebrations. We’ve perfected this recipe to not only replicate but elevate that classic combination of creamy vanilla and chocolate ice cream, irresistible chocolate crunchies, and whipped topping. Get ready to impress your friends and family with a homemade frozen dessert that tastes like pure nostalgia, only better.
- The Secret to a Better-Than-Store-Bought Ice Cream Cake?
- Your Ultimate Ice Cream Cake Ingredient Checklist
- Timing Your Frozen Masterpiece to Perfection
- Step 1: Building Your Crunchy Chocolate Foundation
- Step 2: Layering the Rich Chocolate Ice Cream
- Step 3: Creating the Legendary Fudge and Crunch Center
- Step 4: Adding the Creamy Vanilla Ice Cream Layer
- Step 5: The Big Chill and Final Frosting
- The Nutritional Profile of Your Homemade Delight
- Healthier Swaps for a Guilt-Free Indulgence
- Creative Ways to Serve and Garnish
- Common Mistakes to Sidestep for Cake Perfection
- Storing Your Frozen Treasure
- Your Go-To Recipe for Unforgettable Celebrations
- Your Top Questions About Making Ice Cream Cake
Your Ultimate Ice Cream Cake Ingredient Checklist
Crafting this masterpiece is all about layering simple, delicious components. Here’s everything you’ll need to assemble your own iconic frozen cake, complete with tips for perfect results and clever substitutions.
| Ingredient Category | Ingredient | Quantity | Sensory Description & Smart Swaps |
| For the Bottom Chocolate Layer | Chocolate Sandwich Cookies (e.g., Oreos) | 1.5 cups (about 15 cookies), finely crushed | The rich, dark, and crunchy foundation. Swap: Any chocolate wafer or biscuit will work beautifully. For a gluten-free version, use gluten-free chocolate sandwich cookies. |
| Unsalted Butter, melted | 4 tbsp | The liquid gold that binds our crunchy base together. Swap: Melted coconut oil can be used for a slight coconut undertone. | |
| For the Famous Fudge & Crunch Center | Chocolate Fudge Sauce | 1 cup | Thick, gooey, and intensely chocolatey. Use your favorite store-bought brand for convenience. Swap: You can make a simple homemade fudge sauce by melting chocolate chips with a bit of heavy cream. |
| Chocolate Sandwich Cookies (e.g., Oreos) | 1 cup (about 10 cookies), coarsely chopped | The star of the show! These create that signature crunchy texture. Keep the pieces a bit larger for a satisfying bite. | |
| For the Ice Cream Layers | Chocolate Ice Cream | 1.5 quarts (6 cups), softened | A deep, rich, and creamy chocolate layer. Pro Tip: Let it soften on the counter for 15-20 minutes until it’s spreadable but not melted. |
| Vanilla Ice Cream | 1.5 quarts (6 cups), softened | The classic, creamy, and sweet counterpart to the chocolate. | |
| For the Whipped Topping & Garnish | Whipped Topping (e.g., Cool Whip), thawed | 1 (8 oz) container | The light, airy, and fluffy frosting that encases the cake. Swap: You can make your own stabilized whipped cream by whipping 1.5 cups of heavy cream with 3 tbsp of powdered sugar and 1 tsp of vanilla extract. |
| Chocolate Drizzle and Sprinkles | For Garnish | The decorative finishing touches that make it a true celebration cake. |
Timing Your Frozen Masterpiece to Perfection
Patience is key when working with frozen desserts, as each layer needs time to set.
- Active Preparation Time: 30 minutes
- Freezing Time: At least 4-6 hours (ideally overnight)
- Total Time: Approximately 4.5 – 6.5 hours
While this may seem like a long time, the active work is minimal. A comparable from-scratch baked and frosted layer cake can take up to 3 hours of active work. This Copycat Dairy Queen Ice Cream Cake recipe requires about 80% less hands-on time, making it a perfect make-ahead dessert for any occasion.
Step 1: Building Your Crunchy Chocolate Foundation
First, let’s create the base that provides that essential crunch. In a small bowl, combine your finely crushed chocolate sandwich cookies with the melted butter. Stir until the crumbs are evenly moistened. Press this mixture firmly and evenly into the bottom of a 9-inch springform pan. A springform pan is highly recommended as it makes releasing the finished cake a breeze. Use the bottom of a measuring cup to get a nice, compact layer. Place the pan in the freezer for at least 15 minutes for the crust to firm up.
Step 2: Layering the Rich Chocolate Ice Cream
Once your crust is firm, it’s time for the first ice cream layer. Take your softened chocolate ice cream and spread it evenly over the chilled cookie crust. Work quickly to prevent the ice cream from melting too much. Use an offset spatula to create a smooth, even surface. Place the pan back in the freezer for at least 30-45 minutes, or until the chocolate ice cream is firm to the touch.
Step 3: Creating the Legendary Fudge and Crunch Center
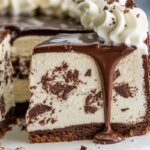
This is the layer that truly defines a Copycat Dairy Queen Ice Cream Cake. Once the chocolate ice cream layer is firm, pour the chocolate fudge sauce over it, spreading it almost to the edges. Immediately sprinkle the coarsely chopped chocolate sandwich cookies over the fudge. Gently press them into the fudge to ensure they adhere. This combination of gooey fudge and crunchy cookie pieces is pure magic.
Step 4: Adding the Creamy Vanilla Ice Cream Layer
Now for the final ice cream layer. Carefully spread the softened vanilla ice cream over the fudge and crunch layer. Be gentle to avoid disturbing the layer beneath. Again, use your offset spatula to create a smooth, flat top. This will be the canvas for our whipped topping.
Step 5: The Big Chill and Final Frosting

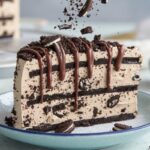
Cover the springform pan with plastic wrap and place it in the freezer for a minimum of 4 hours, but overnight is best. This extended freezing time ensures that every layer is completely firm, which is crucial for getting clean slices. Once fully frozen, run a knife around the edge of the pan before releasing the springform collar. Transfer the cake to a serving platter. Frost the top and sides with the thawed whipped topping. You can get creative here, making swirls and peaks. For that classic DQ look, use a piping bag to create a decorative border around the top and bottom edges. Finish with a chocolate drizzle and a generous amount of sprinkles.
The Nutritional Profile of Your Homemade Delight
While this is an indulgent treat, making it at home gives you control over the ingredients. Here’s an approximate nutritional breakdown for a single slice (assuming the cake is cut into 12 servings):
- Calories: Approximately 450-550 kcal
- Fat: 25-30g
- Saturated Fat: 14-18g
- Carbohydrates: 50-60g
- Sugar: 35-45g
- Protein: 6-8g
Note: These values can vary significantly based on the specific brands of ice cream, cookies, and toppings used.
Healthier Swaps for a Guilt-Free Indulgence
Want to enjoy this classic treat with a few healthier tweaks? It’s entirely possible!
- Lower-Sugar Ice Cream: Many brands now offer excellent low-sugar or keto-friendly ice cream options. Using these can significantly reduce the overall sugar content.
- Homemade “Magic Shell” Drizzle: For the fudge layer and drizzle, melt 1 cup of dark chocolate chips (70% cacao or higher) with 2 tablespoons of coconut oil. This will have less sugar and more antioxidants than most store-bought fudge sauces.
- Go Greek: For a protein boost and less fat, you can create a “frosting” by mixing plain Greek yogurt with a bit of powdered sugar and vanilla. It offers a pleasant tang that pairs well with the sweet ice cream.
- Fruit-Forward: Fold some fresh raspberries or chopped strawberries into the vanilla ice cream layer for a burst of natural sweetness and added nutrients.
Creative Ways to Serve and Garnish
Presentation is everything! Here are some fun ways to serve your Copycat Dairy Queen Ice Cream Cake:
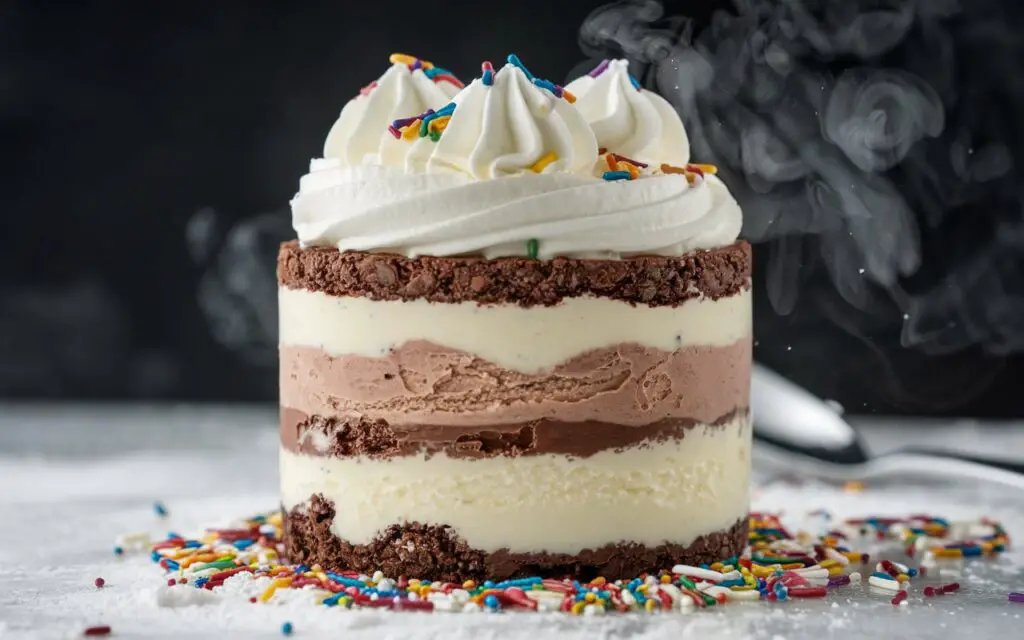
- Themed Decorations: Customize the sprinkles and decorations to match a birthday theme, holiday, or special event.
- Extra Crunch: Lightly toast some chopped nuts, like pecans or almonds, and press them into the whipped topping on the sides of the cake.
- A Warm Welcome: Serve each slice with a small pitcher of warm caramel or fudge sauce on the side for guests to pour over their slice.
- Coffee Pairing: A slice of this ice cream cake is the perfect partner for a hot cup of coffee or a cold brew, creating a delightful contrast of temperatures and flavors.
Common Mistakes to Sidestep for Cake Perfection
Avoid these common pitfalls to ensure your ice cream cake is a stunning success:
- Using Melted Ice Cream: Your ice cream should be softened, not melted. Melted ice cream, when refrozen, becomes icy and loses its creamy texture.
- Rushing the Freezing Times: This is the most critical mistake. Each layer needs to be firm before adding the next. Rushing will cause the layers to blend together into a muddy mess.
- Forgetting to Line the Pan: While a springform pan is best, if you’re using a regular cake pan, be sure to line it with plastic wrap, leaving an overhang to easily lift the cake out.
- Frosting a “Warm” Cake: Attempting to frost the cake before it’s fully frozen solid will result in the whipped topping melting and sliding off.
Storing Your Frozen Treasure
Proper storage is essential to maintain the cake’s texture and flavor.
- In the Freezer: Store the finished cake in an airtight cake carrier or a box in the freezer. This will prevent it from absorbing any freezer odors. It will keep well for up to one week.
- Pre-Slicing for Convenience: If you anticipate having leftovers, pre-slicing the cake can be a great idea. Place wax paper between the slices to prevent them from sticking together. This makes it easy to grab a single serving without having to thaw the entire cake.
Your Go-To Recipe for Unforgettable Celebrations
This Copycat Dairy Queen Ice Cream Cake is more than just a recipe; it’s a passport to creating cherished memories. From the crunchy chocolate base to the iconic fudge center and creamy ice cream layers, every bite is a celebration. By making it at home, you not only get a superior-tasting dessert but also the satisfaction of creating something special for the people you love.
Ready to become a dessert legend? Give this recipe a try! We would love to see your creations. Share your feedback in the review section, or leave a comment on our blog. Don’t forget to subscribe for more delicious copycat recipes and baking tips!
Your Top Questions About Making Ice Cream Cake
- Can I use different ice cream flavors?Absolutely! The beauty of this recipe is its versatility. Mint chocolate chip and chocolate, strawberry and vanilla, or even coffee and caramel would be fantastic combinations.
- Do I have to use a springform pan?A springform pan is highly recommended for easy removal. However, you can use a 9-inch deep-dish pie plate or a regular 9-inch round cake pan. Just be sure to line it with two long pieces of plastic wrap, leaving an overhang on all sides, so you can easily lift the cake out once frozen.
- My fudge layer became rock hard. How can I prevent this?Some commercial fudge sauces can freeze very hard. To prevent this, you can mix your fudge sauce with a few tablespoons of whipped topping before spreading it. This will keep it softer and easier to slice when frozen.
- How far in advance can I make this cake?You can make this cake up to a week in advance. Just be sure to store it properly in an airtight container in the freezer to prevent freezer burn and maintain its freshness.
- What’s the best way to get clean slices?For perfect, clean slices, dip a large, sharp knife in hot water and wipe it dry before each cut. The hot blade will slice through the frozen cake with ease.