Is there any dessert more beautiful or intimidating than a Pavlova? That cloud of snowy white, crispy meringue, topped with pillows of cream and bright, fresh fruit—it’s a true show-stopper. But many home bakers are terrified of making one. We’ve all heard the horror stories of weeping meringues, deflated disks, and catastrophic cracks.
- Ingredients for Your Easy Pavlova
- Timing
- Step-by-Step Instructions
- Step 1: Preheat Oven and Prep Your Pan
- Step 2: Whisk Egg Whites and Add Sugar
- Step 3: Fold in the Stabilizers
- Step 4: Shape and Bake the Pavlova
- Step 5: Cool the Pavlova (The #1 Secret)
- Step 6: Decorate and Serve
- Nutritional Information
- Healthier Alternatives
- Serving Suggestions
- Common Mistakes to Avoid
- Storing Tips
- Conclusion
- FAQs
- Q1. Why do my egg whites have to be at room temperature?
- Q2. Can I use regular granulated sugar instead of caster sugar?
- Q3. Why did my pavlova turn brown?
- Q4. Can I make this vegan?
- Fail-Proof Easy Pavlova Recipe (Crispy & Chewy)
What if I told you that the secret to a perfect pavlova isn’t a magical gift, but just a few simple, non-negotiable rules? This Easy Pavlova Recipe is your key to a “fail-proof” dessert. It delivers that perfect, sought-after texture: a crisp, delicate outer shell that gives way to a soft, gooey, marshmallowy center. Forget your fears; it’s time to master this stunning, naturally gluten-free dessert.
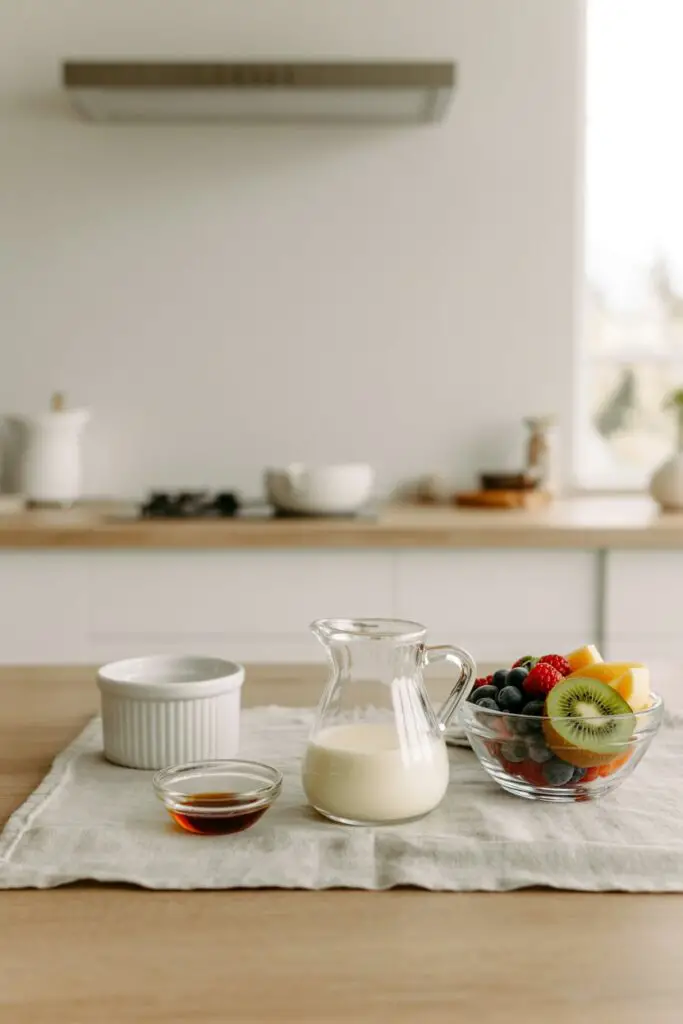
Ingredients for Your Easy Pavlova
The ingredient list is simple, but the quality and state of these ingredients are key. Room temperature egg whites are non-negotiable!
| Ingredient | Amount/Quantity |
| For the Meringue Shell | |
| Large egg whites | 6 (must be at room temperature) |
| Pinch of salt | 1 |
| Caster sugar (superfine) | 1 1/2 cups (330g) |
| Cornflour (cornstarch) | 3 teaspoons |
| White vinegar | 1 teaspoon |
| Vanilla extract | 1 teaspoon |
| For the Topping | |
| Chilled thickened cream (heavy cream) | 300ml |
| Seasonal fresh fruit | As desired (berries, kiwi, passionfruit) |

Timing
The most important part of this recipe is the long, hands-off cooling time. This is the secret to a perfect, crack-free shell.
- Prep time: 20 minutes
- Bake time: 1 hour 15 minutes
- Cooling time: 2 hours (in the oven, turned off)
- Total time: Approximately 3 hours 35 minutes (mostly inactive)
Step-by-Step Instructions
Step 1: Preheat Oven and Prep Your Pan
First, preheat your oven to 150°C (300°F). Line a large, flat baking tray with non-stick baking paper. Take a 20cm (8-inch) plate or cake pan, place it on the paper, and trace a circle. Flip the paper over so the pencil/pen side is down, but you can still see the guide.
Step 2: Whisk Egg Whites and Add Sugar
In a large, spotlessly clean glass or metal bowl, add your room temperature egg whites and the pinch of salt. Using an electric mixer (handheld or stand mixer), whisk on high speed until they form soft peaks.
Now, begin adding the caster sugar. This is a crucial step: add the sugar one tablespoon at a time while the mixer is running. After all the sugar has been added, continue to whisk on high speed for another 3-4 minutes.
- Pro-Tip: The meringue is ready when it’s extremely thick, stiff, and glossy. To check if the sugar is dissolved, rub a tiny bit of meringue between your thumb and forefinger. If it feels smooth, you’re ready. If it feels grainy, keep whisking!
Step 3: Fold in the Stabilizers
In a small bowl, combine the cornflour, white vinegar, and vanilla extract. Add this to the meringue mixture and whisk on low speed (or gently fold with a spatula) until it is just combined. Do not overmix and deflate your air.
- Why? The cornflour and vinegar are stabilizers. They are the secret to that soft, marshmallowy center and help prevent the pavlova from weeping.
Step 4: Shape and Bake the Pavlova
Spoon the glorious, thick meringue onto your prepared baking tray, using the circle as your guide. Use a spatula to spread the meringue into a round, smoothing the surface and sides. You can create lovely swirls and peaks as you go.
Place the tray in the oven. As soon as you close the door, reduce the oven temperature to 120°C (250°F). Bake for 1 hour to 1 hour 15 minutes. The pavlova should be dry to the touch and a very pale, creamy color when done.
Step 5: Cool the Pavlova (The #1 Secret)
This is the most important step for a crack-free pavlova. Turn the oven off completely. Do not open the door. Let the pavlova cool completely inside the oven for at least 2 hours, or even overnight. A sudden change in temperature is what causes those dramatic cracks.
Step 6: Decorate and Serve
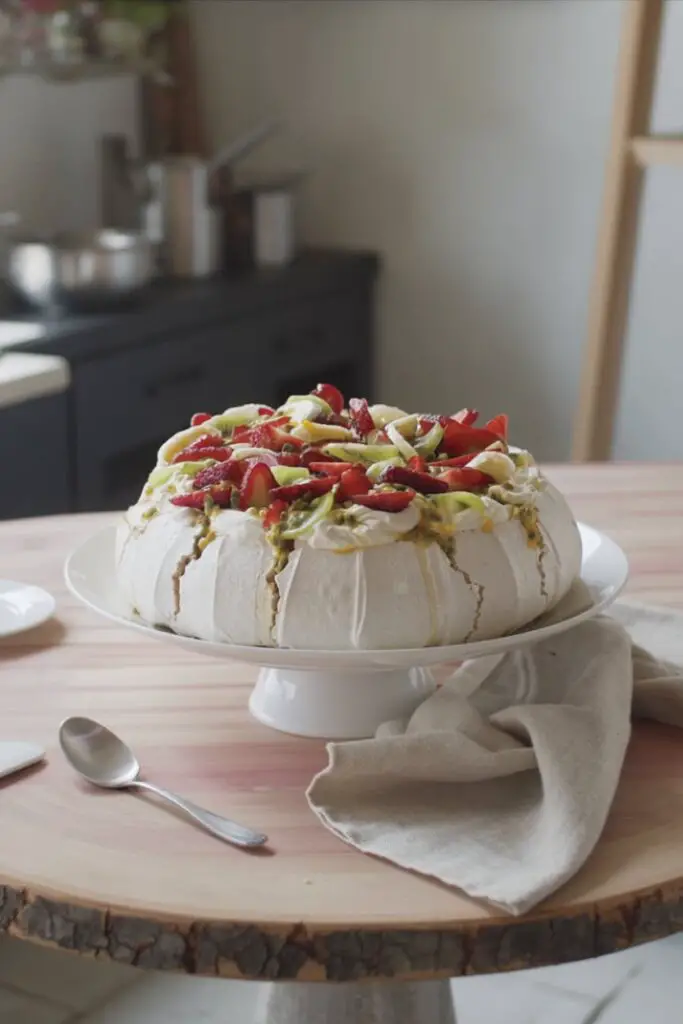
When you are ready to serve, carefully remove the cooled pavlova shell from the oven. In a separate bowl, whip the chilled thickened cream until it’s thick and holds its shape. Spoon the cream generously onto the top of the pavlova. Decorate with all your beautiful, fresh seasonal fruit. Cut into wedges to serve immediately.
Nutritional Information
This is an estimate for one serving of pavlova (assuming the pavlova is cut into 8 wedges) before toppings, which can vary widely.
- Calories: ~180 kcal
- Protein: 3 g
- Fat: <1 g
- Carbohydrates: 40 g
- Sugar: 40 g
(Note: This meringue shell is naturally gluten-free and fat-free! The final calories will depend on your cream and fruit.)
Healthier Alternatives
While “pavlova” and “healthy” aren’t often in the same sentence, you can make a few swaps to lighten it up.
- Lower-Sugar Meringue: You can slightly reduce the sugar to 1 1/4 cups, but I don’t recommend going any lower, as the sugar is critical for the structure and stability of the meringue.
- Lighter Topping: Swap the whipped cream for a thick, unsweetened plain Greek yogurt. It adds a wonderful tang that cuts through the sweetness and gives you a great protein boost.
- Smart Fruit: Top with low-glycemic fruits like berries (raspberries, strawberries, blueberries) and kiwi fruit instead of higher-sugar fruits like mango or banana.
Serving Suggestions
The beauty of this Easy Pavlova Recipe is its versatility. It’s the perfect blank canvas!
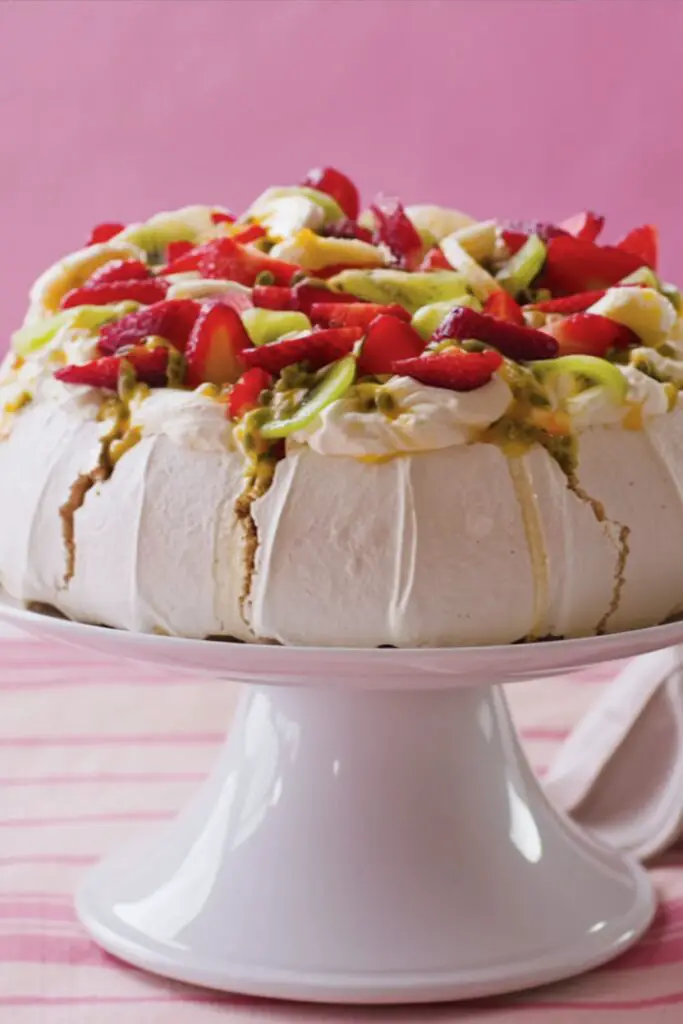
- The Classic: Pile it high with whipped cream, sliced strawberries, kiwi fruit, and the pulp from two passionfruit. This is a traditional and unbeatable combination.
- Winter Berry: For a holiday dessert, top with whipped cream, pomegranate seeds, and a few mint leaves. It looks stunningly festive.
- Chocolate Ripple: Gently fold 1/4 cup of chocolate shavings or a chocolate ripple sauce through the whipped cream before spooning it on top.
- Lemon Curd: Before adding the cream, spread a thin layer of tangy lemon curd over the meringue base.
Common Mistakes to Avoid
- My egg whites won’t whip!
- Cause: There is a trace of fat or grease. This could be a speck of egg yolk, or a bowl that wasn’t perfectly clean. Plastic bowls can retain fat, so always use a glass or metal bowl.
- Solution: Start over with clean, dry equipment and be very careful separating your eggs.
- My pavlova is “weeping” (leaking syrup).
- Cause: The sugar was not fully dissolved in the egg whites.
- Solution: Add the sugar one spoonful at a time. Be patient! Always do the “rub test” (rubbing the meringue between your fingers) to ensure it’s smooth, not grainy, before baking.
- My pavlova cracked dramatically.
- Cause: A sudden change in temperature.
- Solution: Follow Step 5! Cool the pavlova in the oven with the door closed. A few small, rustic cracks are normal and add character, but a major collapse is from cooling it too fast.
- My pavlova is flat and chewy, not airy.
- Cause: You used cold eggs or over-mixed the stabilizers.
- Solution: Room temperature egg whites are essential. They whip to a much greater volume than cold eggs. When you add the cornflour/vinegar, fold it in gently and stop as soon as it’s combined.
Storing Tips
- To Store the Shell: A pavlova shell must be stored undecorated. Keep the completely cooled shell in an airtight container at room temperature for up to 2 days. Do not put an undecorated shell in the fridge—the moisture will make it soft and sticky.
- To Store a Decorated Pavlova: You don’t. A decorated pavlova is a “serve immediately” dessert. The moisture from the cream will begin to dissolve the crispy meringue shell within an hour.
- To Freeze: You can freeze the un-topped meringue shell! Wrap it carefully in plastic wrap and then in foil and freeze for up to 1 month. Let it thaw at room temperature before decorating.
Conclusion
This Easy Pavlova Recipe is your key to a spectacular, show-stopping dessert that is deceptively simple. By following a few key rules—room temperature eggs, dissolving the sugar slowly, and cooling it completely in the oven—you can achieve that perfect, coveted pavlova texture every single time. It’s the perfect, impressive dessert for any celebration.
We hope you enjoy this recipe! Try it out and let us know in the comments how it turned out for you. What are your favorite fruit toppings? We’d love to hear your feedback!
FAQs
Q1. Why do my egg whites have to be at room temperature?
Room temperature egg whites are more relaxed and will whip up to a much greater volume, creating a lighter, airier meringue. Cold eggs will stay tighter and result in a denser pavlova.
Q2. Can I use regular granulated sugar instead of caster sugar?
You can, but it’s risky. Caster sugar (or “superfine” sugar) is much finer and dissolves easily. Regular sugar is coarser and will struggle to dissolve, which is the main cause of a “weeping” or gritty pavlova. If you only have regular sugar, pulse it in a food processor for 30 seconds to make it finer.
Q3. Why did my pavlova turn brown?
Your oven was too hot! This is a “low and slow” bake. Ensure you reduce the temperature to 120°C (250°F) right after you put it in. A perfect pavlova should be a pale, antique cream color, not a deep tan.
Q4. Can I make this vegan?
Yes! You can make a vegan meringue using aquafaba (the water from a can of chickpeas) in place of egg whites. The ratios and technique are slightly different, but it’s a fantastic substitute.
Print
Fail-Proof Easy Pavlova Recipe (Crispy & Chewy)
- Total Time: 3 hours 35 minutes
- Yield: 8 Servings 1x
- Diet: Gluten Free
Description
This Easy Pavlova Recipe is your key to a “fail-proof” dessert. It delivers that perfect, sought-after texture: a crisp, delicate outer shell that gives way to a soft, gooey, marshmallowy center. Forget your fears; it’s time to master this stunning, naturally gluten-free dessert.
Ingredients
For the Meringue Shell:
- 6 Large egg whites (must be at room temperature)
- 1 Pinch of salt
- 1 1/2 cups (330g) Caster sugar (superfine)
- 3 teaspoons Cornflour (cornstarch)
- 1 teaspoon White vinegar
- 1 teaspoon Vanilla extract
For the Topping:
- 300ml Chilled thickened cream (heavy cream)
- As desired Seasonal fresh fruit (berries, kiwi, passionfruit)
Instructions
-
Preheat Oven and Prep Pan: Preheat your oven to 150°C (300°F). Line a large, flat baking tray with non-stick baking paper. On the paper, trace a 20cm (8-inch) circle. Flip the paper over so the pencil side is down.
-
Whisk Egg Whites and Add Sugar: In a large, spotlessly clean glass or metal bowl, whisk the room temperature egg whites and pinch of salt on high speed until they form soft peaks.
-
Begin adding the caster sugar, one tablespoon at a time, while the mixer is running. After all sugar is added, continue to whisk on high speed for another 3-4 minutes until the meringue is extremely thick, stiff, and glossy.
-
Fold in the Stabilizers: In a small bowl, combine the cornflour, white vinegar, and vanilla extract. Add this to the meringue mixture and whisk on low speed (or gently fold) until it is just combined.
-
Shape the Pavlova: Spoon the thick meringue onto your prepared baking tray, using the circle as your guide. Spread the meringue into a round, smoothing the surface and sides.
-
Bake the Pavlova: Place the tray in the oven. As soon as you close the door, reduce the oven temperature to 120°C (250°F). Bake for 1 hour to 1 hour 15 minutes. The pavlova should be dry to the touch and a very pale, creamy color.
-
Cool the Pavlova: This is the most important step. Turn the oven off completely. Do not open the door. Let the pavlova cool completely inside the oven for at least 2 hours, or even overnight.
-
Decorate and Serve: When you are ready to serve, carefully remove the cooled pavlova shell. In a separate bowl, whip the chilled thickened cream until it holds its shape. Spoon the cream generously onto the top of the pavlova.
-
Decorate with all your beautiful, fresh seasonal fruit. Cut into wedges to serve immediately.
Notes
- Meringue Check: The meringue is ready when it’s extremely thick, stiff, and glossy. To check if the sugar is dissolved, rub a tiny bit of meringue between your thumb and forefinger. If it feels smooth, you’re ready. If it feels grainy, keep whisking!
- Stabilizers: The cornflour and vinegar are the secret to that soft, marshmallowy center and help prevent the pavlova from weeping.
- The #1 Secret: Do not open the oven door! Letting the pavlova cool completely inside the oven with the heat off is the best way to prevent a sudden temperature change, which is what causes those dramatic cracks.
- Prep Time: 20 minutes
- Cook Time: 1 hour 15 minutes
- Category: Dessert
- Method: Baking
- Cuisine: Australian / New Zealander
Nutrition
- Serving Size: 1 wedge (1/8th of pavlova)
- Calories: 180 kcal
- Sugar: 40 g
- Sodium: 45 mg
- Fat: 0.3 g
- Saturated Fat: 0 g
- Unsaturated Fat: 0 g
- Trans Fat: 0 g
- Carbohydrates: 40 g
- Fiber: 0 g
- Protein: 3 g
- Cholesterol: 0 mg