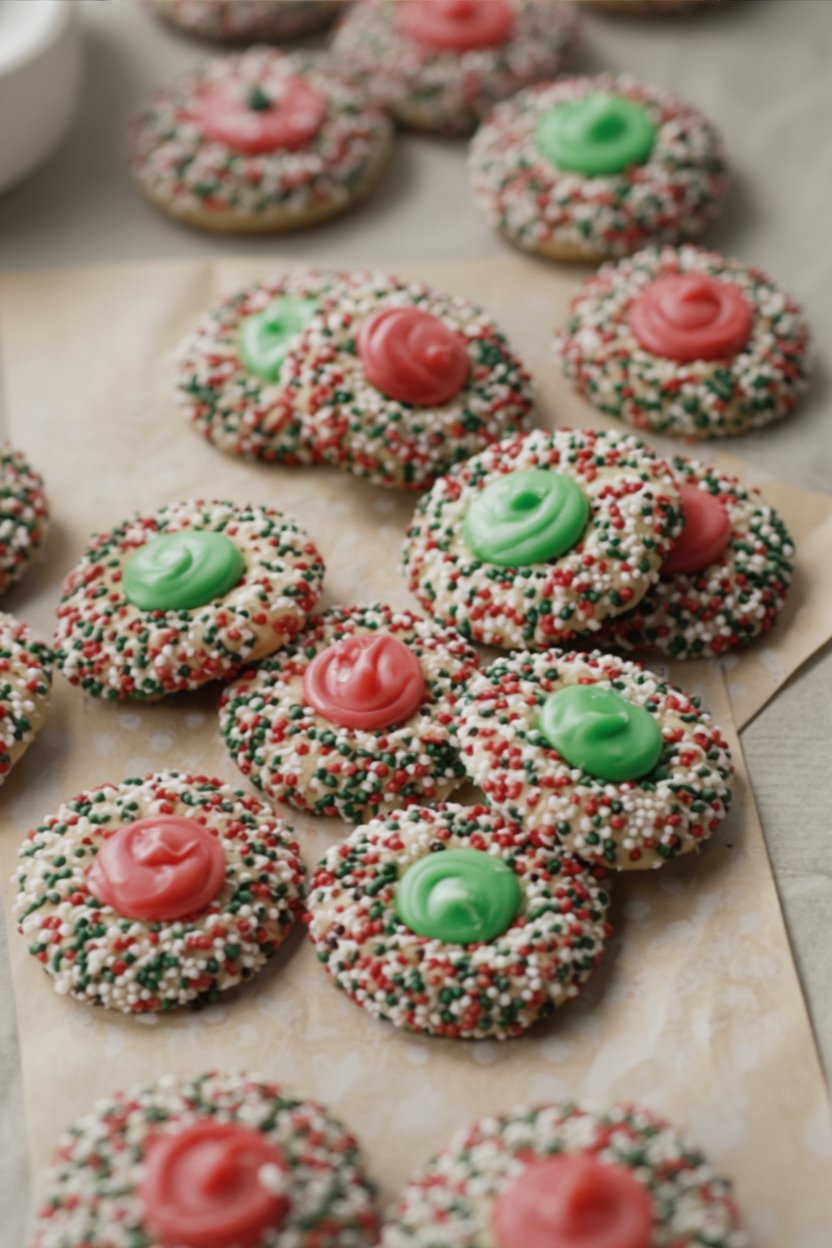
Is there anything that screams “holidays” quite like a tray of jewel-toned cookies? Every year, when the calendar flips to December, I find myself craving the buttery, melt-in-your-mouth texture of Festive Thumbprint Cookies. They are a staple at cookie exchanges and a favorite for leaving out on Santa’s plate. Unlike complex pastries that require hours of chilling and rolling, these gems are surprisingly approachable, yet they look like they came straight from a boutique bakery.
- Ingredients List
- Timing
- Step-by-Step Instructions
- Step 1: Cream the Butter and Sugar
- Step 2: Add Wet Ingredients and Flour
- Step 3: Shape and Coat
- Step 4: Indent and Bake
- Step 5: Reshape and Cool
- Step 6: Create the Candy Filling
- Step 7: Tint and Fill
- Nutritional Information
- Healthier Alternatives
- Serving Suggestions
- Common Mistakes to Avoid
- Storing Tips
- Conclusion
- FAQs
- Q1. Can I use jam instead of the candy filling?
- Q2. Why did my cookies spread flat?
- Q3. Can I make the dough ahead of time?
- Q4. My filling is grainy. What went wrong?
- Festive Thumbprint Cookies: A Colorful Holiday Classic
While many recipes use jam, this specific version features a rich, homemade candy filling that sets perfectly, offering a delightful creamy contrast to the crisp, sugary exterior. If you have been searching for the ultimate holiday treat that balances texture, sweetness, and visual appeal, look no further. Let’s fire up the oven and create a batch of these Festive Thumbprint Cookies that are guaranteed to sparkle on your dessert table.
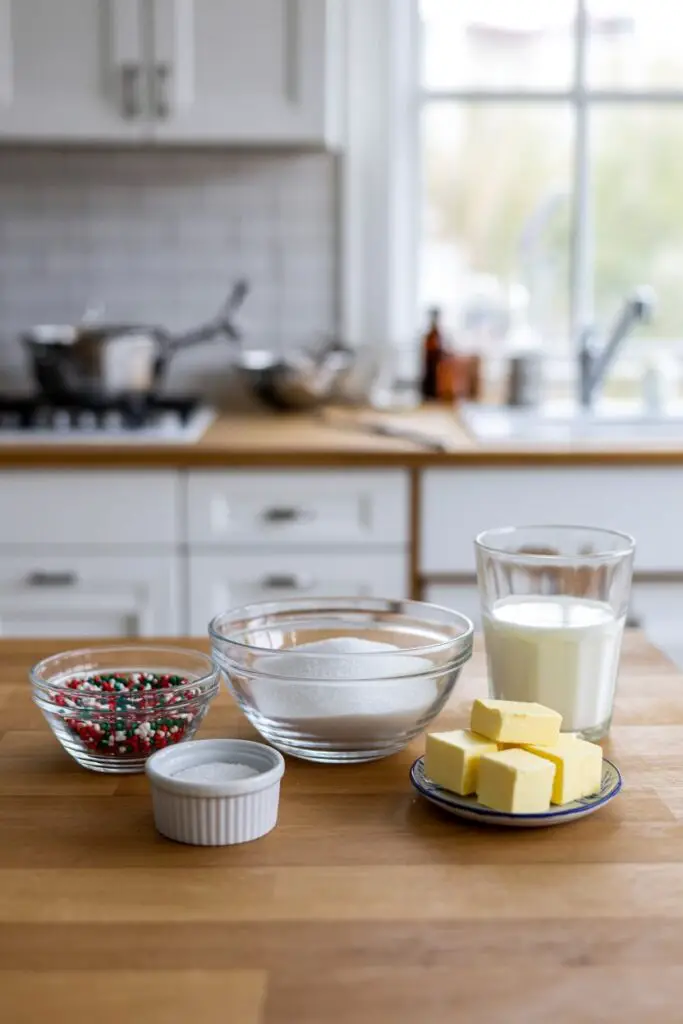
Ingredients List
The magic of shortbread-style cookies lies in the ratio of fat to flour. Using room-temperature ingredients is crucial for that tender crumb.
| Ingredient | Amount/Quantity | Notes |
| Butter | 1 cup | Softened to room temperature; unsalted preferred |
| Brown Sugar | 1/2 cup | Packed; adds moisture and caramel depth |
| Large Egg | 1 | Room temperature for better emulsification |
| Vanilla Extract | 1 tsp | Pure extract offers the best aroma |
| All-Purpose Flour | 2 cups | Spooned and leveled |
| Salt | 1/4 tsp | Balances the sweetness |
| Sprinkles | As needed | Nonpareils or colored sugar for coating |
| For the Filling: | ||
| Granulated Sugar | 1 cup | The base of the candy filling |
| Butter (Cubed) | 1/4 cup | Adds richness to the filling |
| 2% Milk | 1/4 cup | Whole milk works well too |
| White Candy Coating | 8 oz | Chopped; helps the filling set firm |
| Vanilla Extract | 1 tsp | For flavor depth |
| Food Coloring | Red & Green | Gel or liquid drops |


Timing
These cookies come together relatively quickly, making them perfect for a weekend baking project.
- Prep Time: 25 minutes
- Cook Time: 12 minutes per batch
- Cooling/Setting Time: 30 minutes
- Total Time: ~70 minutes(About 20% faster than making decorated sugar cookies since there is no chilling required!)
Step-by-Step Instructions
Step 1: Cream the Butter and Sugar
Preheat your oven to 350°F (175°C). In a large mixing bowl or stand mixer, cream the softened butter and packed brown sugar.
- Tip: Be patient here. Beat on medium-high speed for 5-7 minutes until the mixture is pale and airy. This aeration is the secret to a light cookie that isn’t dense.
Step 2: Add Wet Ingredients and Flour
Beat in the egg and vanilla extract until fully combined. In a separate small bowl, whisk together the flour and salt to remove any lumps. Gradually add this dry mixture into the creamed butter.
- Tip: Mix on low speed just until the flour disappears. Overworking the dough at this stage develops gluten, which can make your tender cookies tough.
Step 3: Shape and Coat
Place your colored sprinkles or nonpareils in shallow bowls. Shape the dough into 1-inch balls (a small cookie scoop is helpful here for uniformity). Dip the tops of the balls into the sprinkles, pressing gently to adhere.
Step 4: Indent and Bake
Place the cookies 2 inches apart on ungreased baking sheets. Using your thumb (or the back of a rounded teaspoon measuring spoon), press a deep indentation into the center of each ball.
Bake for 10-12 minutes or until the edges are lightly golden brown.
Step 5: Reshape and Cool
Immediately upon removing the pan from the oven, the indentations may have puffed up slightly. Use the handle of a wooden spoon to gently press the centers back down to enlarge them.
Transfer the cookies to wire racks to cool completely. They must be cool before filling, or the candy mixture will run.
Step 6: Create the Candy Filling
In a small saucepan, bring the granulated sugar, cubed butter, and milk to a boil. Stir constantly to prevent scorching. Once boiling, cook and stir for exactly 1 minute.
Remove from heat. Add the white candy coating and vanilla extract. Stir vigorously until the mixture is smooth and glossy.
Step 7: Tint and Fill
Work quickly, as the filling sets as it cools. Divide the hot filling between two small heat-safe bowls. Tint one bowl red and the other green using food coloring.
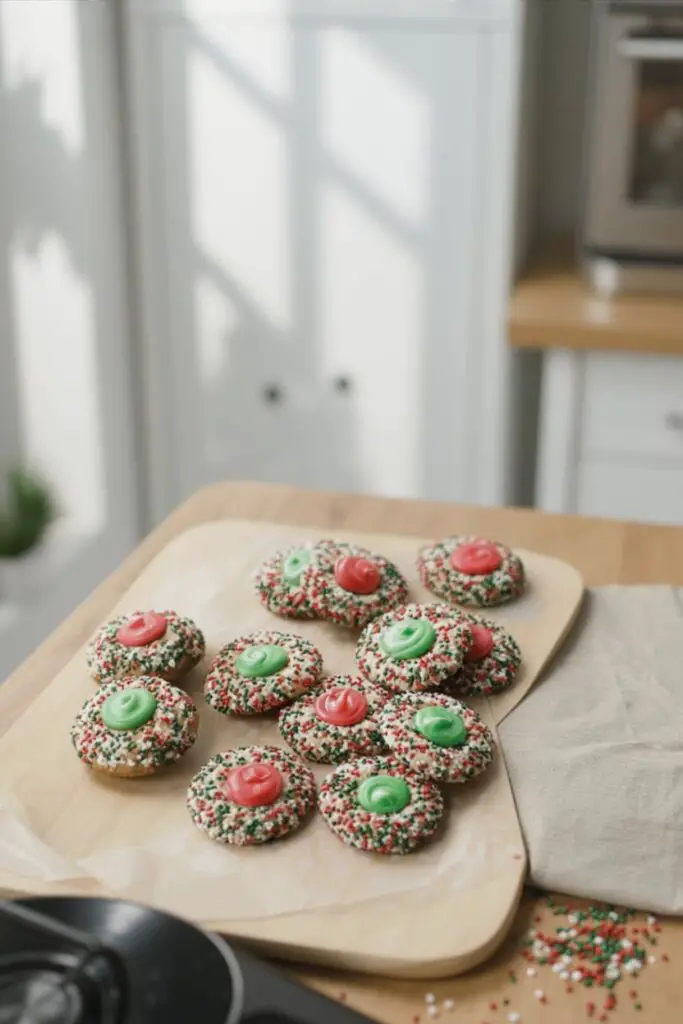
Spoon the warm filling carefully into the indentations of the cooled cookies. Let them stand at room temperature until the filling is firm and set.
Nutritional Information
While these are a decadent holiday treat, it is helpful to know what goes into them. Here is an estimated breakdown per cookie (assuming a batch of 24):
- Calories: ~180 kcal
- Fat: 9g (Saturated: 5g)
- Carbohydrates: 24g
- Sugar: 18g
- Protein: 2g
- Sodium: 60mg
Note: These cookies are energy-dense due to the butter and sugar content. Enjoy them as part of a balanced celebration!
Healthier Alternatives
If you want to enjoy the spirit of these cookies with a slightly better nutritional profile or to accommodate dietary needs, consider these modifications:
- Whole Grain Twist: Swap 50% of the all-purpose flour for white whole wheat flour. It adds a bit of fiber without significantly altering the taste.
- Jam Filling: Instead of the boiled sugar/candy filling, use low-sugar fruit preserves (like raspberry or apricot). This reduces the refined sugar content and adds a natural fruit flavor. Add the jam before baking for a chewy texture, or after baking for a fresh taste.
- Gluten-Free: Use a high-quality 1:1 Gluten-Free Baking Flour blend (look for one with xanthan gum) in place of the wheat flour.
- Natural Coloring: Instead of artificial dyes, use beet powder for red and matcha powder or spirulina for green to tint the filling.
Serving Suggestions

Presentation is everything during the holidays. Here is how to make these Festive Thumbprints shine:
- The Cookie Box: These are sturdy cookies that travel well. Place them in a tin lined with parchment paper for the perfect neighbor gift.
- Pairings: The sweetness of the candy filling pairs beautifully with unsweetened beverages. Serve with a mug of strong Earl Grey tea or a dark roast coffee to cut the sugar.
- Santa’s Platter: Arrange these on a plate with a glass of milk. The red and green colors look vibrant against a white ceramic plate.
Common Mistakes to Avoid
Baking is a science, and small variables can change the outcome. Watch out for these pitfalls:
- Butter Too Warm: If your butter is melting/oily rather than just soft, the cookies will spread into flat puddles. Solution: The butter should hold a fingerprint indentation but not be greasy.
- Cracking Edges: If the dough is too dry, the edges will split deeply when you press your thumb in. Solution: If the dough feels crumbly, let it sit at room temperature for a few minutes so the hydration creates a more cohesive ball, or gently warm the ball in your hands before rolling.
- Filling Hardening Too Fast: The boiled filling sets up quickly. Solution: Keep the saucepans warm or work with a partner to fill the cookies immediately after tinting. If it gets too stiff, microwave it for 5-10 seconds to loosen it up.
Storing Tips
These cookies have excellent staying power, making them great for making ahead.
- Room Temperature: Store in an airtight container with layers separated by wax paper. They will stay fresh for up to 5 days.
- Freezing: You can freeze the baked cookies without the filling for up to 3 months. Thaw and fill fresh for the best texture. If freezing fully assembled cookies, ensure the filling is completely set and rock-hard before stacking.
- Reheating: These are best served at room temperature to maintain the snap of the candy center.
Conclusion
There is a reason Festive Thumbprint Cookies return to our kitchens year after year. They offer a perfect bite of nostalgia: a buttery, tender base that melts away, followed by the satisfying sweetness of the colorful filling. They are a joy to make, a delight to look at, and even better to eat.
I hope this recipe becomes a cherished part of your holiday traditions. Whether you are baking with kids or prepping for a high-stakes cookie swap, these thumbprints are a guaranteed win.
Try it out and let us know! Did you stick with red and green, or did you try a different color palette? We’d love to hear your feedback in the comments below. Don’t forget to rate the recipe and subscribe to our blog for more delicious, healthy recipes delivered straight to your inbox.
FAQs
Q1. Can I use jam instead of the candy filling?
Absolutely. This is the most common variation of the thumbprint cookie. If using jam, you have two options: fill the indentations before baking for a sticky, chewy center, or fill them with heated jam after baking for a glossy, fruity center. Raspberry and apricot jams work best.
Q2. Why did my cookies spread flat?
This usually happens for one of two reasons: either the butter was too warm (melted) when you started creamed it, or you didn’t measure the flour correctly. Always spoon your flour into the measuring cup and level it off rather than scooping directly from the bag, which packs the flour down.
Q3. Can I make the dough ahead of time?
Yes! You can prepare the dough, shape it into balls, and refrigerate them for up to 2 days before baking. You may need to add 1-2 minutes to the baking time if the dough is going into the oven cold. This actually helps them hold their shape even better!
Q4. My filling is grainy. What went wrong?
If the filling is grainy, the sugar likely didn’t dissolve completely, or it crystallized. When boiling the milk, sugar, and butter, make sure to bring it to a full rolling boil and stir constantly. Do not scrape down the sides of the saucepan if you see sugar crystals there, as reintroducing them to the syrup can cause crystallization.
Print
Festive Thumbprint Cookies: A Colorful Holiday Classic
- Total Time: 1 hour 10 minutes
- Yield: 24 Cookies 1x
- Diet: Vegetarian
Description
Is there anything that screams “holidays” quite like a tray of jewel-toned cookies? These Festive Thumbprint Cookies are a staple at cookie exchanges. Unlike complex pastries, these gems are surprisingly approachable, yet they look like they came straight from a boutique bakery. This version features a rich, homemade candy filling that sets perfectly, offering a delightful creamy contrast to the crisp, sugary exterior.
Ingredients
For the Cookie Dough:
- 1 cup Butter, softened
- 1/2 cup Brown Sugar, packed
- 1 Large Egg, room temperature
- 1 tsp Vanilla Extract
- 2 cups All-Purpose Flour
- 1/4 tsp Salt
- As needed Sprinkles (for coating)
For the Candy Filling:
- 1 cup Granulated Sugar
- 1/4 cup Butter, cubed
- 1/4 cup 2% Milk
- 8 oz White Candy Coating, chopped
- 1 tsp Vanilla Extract
- Red & Green Food Coloring
Instructions
- Cream Butter: Preheat oven to 350°F (175°C). Cream the softened butter and brown sugar on medium-high speed for 5-7 minutes until pale and airy.
- Mix Dough: Beat in the egg and vanilla. Gradually add the flour and salt, mixing on low just until combined. Do not overwork.
- Shape and Coat: Shape dough into 1-inch balls. Dip the tops into sprinkles, pressing gently.
- Indent and Bake: Place balls on ungreased sheets. Press a deep indentation into the center of each with your thumb. Bake for 10-12 minutes.
- Reshape and Cool: While hot, re-press the centers with a wooden spoon handle. Cool completely on wire racks.
- Make Filling: Boil granulated sugar, cubed butter, and milk in a saucepan for exactly 1 minute, stirring constantly. Remove from heat; stir in candy coating and vanilla until smooth.
- Tint and Fill: Quickly divide filling into two bowls; tint red and green. Spoon warm filling into the cooled cookies. Let stand until set.
Notes
- Creaming Tip: Don’t rush the creaming step! Beating for 5-7 minutes creates the aeration needed for a light texture.
- Filling Timing: Work quickly once the filling is made, as it sets fast as it cools.
- Don’t Overmix: Stop mixing the flour as soon as it disappears to keep the cookies tender.
- Cool First: Ensure cookies are fully cooled before filling so the candy mixture doesn’t run.
- Prep Time: 25 minutes
- Cook Time: 12 minutes
- Category: Dessert, Cookies, Holiday
- Method: Baking
- Cuisine: American
Nutrition
- Serving Size: 1 cookie
- Calories: 180 kcal
- Sugar: 18 g
- Sodium: 60 mg
- Fat: 9 g
- Saturated Fat: 5 g
- Unsaturated Fat: 3 g
- Trans Fat: 0 g
- Carbohydrates: 24 g
- Fiber: 0 g
- Protein: 2 g
- Cholesterol: 25 mg