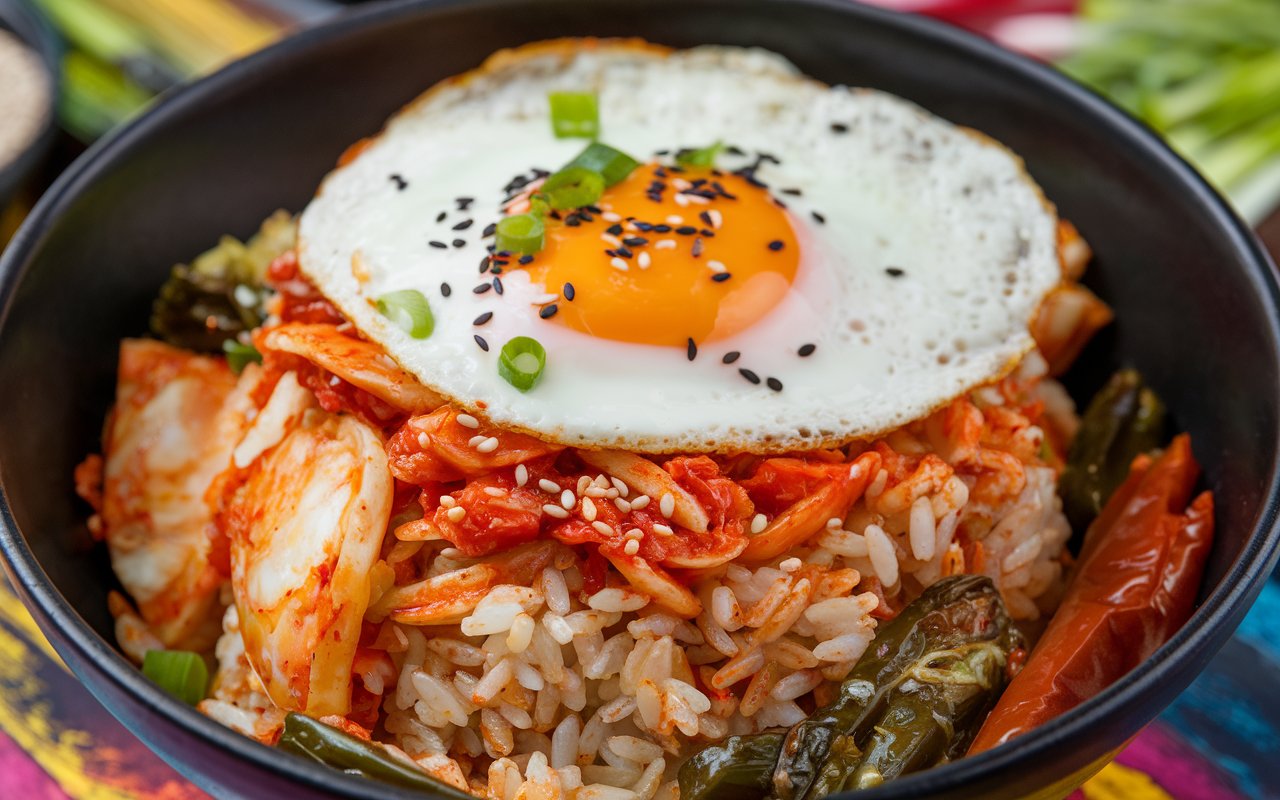
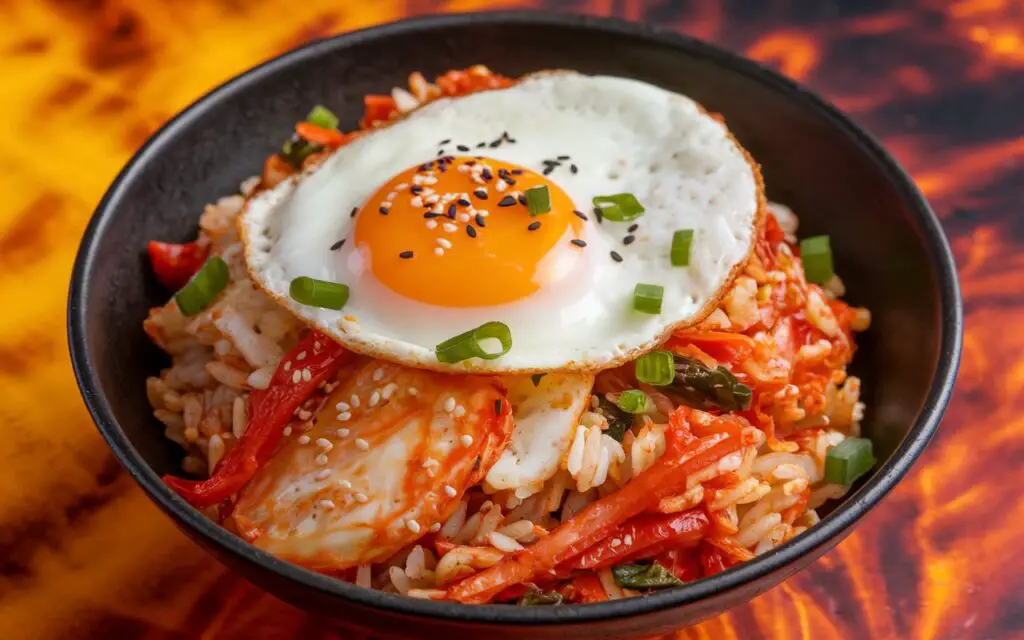
When a craving for comfort meets a desire for punchy flavors, it’s hard to beat Korean Kimchi Fried Rice, known locally as kimchi bokkeumbap. The dish unites day-old rice with tangy, fermented kimchi, plus aromatic vegetables, some protein (like pork belly or spam in classic forms), and a drizzle of sesame oil. Each spoonful bursts with that distinct kimchi sourness, balanced by the mellow starch of rice. Cracking a fried egg on top or adding a sprinkling of seaweed or green onions can turn it into a near-complete meal, satisfying both your taste buds and your appetite for something bold yet homey.
My personal journey to kimchi fried rice began when a friend introduced me to kimchi’s addictive tang—somehow sour, spicy, and pungent all at once. I found myself daydreaming about ways to highlight it beyond a side dish. Fried rice quickly emerged as a perfect vehicle: leftover rice stashed in the fridge, a half-jar of kimchi waiting to be used, and some random vegetables all meant I could whip up a meal in minutes. Over the years, I experimented with adding gochujang (Korean chili paste) for extra heat, or layering in bacon or spam for that salty-savory depth. The outcome was always gratifying, bridging that sweet spot between comforting fried rice and the punchy flavor boost that only kimchi can provide.
In this guide, we’ll detail how to conjure a sizzling wok of Korean Kimchi Fried Rice—picking the right kimchi, preparing the rice for optimal texture, and adjusting heat and toppings to your preference. Whether you’re new to kimchi or already in love with its bold taste, get ready to enjoy a quick, spicy, tangy staple that redefines the concept of fried rice.
Section 1: Why Korean Kimchi Fried Rice Resonates

- Kimchi’s Distinct Flavor
Fermented cabbage (or radish) laced with chili and garlic fosters a tangy, pungent taste that enlivens day-old rice. It’s a prime example of “transforming humble leftovers into something spectacular.” - Speed & Convenience
With leftover rice, the dish can come together in about 15 minutes. A single wok or pan suffices, minimizing cleanup, making it a perfect weekday fix. - Texture Balance
Crisp bits of stir-fried rice, tender or crunchy vegetables, and the softness of kimchi create a medley of mouthfeels in every bite. Adding a fried egg fosters a pleasingly runny yolk for extra richness. - Variable Heat & Protein
From mild to fiercely spicy, you can moderate the heat by choosing mild kimchi or adding extra gochujang. Protein options range from pork belly, bacon, spam, tofu, or none at all, adapting to your palate and dietary needs.
Section 2: Ingredient Overview
Use this table to plan your 3–4 servings of kimchi fried rice:
| Ingredient | Quantity | Notes |
|---|---|---|
| Cooked Rice (preferably day-old) | ~3 cups | Dry, cold rice fries best; fresh rice can be used but may be stickier |
| Kimchi (cabbage or radish) | ~1 cup, chopped | Reserve some kimchi juice for extra flavor |
| Protein (optional: bacon, spam, tofu, or leftover meat) | ~½–1 cup diced | Traditional versions often use pork belly or spam |
| Onion (chopped) | ½ cup | Adds sweetness & depth |
| Garlic (minced) | 2 cloves (optional) | Additional aromatic |
| Gochujang (Korean chili paste) (optional) | 1–2 tsp or to taste | For extra heat & color |
| Soy Sauce or Salt | As needed | Season carefully, depending on how salty your kimchi is |
| Sesame Oil | 1 tbsp | Final drizzle for aroma |
| Green Onions (chopped) | 2–3 stalks | For garnish, or stir in at the end for color & freshness |
| Egg (fried or sunny-side) (optional) | 1 per serving | Classic topping |
| Oil (vegetable) | 2–3 tbsp | For stir-frying |
| Toasted Sesame Seeds (optional garnish) | 1 tsp | Adds crunchy finishing note |
Section 3: Step-by-Step Recipe (Approx. 15–20 Minutes)
- Prep Ingredients
- Chop kimchi, reserving 1–2 tablespoons of its juice. Dice onion, slice or dice your protein (if using bacon/spam). If using tofu, cut into small cubes.
- Fry Protein
- Warm 1 tablespoon of oil in a wok or large skillet over medium-high heat. If using bacon or pork belly, add it first, letting fat render for ~3–4 minutes. If you have spam or leftover cooked meat, quickly brown it for 2–3 minutes. Tofu might require slightly less time or more oil if it’s not firm enough. Remove protein from pan, draining excess grease if needed, leaving about 1 tablespoon behind.
- Sauté Onions & Kimchi
- In the same pan, add chopped onion. Sauté for 2–3 minutes until translucent. If you like garlic, stir in minced garlic for 30 seconds.
- Next, add kimchi. Stir-fry for another 2–3 minutes. This drives off excess liquid, deepening the kimchi’s flavor. If you want it spicier or sweeter, swirl in a teaspoon of gochujang at this stage.
- Incorporate Rice
- Add the cold, cooked rice to the wok. Break up clumps with a spatula, distributing it evenly among the kimchi-onion mixture. Keep heat at medium-high, tossing for ~3–4 minutes.
- Return the cooked protein to the pan. Drizzle in any reserved kimchi juice. If the mixture seems too dry, add a splash of water or stock. If it’s too wet, let it stir-fry a bit longer to evaporate extra moisture.
- Season & Taste
- Season with soy sauce or a pinch of salt. Be cautious—kimchi and gochujang can already bring saltiness.
- Adjust heat by adding more gochujang or a dash of chili flakes if you crave a bigger punch. If your kimchi is extremely sour, a sprinkle of sugar can mellow it out.
- Finish with Sesame Oil
- Once the rice is evenly coated, heated through, and slightly crisp in some spots, turn off the heat. Drizzle 1 tablespoon of sesame oil, tossing quickly. This final step imparts a classic nutty fragrance.
- Garnish & Serve
- Top with chopped green onions or sesame seeds. For an even more classic presentation, fry an egg separately and slide it on top. The runny yolk merges elegantly with the spicy tang of the rice. Serve hot, letting diners break the egg yolk if included.
(Optional tip: If you want more crisp edges on the rice, press some down in the wok for 1 minute, letting it “toast” slightly before stirring.)
Section 4: Ensuring Perfect Kimchi Fried Rice
- Use Day-Old Rice
- Freshly cooked rice tends to be too moist and clumpy. Chilling it overnight in the fridge dries it out slightly, giving a better fry texture.
- Select Well-Fermented Kimchi
- Kimchi that’s had time to ferment (slightly aged) often has a stronger tang, adding more depth to the dish. If your kimchi is too fresh or mild, you might lack that robust flavor.
- Cook at High Heat
- A hot wok or skillet helps quickly fry the rice and kimchi, preventing sogginess. Constant movement ensures everything incorporates while some grains get a mild crisp.
- Taste as You Go
- Because kimchi and gochujang differ in salt/spice levels by brand, keep sampling. Add or reduce extra seasoning carefully to avoid oversalting or overwhelming heat.
Section 5: Flavor Variations
- Bacon or Spam
- Classic comfort approach: Crisp up diced bacon or spam for a salty-sweet undertone. Perfect for those who want a meaty dimension.
- Seafood Twist
- Use small shrimp or leftover fish for a briny, oceanic note. Season lightly with salt, letting the kimchi remain the star.
- Vegetarian/Vegan
- Double up on veggies (like carrots, peas, bell peppers) or add firm tofu. Check the kimchi label if you want it fully vegan, as some kimchi brands use fish sauce or shrimp paste.
- Cheese Topping
- Some modern variants add shredded cheese, letting it melt over the rice for a fusion style. This might appeal to those who love cheesy, spicy combos.
Section 6: Serving Suggestions
- Banchan (Side Dishes): Korean tables typically include side dishes like pickled radish, additional kimchi types, or spinach (sigeumchi namul).
- Additional Protein: If your kimchi fried rice is vegetarian, consider a fried egg or a side of grilled tofu. If you used bacon, you may not need more protein.
- Soup Pairing: A light Korean soup (like a seaweed soup or miso soup) can complement the robust flavor of the fried rice.
- Leftovers: Kimchi fried rice often tastes just as good the next day. Reheat in a skillet with a drop of oil to revive any crispness.

Section 7: FAQ – Korean Kimchi Fried Rice
Q1: Can I use fresh-cooked rice if I didn’t plan ahead?
A1: You can, but the dish may be stickier. Spread the freshly cooked rice on a tray to cool and dry for 10–15 minutes if possible. Or skip that if you’re in a hurry—taste remains good, texture less so.
Q2: What if my kimchi is extremely sour?
A2: If it’s too tangy, add a bit of sugar or reduce the quantity used. Slightly older kimchi is actually prized for cooking, but you can always adjust sweetness or add more rice to balance.
Q3: Does this dish have to be spicy?
A3: Typically, yes, but you can moderate the spice level by selecting mild kimchi or adding less chili paste. If you can find white kimchi (non-spicy), that’s also an option, though less common.
Q4: How can I get a “fried” crust like at restaurants?
A4: Use a wide pan or wok and cook at high heat without excessive stirring. Let the rice sit for short intervals to crisp up the bottom, akin to a paella’s socarrat.
Q5: Is sesame oil necessary at the end?
A5: Yes, that drizzle of sesame oil near the finish is typical in Korean cooking, bringing a final wave of nutty fragrance. Without it, the flavor might feel incomplete.
Conclusion

Melding the bold punch of kimchi with the comforting familiarity of fried rice, Korean Kimchi Fried Rice stands as a prime example of how leftover staples can morph into a dish that’s anything but ordinary. Quick, flexible, and undeniably flavorful, it’s an easy entry point into Korean cuisine. You’ll also discover a surprising synergy in each bite: the tangy heat from fermented kimchi softened by warm rice and (optionally) balanced by salty bits of pork or tofu.
Ready to transform your leftover rice and that half-full kimchi jar into a sizzling, memorable meal? Grab a wok, chop some onion, and let the synergy of garlic, chili paste, and kimchi do the heavy lifting. Once you relish that final spoonful—maybe with a fried egg perched on top—swing back to share any personal twists: Did you toss in bacon, top it with cheese, or add an unexpected veggie for color? Your creativity could inspire other fans of comfort food to see just how fulfilling (and simple) a homemade kimchi fried rice session can be.