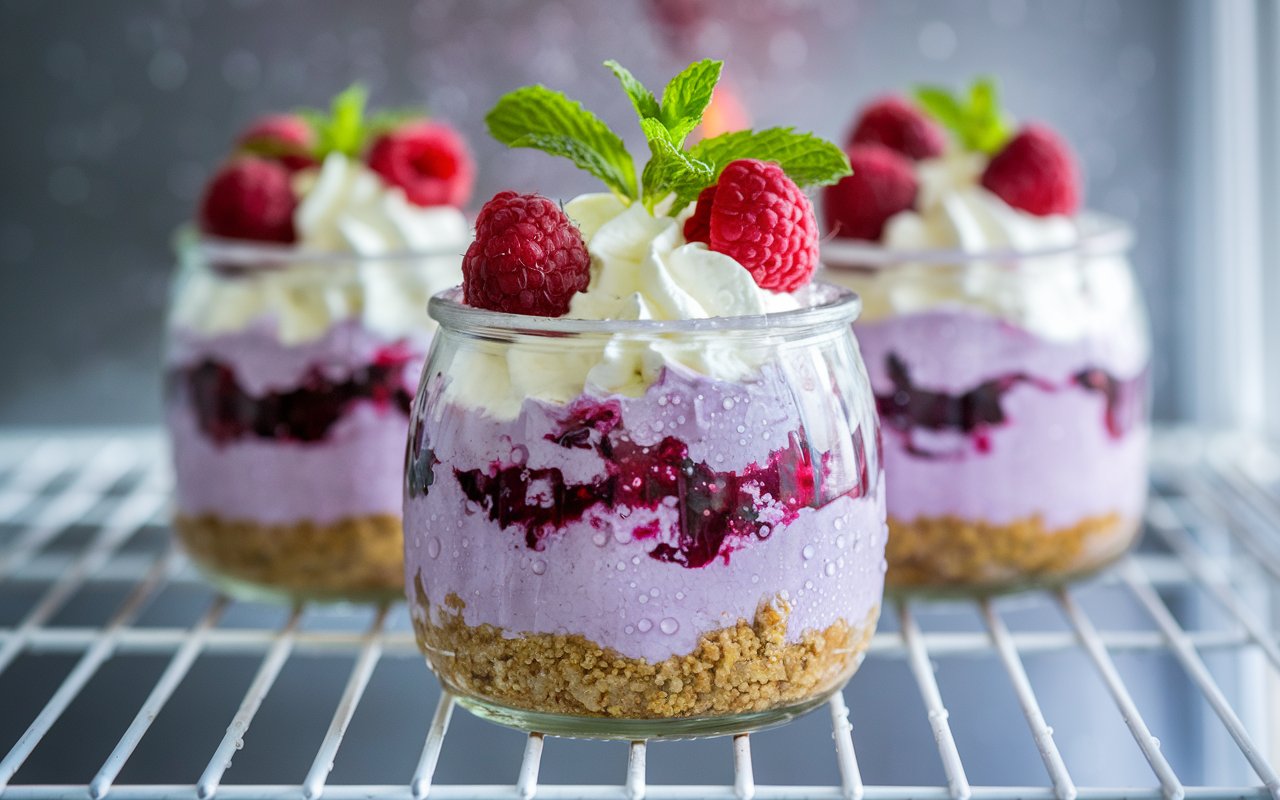
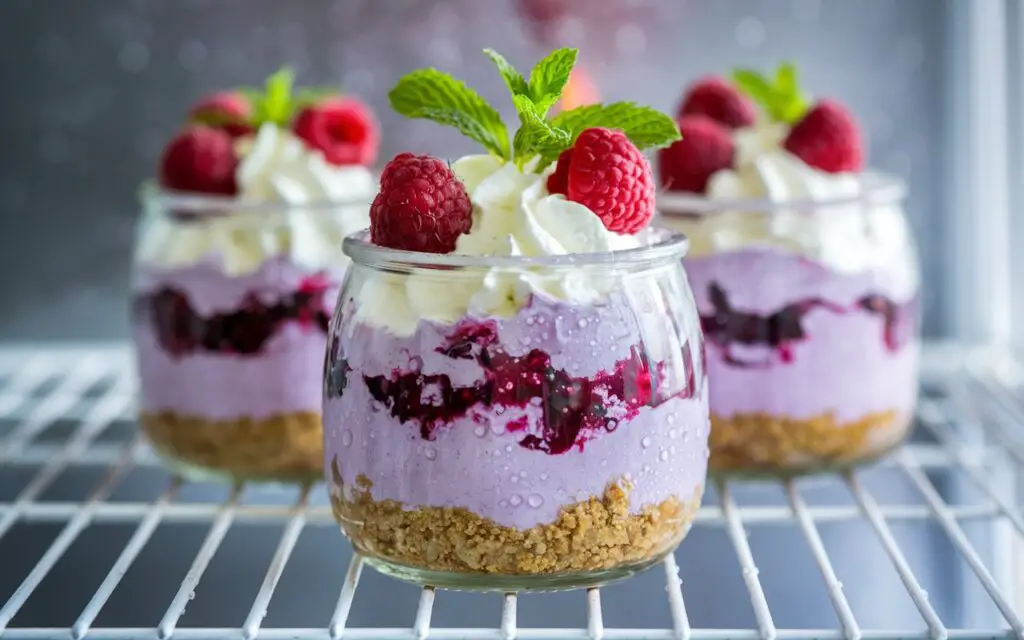
The Effortless Dessert Taking Over Summer Gatherings
Did you know that according to recent food trend reports, searches for “individual desserts” have skyrocketed by over 250%? In our fast-paced world, people crave impressive, delicious treats that are both easy to make and serve. What if you could whip up a stunning, bakery-worthy dessert in just 15 minutes, with no oven required? Say hello to your new go-to recipe: these divine No-Bake Berry Cheesecake Jars. This isn’t just another dessert; it’s your secret weapon for everything from summer barbecues in Marrakesh to quiet weeknight indulgences. These perfectly portioned jars are the ultimate blend of creamy, crunchy, and fruity, proving that elegant desserts don’t have to be complicated.
- The Effortless Dessert Taking Over Summer Gatherings
- Everything You Need for Your Cheesecake Jars
- Timing: An Elegant Dessert in Under 20 Minutes
- Step 1: Craft the Perfect Crunchy Base
- Step 2: Whip Up the Dreamiest Cheesecake Filling
- Step 3: Layer Your Luscious Jars
- Step 4: Top with a Burst of Berry Goodness
- A Look at the Nutritional Profile
- Healthier Alternatives for a Lighter Treat
- Creative Serving & Presentation Ideas
- Common Mistakes to Avoid for Flawless Cheesecake Jars
- Storing Your Dessert Jars
- Your New Favorite Effortless Dessert
- Your Questions, Answered: Cheesecake Jar FAQs
Everything You Need for Your Cheesecake Jars
The magic of this recipe is its simplicity and the quality of its components. We’re creating three distinct, harmonious layers: a buttery biscuit base, a luscious cheesecake filling, and a vibrant berry topping.
| Component | Ingredient | Amount | Sensory Description & Smart Swaps |
| Buttery Biscuit Crust | Digestive Biscuits | 1.5 cups, crushed (about 12 biscuits) | The classic, subtly sweet and crumbly foundation. Easy Swap: Graham crackers, Biscoff cookies for a spiced note, or shortbread for extra richness. |
| Unsalted Butter | 6 tbsp, melted | Binds our crust with a rich, nutty flavor that complements the sweet filling. Easy Swap: Use melted coconut oil or a vegan butter substitute for a dairy-free option. | |
| Creamy Cheesecake Filling | Full-Fat Cream Cheese | 16 oz (2 blocks), softened to room temp | The tangy, velvety heart of our cheesecake. Using it at room temperature is crucial for a lump-free texture. Easy Swap: For an even richer, more luxurious filling, substitute one block with mascarpone cheese. |
| Heavy Whipping Cream | 1 cup, cold | Whipped to create a light, airy, and stable structure for the filling. Easy Swap: Use full-fat canned coconut cream (the solid part only) for a dairy-free alternative. | |
| Powdered Sugar | 3/4 cup | Dissolves instantly for a perfectly smooth, sweet filling. Easy Swap: Pure maple syrup or agave nectar can be used, but may result in a slightly looser filling. | |
| Fresh Lemon Juice | 1 tbsp | A secret weapon that brightens the flavors and adds a classic cheesecake tang. | |
| Vanilla Extract | 1 tsp | Adds a warm, aromatic depth to the creamy filling. | |
| Vibrant Berry Topping | Mixed Berries | 2 cups, fresh or frozen | A jewel-toned mix of strawberries, blueberries, raspberries, and blackberries. Easy Swap: Use a single type of berry, like just raspberries, or try other fruits like cherries or chopped mango. |
| Granulated Sugar | 2 tbsp | Helps the berries release their juices to create a luscious, natural syrup. |
Timing: An Elegant Dessert in Under 20 Minutes
This recipe is the epitome of efficiency, making it perfect for last-minute dessert needs.
- Active Preparation Time: 15-20 minutes
- Chilling Time: At least 2 hours (but can be served immediately for a softer set)
- Total Time: Approximately 2 hours and 20 minutes
A typical baked cheesecake requires an average of 90 minutes of prep and baking, plus at least 4 hours of chilling. This no-bake recipe saves you over 75% of the active kitchen time, freeing you up to enjoy your day.
Step 1: Craft the Perfect Crunchy Base
Your first step is creating that irresistible, buttery crunch. In a medium bowl, combine your crushed digestive biscuits with the melted butter. Stir with a fork until the mixture resembles damp sand. This texture is key to a crust that’s firm but not hard. Divide this mixture evenly among 6-8 small glass jars or glasses (8-ounce jars are perfect). Use the back of a spoon to gently press the crumbs into a firm, even layer at the bottom of each jar. This little bit of pressure ensures your crust doesn’t crumble and mix into the filling.
Step 2: Whip Up the Dreamiest Cheesecake Filling
Now for the star of the show. In a large mixing bowl, beat the softened cream cheese with an electric hand mixer (or in a stand mixer) on medium speed until it’s completely smooth and free of lumps. This step is critical; starting with cold cream cheese is a common mistake that leads to a lumpy filling. Scrape down the sides of the bowl, then add the powdered sugar, lemon juice, and vanilla extract. Beat again until everything is well combined and smooth. In a separate, chilled bowl, whip the cold heavy cream until stiff peaks form. Gently fold about one-third of the whipped cream into the cream cheese mixture to lighten it. Then, add the remaining whipped cream and continue to fold until the mixture is uniform in color and texture. Be careful not to overmix, as this can deflate the air you just whipped in.
Step 3: Layer Your Luscious Jars
Time for assembly! You can either spoon the cheesecake filling over the crust or, for a cleaner, more professional look, transfer the filling to a piping bag (or a large Ziploc bag with the corner snipped off). Pipe the filling into each jar, creating a thick, even layer over the biscuit base. This piping trick is a game-changer, preventing smudges on the inside of the jar and creating beautiful, distinct layers.
Step 4: Top with a Burst of Berry Goodness

For the vibrant final touch, prepare your berry topping. In a small saucepan, combine your mixed berries and the granulated sugar. Cook over medium heat for 5-7 minutes, stirring occasionally, until the berries have softened and released their juices, creating a beautiful, syrupy compote. For a brighter flavor, you can add a squeeze of fresh lemon juice at the end. Let the berry compote cool for at least 10 minutes before topping your cheesecakes. This prevents the warm sauce from melting the creamy filling. Spoon a generous amount of the cooled berry mixture over the cheesecake layer in each jar.
A Look at the Nutritional Profile
While these No-Bake Berry Cheesecake Jars are a treat, you can still feel good about the wholesome ingredients. Here is an approximate nutritional breakdown per jar (assuming 8 servings):
- Calories: 450-500 kcal
- Fat: 35g
- Carbohydrates: 30g
- Sugar: 22g (a significant portion from the natural fruit sugars)
- Protein: 8g
Data shows that a single serving of a store-bought cheesecake can have upwards of 40 grams of sugar. This homemade version offers you more control and a healthier dose of antioxidants from the fresh berries.
Healthier Alternatives for a Lighter Treat
Looking to make this recipe a bit more virtuous? These simple swaps can reduce calories and fat without a major flavor sacrifice.
- Go Greek: Substitute half of the full-fat cream cheese with plain, full-fat Greek yogurt. This will add a protein boost and a lovely tang while cutting down on fat.
- Lower-Fat Cream Cheese: Use Neufchâtel cheese, which has about one-third less fat than regular cream cheese, for a lighter but still creamy texture.
- Natural Sweeteners: Replace the powdered sugar with maple syrup or honey to taste. Note that this might make the filling slightly less firm.
- Nutty Crust: For a gluten-free and higher-protein crust, swap the biscuits for a mixture of almond flour, a touch of maple syrup, and melted coconut oil.
Creative Serving & Presentation Ideas
These jars are already beautiful, but a few extra touches can make them truly spectacular for any occasion.
- Herbaceous Garnish: A single fresh mint or basil leaf on top of the berries adds a pop of green and a surprising, sophisticated aroma.
- Citrus Zest: Before serving, finely grate a little lemon or orange zest over the top to brighten the flavors and add a professional touch.
- Themed for Events: For patriotic holidays, use a mix of strawberries and blueberries. For a more elegant affair, use only raspberries and garnish with white chocolate shavings.
- Texture Boost: Sprinkle a few toasted slivered almonds, granola, or a crumble of leftover biscuits on top just before serving for an extra crunch.
Common Mistakes to Avoid for Flawless Cheesecake Jars
This recipe is simple, but avoiding these common pitfalls will guarantee perfect results every time.
- Lumpy Filling: The number one culprit is using cream cheese that’s too cold. Ensure it’s fully softened to room temperature for that signature velvety texture.
- Over-whipping the Cream: Whipping your heavy cream past the “stiff peaks” stage will cause it to separate and become grainy. Watch it carefully.
- Runny Filling: Don’t be tempted to skip the heavy cream or use a low-fat version. The fat content is essential for creating a stable, set filling.
- Topping Too Soon: Adding hot berry compote to the cheesecake filling will cause it to melt and create a messy, unappealing mixture. Let it cool!
Storing Your Dessert Jars
One of the best things about this recipe is its make-ahead potential.
- In the Refrigerator: Assemble the jars, cover them with their lids or plastic wrap, and store them in the fridge for up to 3 days. The flavors will actually meld and deepen overnight. For the best texture, it’s recommended to add the berry topping just before serving.
- Prepping Components: You can make the biscuit crumb mixture and the berry compote ahead of time. Store the crumbs in an airtight container at room temperature and the compote in the fridge for up to 5 days. Then, simply whip up the filling and assemble when ready.
Your New Favorite Effortless Dessert
In conclusion, these No-Bake Berry Cheesecake Jars are the perfect dessert solution. They are quick, require no baking, and deliver an incredible combination of textures and flavors that will impress any guest. With its creamy filling, crunchy base, and fresh berry topping, this recipe is a guaranteed winner for any occasion, proving that you don’t need to spend hours in the kitchen to create something truly special.
We invite you to dive into this delightful recipe and see for yourself how easy elegance can be. Try it out and let us know what you think! Leave a comment or a review below, and feel free to share your own creative twists. For more simple yet stunning dessert ideas, don’t forget to subscribe to our blog.
Your Questions, Answered: Cheesecake Jar FAQs
- Can I make one large cheesecake instead of individual jars?Yes, absolutely. You can assemble this recipe in a 9-inch springform pan or a deep-dish pie plate. The chilling time should be extended to at least 4-6 hours to ensure it’s firm enough to slice cleanly.
- Can I freeze these cheesecake jars?While the filling freezes well, the texture of the biscuit crust and the berry topping can change upon thawing. It’s best enjoyed fresh from the refrigerator.
- My cheesecake filling isn’t firm enough. What did I do wrong?This is usually due to one of two things: either the heavy cream was not whipped to stiff peaks, or a lower-fat cream cheese or cream was used. Using full-fat ingredients is key to achieving the right consistency.
- How do I make this recipe gluten-free?It’s very simple! Just use your favorite gluten-free cookies or biscuits for the crust. The rest of the ingredients are naturally gluten-free, but always double-check labels to be safe.
- Can I use a pre-made berry pie filling or jam?Yes, for an even quicker shortcut, you can use a high-quality store-bought berry pie filling, jam, or preserves as the topping. This is a great time-saver if you’re in a pinch.