Have you ever found yourself craving the sophisticated, deep flavors of a traditional Black Forest cake but felt daunted by the idea of baking layers of sponge and tempering chocolate? You are not alone. There is a common misconception that elegant, bakery-quality desserts require hours of labor and a hot oven. These Black Forest Cheesecake Delight Bars are here to shatter that belief.
- Ingredients
- Timing
- Step-by-Step Instructions
- Step 1: Prepare the Crust
- Step 2: Make the Cheesecake Filling
- Step 3: Assemble the Bars
- Step 4: Add the Cherry Topping
- Step 5: Cut and Serve
- Nutritional Information
- Healthier Alternatives
- Serving Suggestions
- Common Mistakes to Avoid
- Storing Tips
- Conclusion
- FAQs
- Q1. Can I use frozen cherries instead of canned pie filling?
- Q2. My whipped cream isn’t stiffening. What did I do wrong?
- Q3. Can I use Cool Whip instead of making whipped cream?
- Q4. Can I make this in a round springform pan?
- No-Bake Black Forest Cheesecake Delight Bars: Easy & Decadent
Combining the rich, tangy creaminess of a classic cheesecake with the timeless duo of dark chocolate and sweet cherries, this recipe delivers maximum impact with minimal effort. Best of all, it is entirely no-bake. Whether you are looking to impress guests at a dinner party or simply need a cool, indulgent treat on a warm day, these bars are the perfect solution. In this post, we will guide you through creating these luscious Black Forest Cheesecake Delight Bars, ensuring you get that perfect ratio of crunchy crust to velvety filling in every bite.
Ingredients
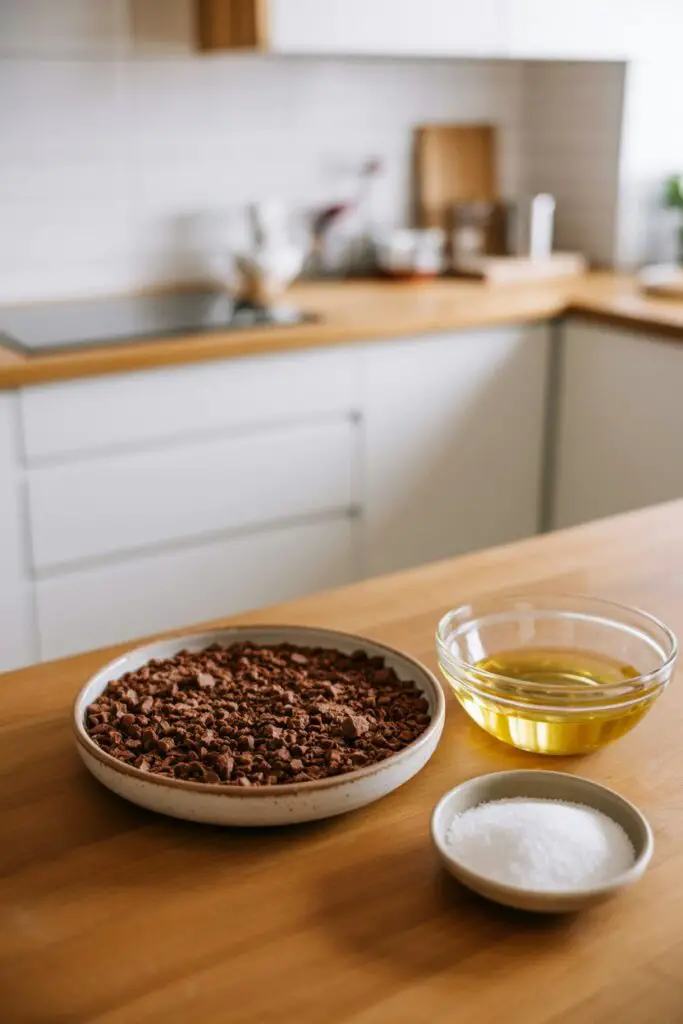
To build these luxurious bars, we need three distinct layers: a crunchy chocolate base, a creamy white center, and a vibrant fruit topping. Here is what you will need:
| Ingredient | Amount/Quantity | Notes |
| Chocolate Cookies or Graham Crackers | 2 cups | Crushed into fine crumbs (Oreos work wonderfully for a dark crust) |
| Melted Butter | 1/2 cup | Salted or unsalted works; binds the crust together |
| Sugar (Optional) | 1-2 tbsp | Add only if using plain graham crackers; skip if using sweet cookies |
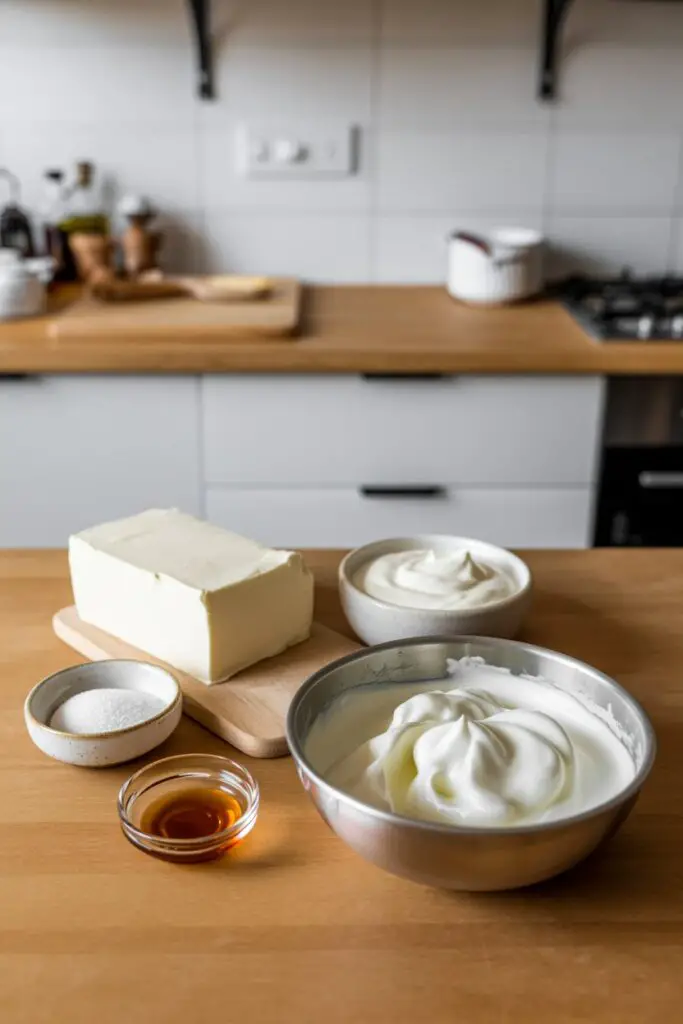
| Full-Fat Cream Cheese | 16 oz (approx.) | Must be softened to room temperature for a lump-free filling |
| Granulated Sugar | 1 cup | Sweetens the tangy cheese mixture |
| Vanilla Extract | 1 tsp | Adds aromatic depth |
| Sour Cream | 1/2 cup (Optional) | Highly recommended for a tangy, ultra-smooth texture |
| Heavy Cream | 1 cup | Whipped to stiff peaks to aerate the filling |
| Cherry Pie Filling | 1 to 1.5 cups | Fresh cherries (pitted/chopped) can also be used |
| Chocolate Chips or Shavings | 1/2 cup | Dark or semi-sweet chocolate pairs best with cherries |

Timing
This recipe is perfect for planning ahead. While the hands-on time is short, the “magic” happens in the refrigerator.
- Prep Time: 20 minutes
- Cook Time: 0 minutes (No-bake!)
- Chill Time: 4 hours (minimum) to Overnight
- Total Time: ~ 4 hours 20 minutes (Note: Only 20 minutes of active work!)
Step-by-Step Instructions
Follow these steps to construct your bars. The key to success here is temperature control—ensure your cold ingredients are cold (heavy cream) and your room-temp ingredients are soft (cream cheese).
Step 1: Prepare the Crust
The foundation is everything. You want a crust that holds together but isn’t rock hard.
Crush your chocolate cookies or graham crackers into fine crumbs using a food processor or a rolling pin and ziplock bag. Pour the crumbs into a large bowl and mix with the melted butter. Stir until the texture resembles wet sand—it should hold its shape when squeezed.
Grease a 9×9-inch square pan (or 9-inch round) lightly. Press the crumb mixture firmly into the bottom of the pan. Use the flat bottom of a glass or a measuring cup to pack it down evenly. Chill the crust in the fridge while you prepare the filling.
Step 2: Make the Cheesecake Filling
This step creates the “Delight” factor.
Beat the softened cream cheese in a large bowl using a hand mixer or stand mixer until it is completely smooth and creamy (about 2 minutes). Add the granulated sugar and vanilla extract, mixing until fully combined.
Whip the heavy cream in a separate cold bowl until it forms stiff peaks. This means when you lift the beaters, the cream stands straight up without drooping.
Fold the whipped cream gently into the cream cheese mixture using a spatula. If using the optional sour cream, fold that in now as well.
- Tip: Use a gentle “under and over” folding motion. You want to keep the air bubbles in the whipped cream to ensure the cheesecake is light and fluffy, not dense.
Step 3: Assemble the Bars
Now, let’s layer the flavors.
Retrieve your crust from the fridge. Pour the velvety cheesecake mixture over the chilled crust. Spread it evenly with an offset spatula or the back of a spoon, ensuring you reach all the corners. Smooth the top as much as possible for a professional look.
Chill the pan in the refrigerator for at least 4 hours, preferably overnight. This rest period allows the fats to solidify, ensuring clean cuts later.
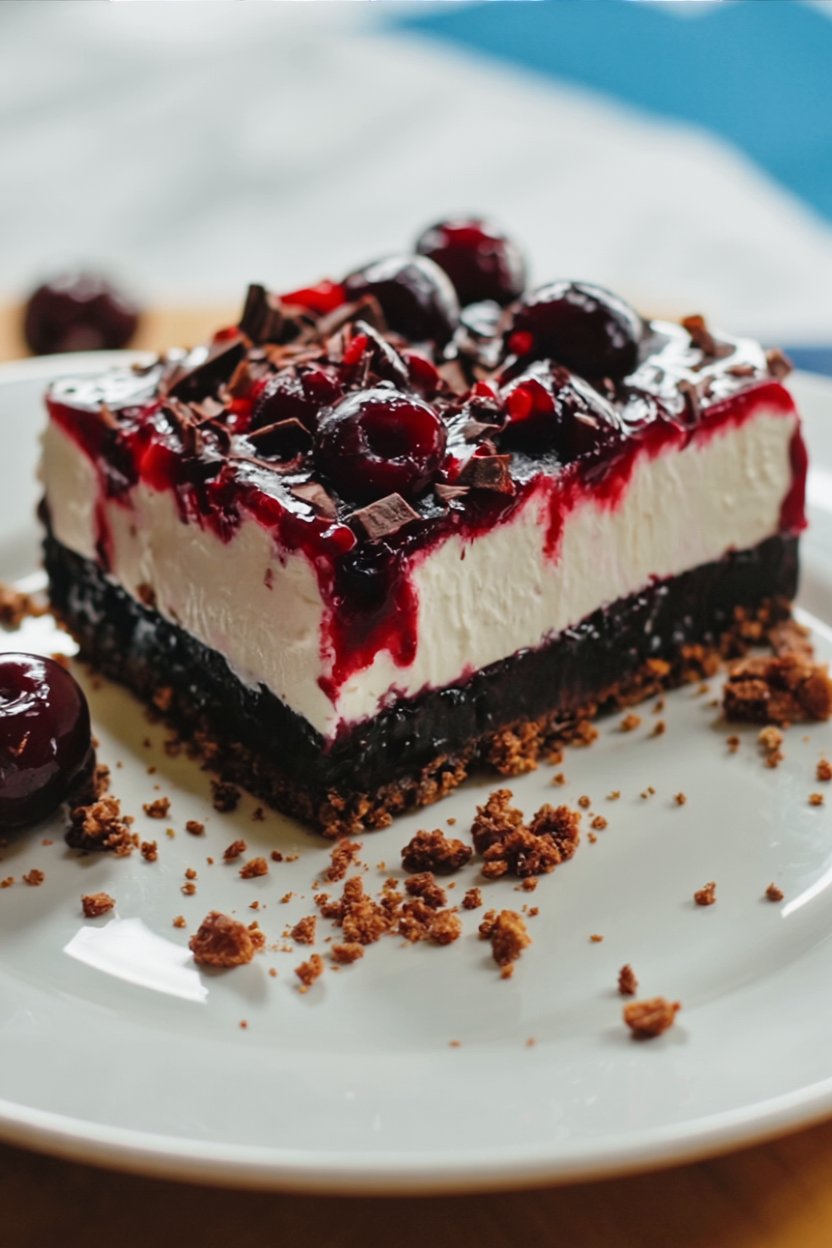
Step 4: Add the Cherry Topping
Once the cheesecake layer is firm to the touch, it is time for the Black Forest finish.
Spoon the cherry pie filling (or homemade cherry compote) generously over the white cheesecake layer. Spread it gently. Sprinkle the chocolate shavings or chips over the cherries. The contrast of the dark chocolate against the bright red cherries is visually stunning.
Step 5: Cut and Serve
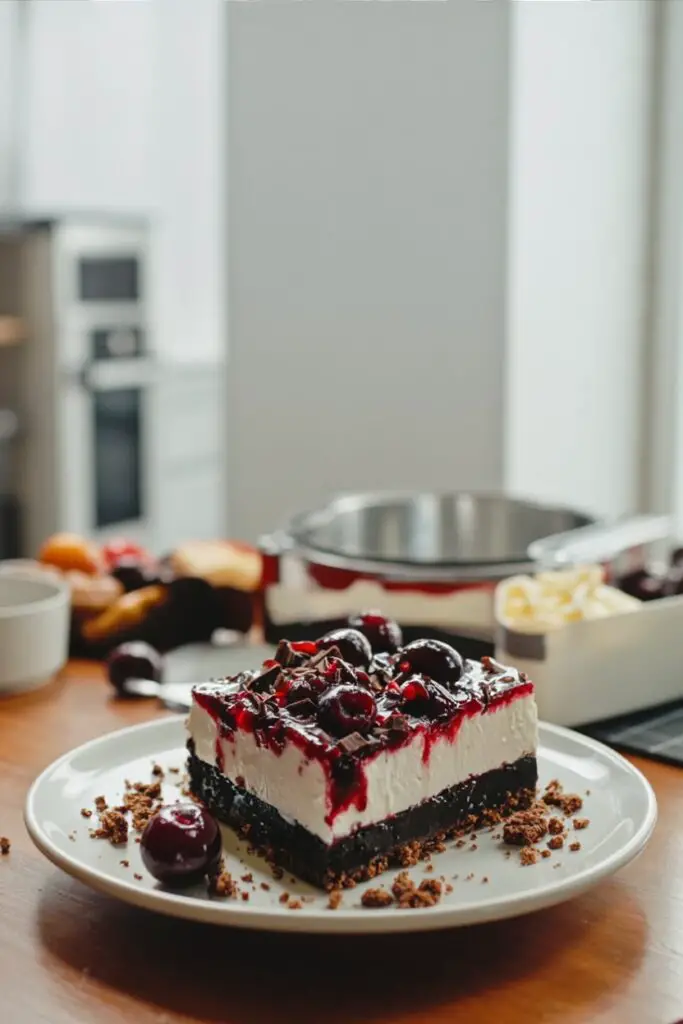
To serve, slice the dessert into squares or rectangles using a sharp knife.
- Actionable Tip: For bakery-perfect edges, dip your knife in hot water and wipe it dry before every single cut. This prevents the filling from smearing.Serve immediately and enjoy the compliments!
Nutritional Information
These bars are an indulgent treat. Here is an estimated nutritional breakdown per serving (assuming 12 bars):
- Calories: ~380 kcal
- Total Fat: 24g (Saturated: 14g)
- Carbohydrates: 38g
- Sugars: 28g
- Protein: 4g
- Cholesterol: 70mg
- Sodium: 180mg
Note: Nutrition will vary based on the type of cookie used for the crust and the sugar content of the pie filling.
Healthier Alternatives
If you want to enjoy the flavors of the Black Forest with a slightly lighter nutritional profile, try these swaps:
- Lighten the Dairy: Swap the full-fat cream cheese for Neufchâtel cheese (1/3 less fat) and use plain Greek yogurt instead of sour cream. This significantly reduces the fat content while adding a protein boost.
- Reduce Sugar: Swap the granulated sugar for a monk fruit sweetener or erythritol blend. Use a “no sugar added” cherry pie filling or make your own compote using fresh cherries and a dash of maple syrup.
- Gluten-Free Option: Use gluten-free chocolate sandwich cookies or gluten-free graham crackers for the crust. The filling and topping are naturally gluten-free (just check the pie filling label for thickeners).
- Crust Alternative: For a nutrient-dense base, make a crust from blended dates, walnuts, and cocoa powder instead of cookies and butter.
Serving Suggestions
Presentation is key for these elegant bars. Here is how to elevate your plating:

- The Fancy Drizzle: Before serving, drizzle a homemade chocolate ganache or chocolate sauce in a zig-zag pattern over the cherries for extra decadence.
- Beverage Pairing: These bars pair beautifully with a hot espresso or a dark roast coffee to cut through the sweetness. For an adult twist, serve with a glass of Pinot Noir or a Kirsch liqueur.
- Individual Portions: Instead of a large pan, make these in individual mason jars or ramekins. It makes for a cute, portable dessert for picnics or parties.
- Fresh Mint: A sprig of fresh mint on top adds a pop of green color and a refreshing aromatic note that complements the cherries.
Common Mistakes to Avoid
No-bake desserts are forgiving, but there are a few pitfalls to watch out for:
- Lumpy Cheesecake: This happens if the cream cheese is too cold. Solution: Leave the cream cheese on the counter for at least an hour before starting. If you are in a rush, microwave it in 10-second intervals (be careful not to melt it!).
- Soggy Crust: If the butter ratio is too high or the filling is too watery. Solution: Ensure you pack the crust down very firmly. Do not use low-fat cream cheese spreads (tub style), as they have higher water content.
- Messy Slices: Cutting the bars before they are fully set. Solution: Patience! 4 hours is the minimum. If they feel soft, pop the pan in the freezer for 30 minutes before slicing.
- Deflated Filling: Over-mixing after adding the whipped cream knocks the air out. Solution: Fold gently by hand; do not use the electric mixer for the final combination step.
Storing Tips
These bars need to be kept cool to maintain their structure.
- Refrigerate: Store leftover bars in an airtight container in the fridge for up to 5 days.
- Freezing: Yes, you can freeze them! Tip: Freeze the bars without the cherry topping for best results. Wrap the cheesecake/crust layers tightly in plastic wrap and foil. Freeze for up to 3 months. Thaw in the fridge overnight, then add the cherries and chocolate just before serving.
- Serving Temperature: Serve directly from the fridge. If left out in a warm room for too long, the filling may soften too much.
Conclusion
These No-Bake Black Forest Cheesecake Delight Bars are the ultimate proof that you don’t need to be a pastry chef to create a stunning dessert. They offer the perfect trifecta of textures: the crunch of the chocolate crust, the cloud-like fluffiness of the cheesecake, and the juicy sweetness of the cherries. It is a crowd-pleaser that looks as good as it tastes.
We hope you enjoy making (and eating!) these delight bars as much as we do. Try it out and let us know in the comments—did you stick with the classic cherry filling or try fresh fruit? We’d love to hear your feedback. Don’t forget to rate the recipe and subscribe to our blog for more delicious, easy-to-make recipes delivered straight to your inbox.
FAQs
Q1. Can I use frozen cherries instead of canned pie filling?
Absolutely. Thaw the frozen cherries and drain any excess liquid. You may want to simmer them in a saucepan with a tablespoon of cornstarch and a little sugar to create a thick, sauce-like consistency similar to pie filling, otherwise, they might be a bit watery on top of the cheesecake.
Q2. My whipped cream isn’t stiffening. What did I do wrong?
Heat is the enemy of whipped cream. Make sure your heavy cream is cold straight from the fridge. It also helps if your bowl and beaters are chilled. If the cream is too warm, the fat won’t emulsify and trap air bubbles effectively.
Q3. Can I use Cool Whip instead of making whipped cream?
Yes, for an even faster version, you can substitute the 1 cup of heavy cream (whipped) with about 2-3 cups of thawed frozen whipped topping (like Cool Whip). The texture will be slightly sweeter and more stable, but less rich than using real cream.
Q4. Can I make this in a round springform pan?
Yes! A 9-inch springform pan works perfectly. In fact, it makes removal easier. Just run a knife around the edge before unclasping the ring. You can then slice it into wedges like a traditional cake instead of bars.
Print
No-Bake Black Forest Cheesecake Delight Bars: Easy & Decadent
- Total Time: 4 hours 20 minutes
- Yield: 12 bars 1x
Description
All the drama of a Black Forest cake—zero baking. A crunchy chocolate cookie crust, pillowy no-bake cheesecake, and a glossy cherry-chocolate topping come together into elegant bars with just 20 minutes of hands-on time.
Ingredients
Chocolate Cookie Crust
- 2 cups chocolate cookie or graham cracker crumbs (Oreos for a dark crust; finely crushed)
- 1/2 cup unsalted butter (melted)
- 1–2 tbsp granulated sugar (optional; add if using plain grahams)
No-Bake Cheesecake Filling
- 16 oz full-fat cream cheese (softened to room temperature)
- 1 cup granulated sugar
- 1 tsp vanilla extract
- 1/2 cup sour cream (optional; for extra tang & silkiness)
- 1 cup heavy cream (whipped to stiff peaks)
Cherry-Chocolate Topping
- 1–1.5 cups cherry pie filling (or pitted chopped fresh cherries)
- 1/2 cup chocolate chips or shavings (dark or semi‑sweet)
Instructions
- Make the Crust: Combine cookie crumbs with melted butter (and sugar if using) until the texture resembles wet sand. Press firmly into a greased 9×9-inch pan. Chill while you make the filling.
- Cheesecake Filling: Beat softened cream cheese until completely smooth (about 2 minutes). Mix in sugar and vanilla. In a separate cold bowl, whip heavy cream to stiff peaks. Gently fold whipped cream (and sour cream, if using) into the cream cheese mixture until light and uniform.
- Assemble & Chill: Spread filling evenly over the chilled crust, smoothing the top. Refrigerate at least 4 hours (overnight best) until set for clean slices.
- Finish: Spoon cherry pie filling over the set cheesecake layer and spread gently. Top with chocolate shavings or chips.
- Cut & Serve: Slice into bars with a hot, dry knife, wiping between cuts for bakery‑clean edges. Serve chilled.
Notes
Temperature control is key: cream cheese must be soft; cream must be very cold. For a firmer crust, add 2–3 tbsp extra crumbs. Swap Oreos for gluten-free cookies if needed. Bars keep 3–4 days refrigerated; freeze (without cherry layer) up to 1 month.
- Prep Time: 20 minutes
- Category: Dessert
- Cuisine: European-Inspired
Nutrition
- Calories: 380
- Sugar: 28
- Sodium: 180
- Fat: 24
- Saturated Fat: 14
- Carbohydrates: 38
- Protein: 4
- Cholesterol: 70