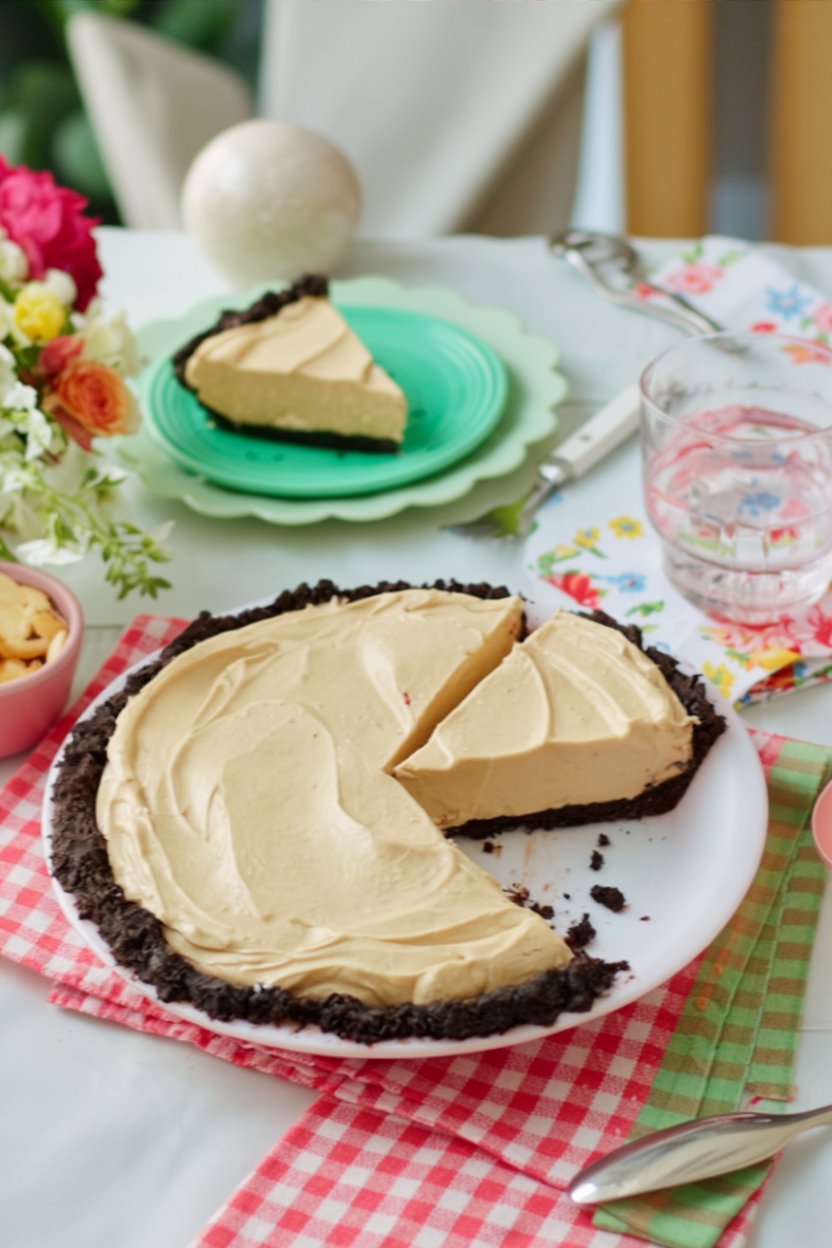
What happens when you combine the rich, dark crunch of an Oreo crust with a fluffy, sweet, and incredibly creamy peanut butter filling? You get a dessert that is practically guaranteed to disappear at any gathering. The classic marriage of chocolate and peanut butter is a timeless favorite for a reason—it’s pure, unadulterated comfort.
- Ingredients
- Timing
- Step-by-Step Instructions
- Step 1: Prepare and Bake the Crust
- Step 2: Create the Peanut Butter Base
- Step 3: Sweeten and Fluff
- Step 4: Fill and Chill
- Nutritional Information
- Healthier Alternatives
- Serving Suggestions
- Common Mistakes to Avoid
- Storing Tips
- Conclusion
- FAQs
- Q1: Can I use homemade whipped cream instead of Cool Whip?
- Q2: Can I make this gluten-free?
- Q3: Can I add chocolate chips to the filling?
- Q4: My filling seems too soft. What can I do?
- No-Bake Chocolate Peanut Butter Pie (Easy & Creamy!)
This Chocolate Peanut Butter Pie recipe is a dream come true for busy cooks and dessert lovers alike. It requires almost zero baking (just a few minutes for the crust!), uses simple pantry staples, and results in a pie that tastes like it came from a gourmet bakery. With its velvety texture and bold flavors, this easy peanut butter pie is the perfect treat for potlucks, holidays, or any time you need a little slice of heaven.
Ingredients
This recipe uses accessible ingredients to create a luxurious dessert.
| Ingredient | Amount/Quantity |
| For the Chocolate Cookie Crust: | |
| Chocolate Sandwich Cookies (e.g., Oreos) | 25 cookies |
| Salted Butter, melted | 5 Tbsp. |
| For the Creamy Peanut Butter Filling: | |
| Creamy Peanut Butter | 1 cup |
| Cream Cheese, softened | 1 (8 oz.) package |
| Powdered Sugar | 1 ¼ cups |
| Whipped Topping (e.g., Cool Whip), thawed | 8 oz. |


Timing
While the active prep time is short, the chilling time is essential for the perfect texture.
- Preparation Time: 20 minutes
- Baking Time: 5-7 minutes (for crust)
- Chilling Time: 4 hours (minimum)
- Total Time: Approximately 4 hours 30 minutes
Step-by-Step Instructions
Follow these simple steps to create a decadent pie that’s sure to impress.
Step 1: Prepare and Bake the Crust
Preheat your oven to 350°F (175°C). Place the 25 chocolate sandwich cookies (filling and all!) into the bowl of a large food processor. Pulse until the cookies are finely crushed into uniform crumbs, which should take about 1 minute.
- Actionable Tip: If you don’t have a food processor, place the cookies in a sealed zip-top bag and crush them with a rolling pin until fine.
Transfer the crumbs to a medium bowl and pour the melted salted butter over them. Stir with a fork until the crumbs are evenly moistened. Press this mixture firmly into the bottom and up the sides of a 9-inch pie plate. Bake for 5 to 7 minutes to set the crust. Remove from the oven and let it cool completely on a wire rack.
- Actionable Tip: Use the bottom of a measuring cup or a glass to press the crumbs down firmly for a compact, sturdy crust.
Step 2: Create the Peanut Butter Base
In the large bowl of a stand mixer fitted with the whisk attachment (or using a hand mixer), beat the creamy peanut butter and softened cream cheese together on medium speed until the mixture is completely smooth and creamy.
- Actionable Tip: Ensure your cream cheese is fully softened to room temperature to avoid any lumps in your filling.
Step 3: Sweeten and Fluff
Reduce the mixer speed to low and gradually add the powdered sugar. Once incorporated, increase the speed and beat until the mixture is smooth. Then, add the thawed whipped topping. Beat on medium speed until the filling is uniform, fluffy, and smooth, scraping down the sides of the bowl as needed to ensure everything is mixed.
Step 4: Fill and Chill
Pour the fluffy peanut butter filling into the completely cooled chocolate crust. Use a spatula or a knife to spread it evenly and smooth the top. Place the pie in the refrigerator to chill for at least 4 hours (or overnight) before serving. This allows the filling to set up for clean, beautiful slices.

Nutritional Information
This is a rich, indulgent dessert! Nutritional values are estimates per slice (assuming 8 slices).
- Calories: Approx. 550-650 kcal
- Protein: 10-12 g
- Carbohydrates: 45-55 g
- Fat: 35-45 g
- Saturated Fat: 15-18 g
- Sugar: 30-35 g
Healthier Alternatives
While this is a treat, you can make a few swaps for a lighter version:
- Light Dairy: Use reduced-fat cream cheese (Neufchâtel) and a “light” or sugar-free whipped topping.
- Natural Peanut Butter: You can use natural creamy peanut butter, but be aware the texture might be slightly less stable. You may need to add a stabilizer or mix it very well.
- Crust: Skip the Oreo crust and make a simple graham cracker crust or serve the filling in individual cups as a mousse to reduce calories.
Serving Suggestions

This Chocolate Peanut Butter Pie is fantastic on its own, but a few garnishes can take it to the next level.
- Chocolate Drizzle: Melt a little chocolate chips or chocolate syrup and drizzle it over the top for a professional finish.
- Peanut Butter Cups: Chop up mini peanut butter cups and sprinkle them around the edge of the pie.
- Whipped Cream: Add a dollop of fresh whipped cream to each slice.
- Crunchy Topping: Sprinkle with chopped roasted peanuts for extra texture.
Common Mistakes to Avoid
For the best pie experience, avoid these common pitfalls:
- Using a Warm Crust: Pouring the filling into a warm crust will cause the filling to melt and become runny. Solution: Ensure the crust is 100% cool before filling.
- Lumpy Cream Cheese: Cold cream cheese won’t blend smoothly. Solution: Leave the cream cheese out for at least an hour before starting.
- Not Chilling Long Enough: Slicing too early will result in a messy, soft pie. Solution: Be patient and chill for the full 4 hours.
- Using Chunky Peanut Butter: While tasty, it disrupts the silky texture. Solution: Stick to creamy peanut butter for this recipe.
Storing Tips
This pie needs to be kept cold.
- Refrigerate: Store the pie loosely covered with plastic wrap or foil in the refrigerator for up to 4-5 days.
- Freeze: This pie freezes beautifully! Wrap it tightly in plastic wrap and then foil. It can be frozen for up to 3 months.
- Serving from Frozen: You can serve it frozen like an ice cream pie, or let it thaw in the refrigerator overnight for a softer texture.
Conclusion
This No-Bake Chocolate Peanut Butter Pie is the ultimate dessert hack. It delivers maximum flavor impact with minimal effort, combining the beloved duo of chocolate and peanut butter into a creamy, dreamy masterpiece. Whether you’re a novice baker or a pro looking for a quick win, this recipe is a guaranteed crowd-pleaser that will have everyone asking for seconds.
Ready to make the easiest, most delicious pie ever? Give this recipe a try and let us know what you think in the comments below! We love hearing your feedback. Don’t forget to rate the recipe and subscribe for more easy dessert ideas!
FAQs
Q1: Can I use homemade whipped cream instead of Cool Whip?
Yes! Whip 1 ½ cups of heavy cream with 2-3 tablespoons of powdered sugar until stiff peaks form. Gently fold this into the peanut butter mixture instead of using the mixer, to keep the air in.
Q2: Can I make this gluten-free?
Absolutely. Simply use gluten-free chocolate sandwich cookies for the crust. The filling ingredients are naturally gluten-free (check your specific brands to be sure).
Q3: Can I add chocolate chips to the filling?
Yes, you can fold in ½ cup of mini chocolate chips into the filling before pouring it into the crust for added texture.
Q4: My filling seems too soft. What can I do?
If your kitchen is very warm or the peanut butter was oily, the filling might be soft. Freezing the pie for an hour or two before serving will help firm it up for slicing.
Print
No-Bake Chocolate Peanut Butter Pie (Easy & Creamy!)
- Total Time: 4 hours 30 minutes
- Yield: 8 Slices 1x
- Diet: Vegetarian
Description
What happens when you combine the rich, dark crunch of an Oreo crust with a fluffy, sweet, and incredibly creamy peanut butter filling? You get a dessert that is practically guaranteed to disappear at any gathering. This recipe requires almost zero baking (just a few minutes for the crust!), uses simple pantry staples, and results in a pie that tastes like it came from a gourmet bakery.
Ingredients
For the Chocolate Cookie Crust:
- 25 Chocolate Sandwich Cookies (e.g., Oreos)
- 5 Tbsp. Salted Butter, melted
For the Creamy Peanut Butter Filling:
- 1 cup Creamy Peanut Butter
- 1 (8 oz.) package Cream Cheese, softened
- 1 1/4 cups Powdered Sugar
- 8 oz. Whipped Topping (e.g., Cool Whip), thawed
Instructions
- Prepare the Crust: Preheat your oven to 350°F (175°C). Place the cookies (filling and all) into a food processor and pulse until finely crushed.
- Mix and Press: Transfer crumbs to a bowl and stir in the melted butter until evenly moistened. Press this mixture firmly into the bottom and up the sides of a 9-inch pie plate.
- Bake and Cool: Bake the crust for 5 to 7 minutes to set. Remove from the oven and let it cool completely on a wire rack.
- Create Peanut Butter Base: In a large bowl, beat the creamy peanut butter and softened cream cheese together on medium speed until completely smooth.
- Sweeten and Fluff: Reduce speed to low and gradually add the powdered sugar. Once incorporated, add the thawed whipped topping. Beat on medium speed until the filling is uniform, fluffy, and smooth.
- Fill and Chill: Pour the filling into the completely cooled crust. Spread evenly. Refrigerate for at least 4 hours (or overnight) before serving to allow the filling to set up.
Notes
- Crust Tip: Use the bottom of a measuring cup to press the crumbs down firmly for a compact, sturdy crust.
- No Food Processor? Place cookies in a sealed zip-top bag and crush with a rolling pin until fine.
- Avoid Lumps: Ensure your cream cheese is fully softened to room temperature before mixing to avoid any lumps in your filling.
- Chill Time: Do not skip the 4-hour chilling time! This is essential for the pie to hold its shape when sliced.
- Prep Time: 20 minutes
- Cook Time: 7 minutes
- Category: Dessert, Pie
- Method: No-Bake (mostly), Chilling
- Cuisine: American
Nutrition
- Serving Size: 1 slice
- Calories: 600 kcal
- Sugar: 32 g
- Sodium: 350 mg
- Fat: 40 g
- Saturated Fat: 16 g
- Unsaturated Fat: 20 g
- Trans Fat: 0 g
- Carbohydrates: 50 g
- Fiber: 2 g
- Protein: 11 g
- Cholesterol: 35 mg