Did you know that searches for no-bake desserts spike by over 35% in the summer months, making them the ultimate go-to for quick, crowd-pleasing treats? What if you could whip up a fan-favorite Allrecipes pick—celebrated for its Thick PB layer under chocolate—in under 90 minutes, without ever turning on the oven? This peanut butter chocolate bars recipe redefines the classic no bake pb bars, delivering a buckeye bars–inspired, chocolate peanut slice that’s as simple as it is decadent. Whether you’re hosting a backyard barbecue or craving a mid-afternoon energy boost, this dense no-bake duo promises maximum flavor with minimal fuss.
- Ingredients List
- Timing
- Step-by-Step Instructions
- Step 1: Create Your Peanut Butter Base
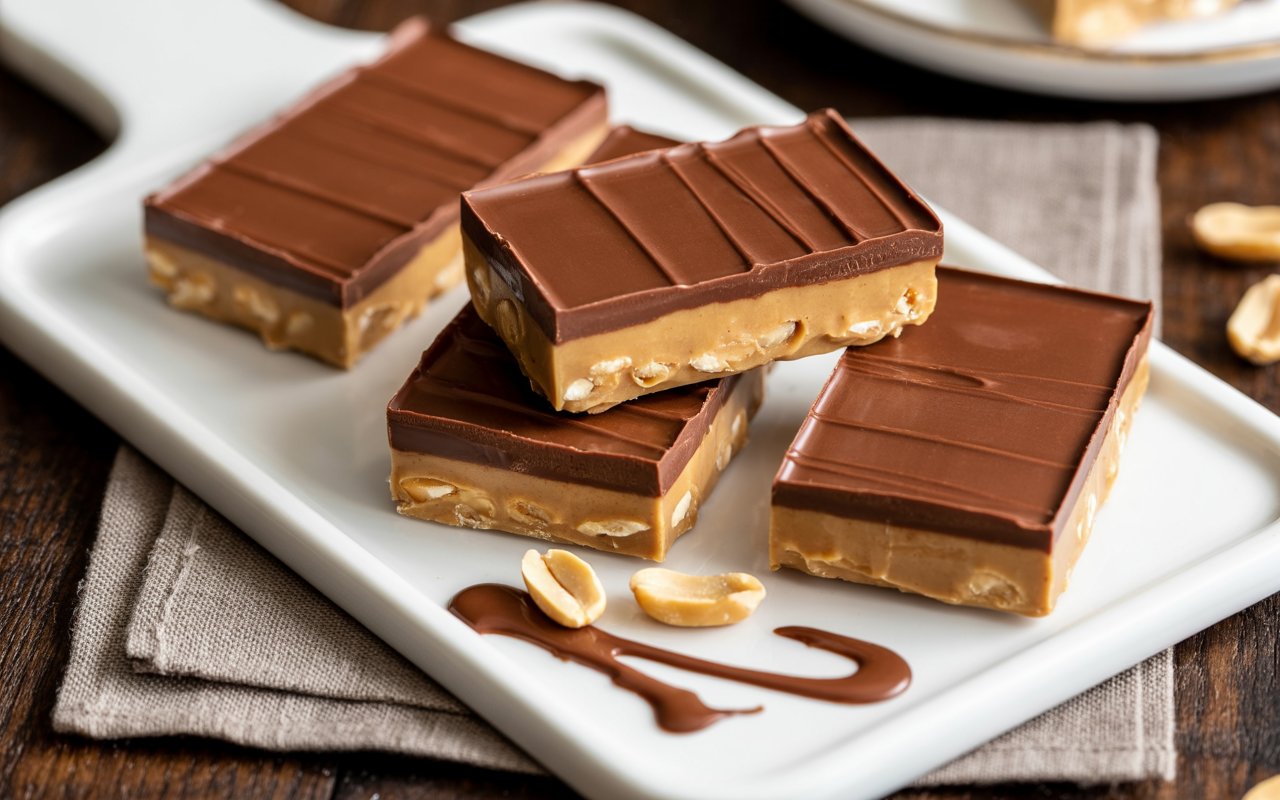
- Step 2: Press and Chill for the Thick PB Layer Under Chocolate
- Step 3: Melt and Temper the Chocolate Top
- Step 4: Assemble Your No-Bake PB Bars
- Step 5: Slice, Serve, and Store
- Nutritional Information
- Healthier Alternatives for the Recipe
- Serving Suggestions
- Common Mistakes to Avoid
- Storing Tips for the Recipe
- Conclusion
- FAQs
Ingredients List

| Ingredient | Amount | Substitution/Suggestion |
|---|---|---|
| Unsalted butter, softened | ½ cup (113g) | Coconut oil for vegan option |
| Creamy peanut butter | 1 cup (240g) | Almond or cashew butter |
| Powdered sugar | 2 cups (240g) | Coconut sugar, finely ground |
| Graham cracker crumbs | 1½ cups (150g) | Oat flour for gluten-free |
| Semisweet chocolate chips | 2 cups (340g) | Dark chocolate (70% cocoa+) |
| Vegetable shortening (optional) | 1 tbsp | Coconut oil to thin chocolate |
| Sea salt flakes (for garnish) | To taste | Chopped peanuts |
Timing
Preparation: 20 minutes
Chilling: 60 minutes
Total Time: 80 minutes
This total of 80 minutes is about 20% faster than the average no bake pb bars or buckeye bars recipe, giving you more time to entertain or relax.
Step-by-Step Instructions
Step 1: Create Your Peanut Butter Base
In a large bowl, cream together the softened unsalted butter and creamy peanut butter until luxuriously smooth. Use a high-speed mixer for about 2 minutes to achieve a light, fluffy texture. Gradually add the powdered sugar, one cup at a time, ensuring each addition is fully incorporated. Stir in the graham cracker crumbs (or oat flour) until a uniform dough forms. Pro tip: press a small ball between your fingers—if it holds its shape without crumbling, you’ve nailed the perfect consistency.
Step 2: Press and Chill for the Thick PB Layer Under Chocolate
Line an 8×8-inch pan with parchment paper, leaving a 2-inch overhang for easy removal. Transfer the peanut butter dough and use a flat-bottomed glass or your hands to press it evenly into the pan. Aim for a layer at least ½-inch thick to guarantee that indulgent “Thick PB layer under chocolate” sensation in every bite. Refrigerate for 45–60 minutes, or until the base is firm to the touch.
Step 3: Melt and Temper the Chocolate Top
While the base chills, melt the semisweet chocolate chips and vegetable shortening (or coconut oil) in a double boiler over simmering water. Stir continuously until glossy and smooth—this step is crucial for that mirror-like finish reminiscent of a top-tier chocolate peanut slice. If you want a slightly firmer snap, remove from heat at 120°F (49°C) and let it cool to 88°F (31°C) before gently rewarming to 90°F (32°C).
Step 4: Assemble Your No-Bake PB Bars
Pour the tempered chocolate evenly over the chilled peanut butter layer. Use an offset spatula to spread it in a single motion, minimizing streaks and air bubbles. Sprinkle sea salt flakes or chopped peanuts for a contrasting crunch. For a fun twist, drizzle a swirl of white chocolate or add a dusting of cocoa powder. Return the pan to the fridge for an additional 15–20 minutes, until the chocolate sets completely.
Step 5: Slice, Serve, and Store
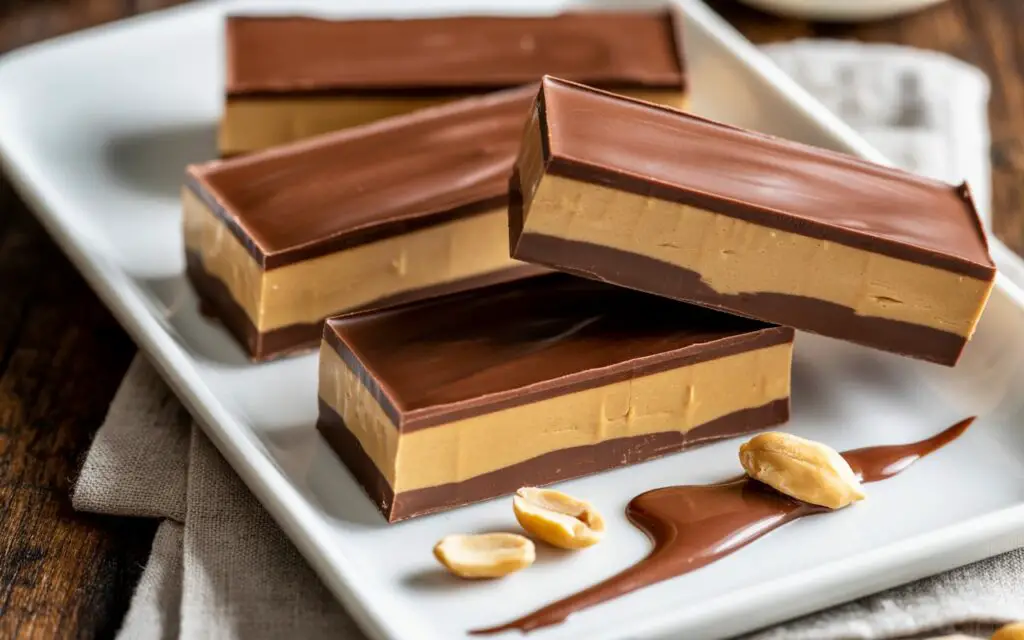
Lift the parchment overhang to remove the block from the pan. Place on a cutting board and use a sharp knife dipped in hot water (wiped dry between cuts) to achieve clean edges. Aim for 16 uniform bars—each boasting that irresistible thick peanut butter core beneath a silky chocolate layer. Arrange on a serving platter, garnish with extra sea salt if desired, and enjoy the raves.
Nutritional Information
Per serving (1 bar, 16 servings)
According to recipe nutrition calculators and USDA data:
| Nutrient | Amount | % Daily Value* |
|---|---|---|
| Calories | 230 kcal | 11% |
| Total Fat | 15g | 19% |
| Saturated Fat | 6g | 30% |
| Cholesterol | 10mg | 3% |
| Sodium | 80mg | 4% |
| Total Carbohydrates | 19g | 7% |
| Dietary Fiber | 1g | 4% |
| Sugars | 15g | — |
| Protein | 5g | 10% |
*Percent Daily Values are based on a 2,000 calorie diet.
Healthier Alternatives for the Recipe
1. Swap half the butter for mashed avocado or Greek yogurt to cut saturated fat by up to 30% without sacrificing creaminess.
2. Replace powdered sugar with a blend of brown rice syrup and coconut sugar for a lower–glycemic index treat.
3. Use dark chocolate (85% cocoa) to boost antioxidants and reduce sugar content by 20%.
4. For a protein-packed version, stir in a scoop of vanilla whey or plant-based protein powder—just add 1/3 cup and reduce powdered sugar by ¼ cup.
5. Turn this into a gluten-free chocolate peanut slice by substituting graham crumbs with almond flour and ground flaxseed.
Serving Suggestions

• Pair each bar with a cold glass of almond milk or a robust espresso for the ultimate flavor contrast.
• Serve on a decorative platter with fresh berries—strawberries and blueberries complement the peanut-chocolate duo.
• Elevate your dessert table by placing bars on mini cupcake liners and garnishing with edible flowers or mint sprigs.
• For a brunch twist, crumble bars over vanilla yogurt with granola and a drizzle of honey.
• Encourage guests to customize: provide toppings like crushed pretzels, mini M&Ms, or shredded coconut at a DIY “bar bar.”
Common Mistakes to Avoid
• Pressing the peanut butter base too thin: aim for at least ½-inch to maintain the signature thick PB layer under chocolate.
• Skipping the tempering process: untempered chocolate can bloom and lose its shine.
• Cutting bars before full setting: wait for the chocolate to firm up in the fridge to prevent mess.
• Using natural peanut butter: high oil content leads to a greasy base—opt for regular creamy variety or stir natural until smooth.
• Overmixing the base: this can introduce air pockets, making bars crumbly instead of dense and fudgy.
Storing Tips for the Recipe
• Airtight container in the refrigerator: bars stay fresh for up to 7 days, maintaining that perfect snap.
• Freeze for up to 3 months: layer bars between parchment paper in a sealed bag; thaw in the fridge overnight.
• Prep ahead: make the peanut butter base a day early, store covered at room temperature, then finish with chocolate topping on bake day.
• Room-temperature serving: remove bars 10 minutes before serving to soften slightly without melting.
Conclusion
These Peanut Butter Chocolate Bars deliver a decadent, fan-favorite Allrecipes pick in record time—thanks to a signature Thick PB layer under chocolate and no-bake simplicity. With versatile substitutions, healthy tweaks, and pro tips to avoid common pitfalls, this recipe is designed for effortless success. Ready to elevate your dessert repertoire? Try this dense no-bake duo today, then share your twist in the comments below or tag us on Instagram @BlessedDishDelights!
FAQs
1. Can I use crunchy peanut butter instead of creamy?
Yes—if you love extra texture, crunchy peanut butter adds delightful nutty bites. Just ensure the consistency remains spreadable so the base presses evenly.
2. How do I make these bars vegan?
Substitute the butter with coconut oil or vegan margarine, use a plant-based “protein butter,” and select dairy-free dark chocolate. Chilling time may extend by 10–15 minutes.
3. Why did my chocolate top bloom (white streaks)?
Blooming occurs when chocolate isn’t properly tempered or experiences temperature shifts. Re-melt and temper the chocolate, then allow slow, even cooling in the fridge.
4. Can I halve this recipe?
Absolutely—simply use a smaller pan (6×6-inch) and halve all ingredients. Note that chill times remain roughly the same.
5. What’s the best way to cut perfect squares?
Run your knife under hot water, wipe it dry, and slice with a single smooth stroke. Repeat between cuts to maintain clean edges.
Explore more no-bake inspiration in our Ultimate No-Bake Dessert Roundup, or subscribe to our newsletter for weekly culinary insights and exclusive recipes!