Peanut butter and jelly conjure childhood memories—school lunches or after-school snacks featuring that timeless sweet-salty pairing. Peanut Butter & Jelly Cookie Bars – A Nostalgic Duo So Tasty harnesses that comforting flavor combination in the form of chewy, crumbly bar cookies. Instead of slathering peanut butter and jelly on bread, you spread them on a soft peanut butter dough and bake to golden perfection. Each bar merges peanutty richness with fruity jam, delivering a simple, crowd-pleasing treat reminiscent of a classic sandwich but with a dessert spin.
- Why PB&J Cookie Bars?
- Key Ingredients in Table Form
- Step-by-Step Preparation
- 1. Cream Butter & Sugars (2–3 minutes)
- 2. Combine Dry Ingredients (1–2 minutes)
- 3. Press & Layer in Pan (2–4 minutes)
- 4. Top & Bake (20–25 minutes)
- 5. Cool & Slice (30–60 minutes)
- Achieving Nostalgic Flavor & Texture
- Serving & Presentation
- Variations
- Dietary & Health Notes
- Storing & Reheating
- Frequently Asked Questions
- Conclusion
In this guide, you’ll discover how to craft the peanut-butter-laced dough, layer jam for a bright middle, and possibly swirl or garnish with extra peanuts or drizzle. We’ll provide a table of essential ingredients, step-by-step assembly, plus tips on ensuring each bar has that luscious peanut-butter note and a jam center that doesn’t overshadow. By the end, you’ll be equipped to whip up a tray that channels the best of PB&J with the portability and sweetness of a cookie bar—perfect for parties, lunchboxes, or quiet indulgence.
Why PB&J Cookie Bars?

- Nostalgic Flavor
The beloved peanut-butter-and-jelly combination resonates with many who grew up on PB&J sandwiches. - Versatile & Portable
Sliced into bars, they’re easy to pack for picnics, potlucks, or as lunchbox treats. - Soft, Chewy Layers
The synergy of peanut butter dough plus jam creates a satisfying texture, bridging sweet jammy pockets and a lightly crumbly base. - Easy to Customize
Use your preferred jelly (grape, strawberry, raspberry) or incorporate crunchy peanut butter for extra texture.
Key Ingredients in Table Form
Below is a summary for about 16 bars (9×9 or 8×8 inch pan):
| Ingredient | Quantity (Approx.) | Purpose / Notes |
|---|---|---|
| Flour (all-purpose) | ~1 1/2 cups | Structure of the dough; can sub partial whole wheat. |
| Creamy Peanut Butter | ~3/4 cup | Core flavor. Use natural or commercial brand; adjust sugar if unsweetened. |
| Butter (softened) | ~1/2 cup (1 stick) | Enhances richness, tenderness of bars. |
| Sugar (granulated) | 1/2 cup | Sweetener for dough. Can combine with brown sugar if desired. |
| Brown Sugar (optional) | 1/4–1/2 cup | Adds moisture and deeper flavor if you prefer. |
| Egg | 1 large | Binds dough, helps set structure. |
| Baking Powder | 1/2 tsp | Light leavening. |
| Salt | 1/2 tsp | Balances sweetness, intensifies peanut flavor. |
| Jelly/Jam (grape, strawberry) | ~1/2 cup | The “J” in PB&J, can use more if you want a thicker layer. |
| Vanilla Extract (optional) | 1 tsp | Rounds out flavor in the dough. |
| Peanuts (crushed) (optional) | 1/4 cup (topping) | Crunch and garnish if you like a chunkier top. |
Step-by-Step Preparation
1. Cream Butter & Sugars (2–3 minutes)
- Mix: In a bowl or stand mixer, cream ~1/2 cup softened butter with 1/2 cup granulated sugar (plus optional 1/4 cup brown sugar) until fluffy.
- Add Peanut Butter: ~3/4 cup. Blend thoroughly.
- Egg & Vanilla: Beat in 1 large egg and 1 teaspoon vanilla extract if using.
2. Combine Dry Ingredients (1–2 minutes)
- Whisk: In a separate bowl, combine 1 1/2 cups flour, 1/2 teaspoon baking powder, 1/2 teaspoon salt.
- Incorporate: Stir the flour mixture into the wet mixture just until combined. Overmixing can toughen bars.
3. Press & Layer in Pan (2–4 minutes)
- Prepare Pan: Line an 8×8 or 9×9 inch baking pan with parchment or grease lightly.
- Dough Base: Reserve about 1/4 cup of dough for topping. Press the rest evenly into the pan to form the bottom layer.
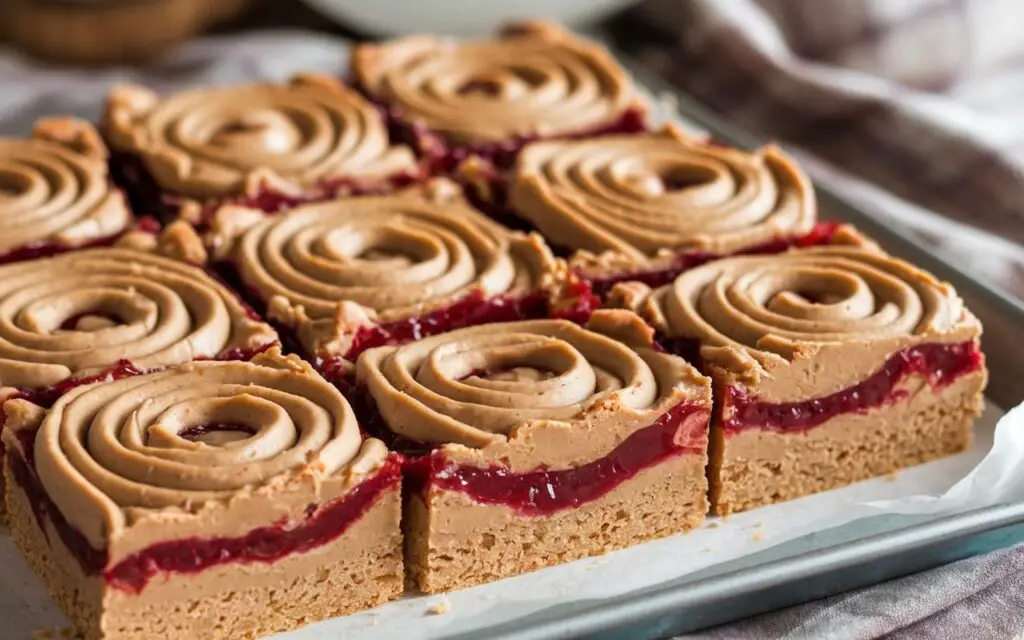
- Jelly Layer: Spread ~1/2 cup of your favorite jam on top, leaving ~1/4 inch from the edges to prevent sticking/burn.
4. Top & Bake (20–25 minutes)
- Crumble or Flatten: Dot the reserved dough on top in small lumps or flatten pieces to form a partial covering.
- Optional: Sprinkle crushed peanuts if you want a crunchy top.
- Oven: Bake at 350°F (175°C) for ~20–25 minutes or until the edges turn golden and the center sets.
5. Cool & Slice (30–60 minutes)
- Cool: Let bars cool in the pan ~30 minutes for jam to set.
- Slice: Lift out using parchment edges (if lined). Cut into squares or rectangles.
Achieving Nostalgic Flavor & Texture
- Creamy Peanut Butter
This ensures a smooth dough. Crunchy PB can work but yields lumps of peanuts in the base. - Jam Consistency
Thicker jam or jelly stands out better between layers, avoiding runniness. - Slight Underbake
Bars firm up as they cool. Overbaking can yield a drier crumb.
Serving & Presentation
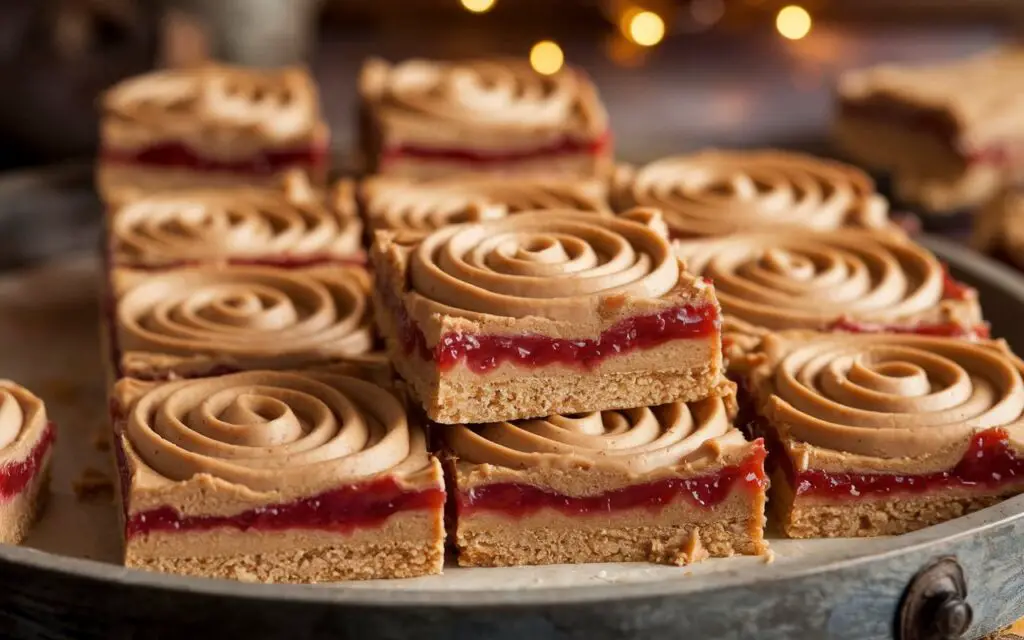
- Plate: Arrange squares on a platter or store in a cookie tin.
- Warm or Room Temp: Some prefer them slightly warm for softer dough and jam.
- Optional Drizzle: Melt peanut butter chips or chocolate chips for a fancy swirl over the top.
Variations
- Different Jams
Strawberry or raspberry is common. Grape jam leans classic PB&J. Apricot or mixed berry can be fun twists. - Peanut Butter Swap
Try almond or cashew butter for a different nutty essence. - Chocolate Addition
Fold in chocolate chips or swirl Nutella for a PB-chocolate jam scenario reminiscent of peanut butter cup vibes.
Dietary & Health Notes
- Moderate Sugar & Fat
The combo of peanut butter, sugar, and jam can be high in calories. Enjoy in moderation. - Natural PB
If using natural, stir well to combine oil. Might need slightly more flour if dough is too sticky. - Allergies
Contains nuts, eggs, wheat. Mind cross-contamination for those with allergies.
Storing & Reheating
- Room Temperature: Bars keep well ~3–4 days in an airtight container.
- Refrigeration: Extends freshness a couple more days, but might stiffen the texture.
- Freezing: Wrap squares individually for up to 2 months. Thaw at room temp.
Frequently Asked Questions
Q1: My jam layer sank.
Either the dough was too thin, or jam was watery. A thicker jam or partial baking of the dough layer for a few minutes can help.
Q2: Could I skip the top crumble layer?
Yes, you can. The bars will have a peanut-butter cookie crust plus jam on top. Slightly reduce baking time.
Q3: Are these crisp or chewy bars?
They lean soft and chewy, especially if not overbaked. If you want crisp edges, bake a few extra minutes.
Q4: How to intensify peanut flavor?
Use peanut butter chips or chopped peanuts in the dough. Or a small dash of peanut butter extract if available.
Q5: Could I reduce sugar?
You can reduce up to ~1/4 cup combined sugar, though texture might be less moist and sweet. The jam still provides sweetness.
Conclusion
Peanut Butter & Jelly Cookie Bars – A Nostalgic Duo So Tasty pays homage to the iconic PB&J sandwich by transforming it into a sweet, sliceable treat that straddles the line between cookie and bar dessert. The peanut-butter-infused dough forms both a sturdy base and a soft, crumbly top (if you reserve some dough), encasing a layer of fruity jam that channels all your favorite childhood lunches. The result is a dessert that’s easy to transport, share, and store—perfect for potlucks, picnics, or a welcome break in your workday.
While grape or strawberry jam might evoke the most nostalgia, you can go bold with apricot, raspberry, or even a swirl of chocolate spread. Each bar offers a gentle peanut-butter aroma and a jam center that, when combined, recalls that simple delight of PB&J. Wrap them up for a lunchbox treat or display them on a cookie tray for guests. Either way, they promise a sweet, smile-inducing break from the ordinary.