There is something undeniably magical about the concept of “icebox cookies.” It’s the culinary equivalent of having money in the bank—knowing you have a log of delicious dough waiting in the fridge, ready to be transformed into fresh treats at a moment’s notice. If you have been searching for the ultimate Slice-And-Bake Butter Cookies recipe, you have officially found it.
- Ingredients
- Timing
- Step-by-Step Instructions
- Step 1: Sift the Dry Ingredients
- Step 2: Cream the Butter
- Step 3: Aerate with Sugar
- Step 4: Add Eggs and Vanilla
- Step 5: Combine with Flour
- Step 6: Shape and Chill
- Step 7: Coat and Slice
- Step 8: The Freezer Trick (Don’t Skip This!)
- Step 9: Bake and Cool
- Nutritional Information
- Healthier Alternatives
- Serving Suggestions
- Common Mistakes to Avoid
- Storing Tips
- Conclusion
- FAQs
- Q1. Can I add mix-ins like chocolate chips or nuts?
- Q2. Why did my cookies spread into flat discs?
- Q3. Can I use salted butter instead of unsalted?
- Q4. How do I keep the dough log round on the bottom?
- Perfect Slice-And-Bake Butter Cookies: Easy & Melt-in-Your-Mouth
These cookies offer that nostalgic, bakery-style texture: crisp edges with a tender, buttery center that practically melts on your tongue. Unlike complex pastries that require hours of active labor, this recipe champions the “make-ahead” philosophy. Whether you are prepping for a holiday cookie swap or just want a sweet treat for your Tuesday coffee, these cookies are versatile, customizable, and foolproof.
Why do we love this specific recipe? It balances the richness of unsalted butter with just the right amount of sugar and vanilla, creating a canvas perfect for festive sprinkles or a simple sugar rim. Let’s dive into how to master these refrigerator cookies that are sure to become a staple in your kitchen rotation.
Ingredients
To achieve that signature tender crumb, precision is key. Here is exactly what you need to gather.

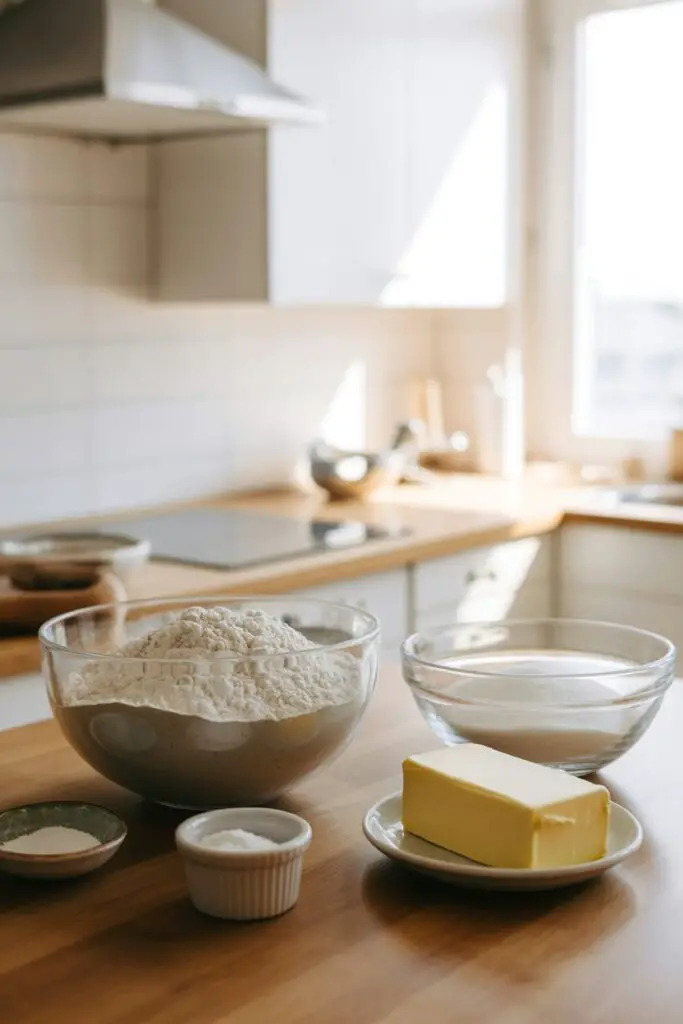
| Ingredient | Amount/Quantity | Notes |
| All-Purpose Flour | 3 cups | The structural base; measure correctly. |
| Baking Powder | 1/2 teaspoon | For just a tiny bit of lift. |
| Kosher Salt | 1/2 teaspoon | Balances the sweetness perfectly. |
| Unsalted Butter | 1 cup (2 sticks) | Softened to room temperature. |
| Sugar | 1 1/3 cups | Granulated white sugar works best here. |
| Large Eggs | 2 | Room temperature for better emulsification. |
| Vanilla Extract | 1 1/2 teaspoons | Use pure extract for the best flavor profile. |
| Sprinkles | As needed | Optional, for coating the edges. |
Timing
Understanding the time commitment helps you plan your baking day. The beauty of this recipe lies in the “chill time,” which breaks up the work.
- Prep Time: 20 minutes
- Chill Time: 1 hour (minimum) to 1 week
- Cook Time: 12–15 minutes per batch
- Total Time: ~1 hour 35 minutes (mostly passive waiting time!)
Note: This total time is significantly less active work than making a layered cake, making it perfect for busy schedules.
Step-by-Step Instructions
Step 1: Sift the Dry Ingredients
Start by setting the foundation for a smooth texture. In a medium bowl, sift together the 3 cups of flour, 1/2 teaspoon of baking powder, and 1/2 teaspoon of kosher salt. Sifting is crucial here—it aerates the flour and ensures you don’t end up with salty clumps in your sweet cookies.
Step 2: Cream the Butter
In the bowl of a stand mixer fitted with the paddle attachment, beat the butter on medium speed until it is completely smooth. This usually takes about 2 minutes. You want the butter to look creamy and velvety before adding anything else.
Step 3: Aerate with Sugar
Add the 1 1/3 cups of sugar to the butter. Continue beating for about 3 minutes until the mixture transforms into a pale, light, and fluffy consistency.
- Tip: This process, known as “creaming,” traps air into the butter, which gives the cookies their delicate structure. Don’t rush it!
Step 4: Add Eggs and Vanilla
Add the eggs one at a time, beating well after each addition to ensure they are fully incorporated. Scrape down the sides of the bowl if necessary. Then, pour in the 1 1/2 teaspoons of vanilla extract and mix briefly.
Step 5: Combine with Flour
Turn the mixer off completely. Add your sifted dry ingredients to the wet mixture. Turn the mixer to the lowest speed and beat just until combined.
- Crucial Tip: Stop mixing as soon as the white streaks of flour disappear. Overworking the dough at this stage activates the gluten, which leads to tough cookies rather than tender ones.
Step 6: Shape and Chill
Divide your dough in half. On a lightly floured surface, shape each piece into a smooth log (about the diameter you want your cookies to be). Wrap each log securely in plastic wrap. Refrigerate them for a minimum of 1 hour.
- Kelly’s Note: You can leave these in the fridge for up to a week, allowing the flavors to meld and deepen.
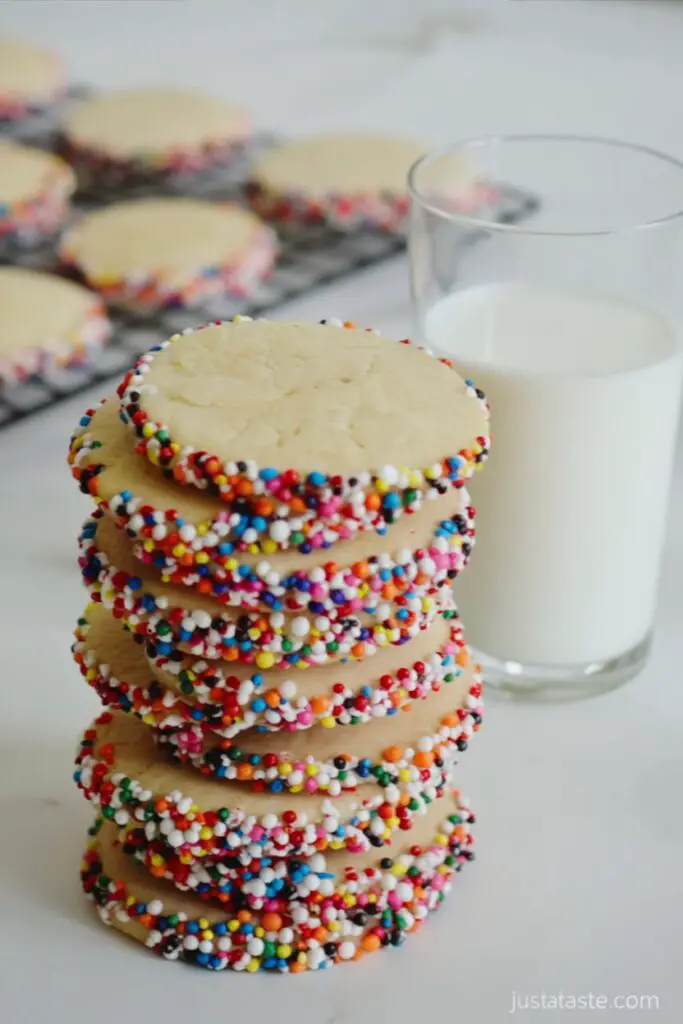
Step 7: Coat and Slice
When you are ready to bake, remove the dough from the fridge. Unwrap the logs and roll them in your sprinkles (if using) so the edges are coated.
- Slicing: Using a sharp knife, slice the log into 1/4-inch thick rounds. If the dough has flattened slightly in the fridge, rotate it as you slice to keep them round.
Step 8: The Freezer Trick (Don’t Skip This!)
Preheat your oven to 350ºF (175ºC) and line two baking sheets with parchment paper. Arrange your cookie rounds on the sheets, spacing them about 1 inch apart.
- Expert Move: Place the baking sheets with the cookies into the freezer for 10 minutes. This ensures the butter is cold when it hits the hot oven, preventing the cookies from spreading too much.
Step 9: Bake and Cool
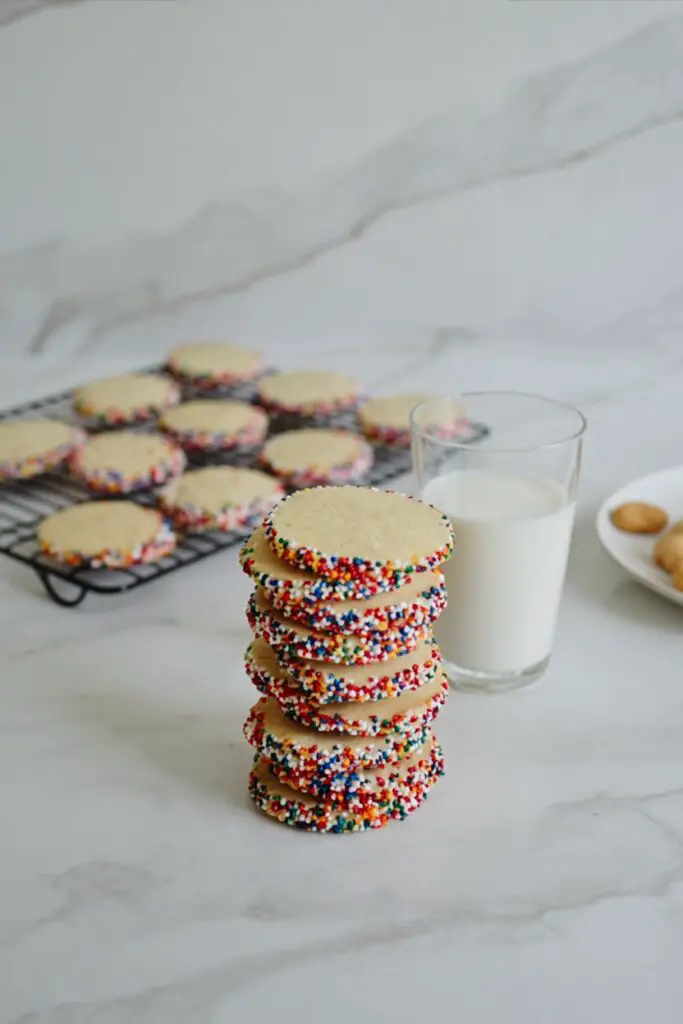
Bake the cookies for 12 to 15 minutes. You are looking for them to be “set”—they should look dry on top and just barely golden on the edges.
- Kelly’s Note: Remove them from the oven and let them cool on the baking sheet for 5 minutes. They are fragile when hot! Afterward, transfer them to a wire rack to cool completely.
Nutritional Information
Here is an estimated nutritional breakdown per cookie (based on a yield of approximately 36 cookies):
- Calories: ~110 kcal
- Carbohydrates: 16g
- Sugars: 8g
- Fat: 5g
- Saturated Fat: 3g
- Protein: 1g
- Sodium: 45mg
Note: These cookies are a high-energy treat. The butter content provides a rich source of fat-soluble vitamins like Vitamin A.
Healthier Alternatives
If you love the idea of slice-and-bake cookies but have specific dietary needs, try these swaps:
- Whole Grain Twist: Substitute 50% of the all-purpose flour with white whole wheat flour. It adds fiber and a nutty flavor without making the cookie too dense.
- Lower Sugar: You can reduce the sugar by about 1/4 cup without ruining the structure, though the texture may be slightly less crisp.
- Gluten-Free: Swap the flour for a high-quality 1:1 Gluten-Free Baking Flour blend. Ensure your blend contains xanthan gum for binding.
- Natural Sprinkles: If you are avoiding artificial dyes, look for sprinkles colored with vegetable juices (beet, turmeric, spirulina) found in many health food stores.
Serving Suggestions
These Slice-And-Bake Butter Cookies are a chameleon of the dessert world.
- The Coffee Companion: The sturdy texture makes them perfect for dunking into a hot cappuccino or a chai latte.
- Holiday Gift Boxes: Because they stack beautifully and don’t crumble easily, they are the ideal candidate for holiday tins. Stack them in clear cellophane bags tied with a ribbon.
- Ice Cream Sandwiches: Take two cookies and sandwich a scoop of strawberry or salted caramel ice cream in between. The butteriness pairs amazingly with creamy frozen desserts.
Common Mistakes to Avoid
Even with a simple recipe, small errors can affect the final result.
- Skipping the Chill: If you bake the dough immediately after mixing, the butter will melt too fast, resulting in a flat, greasy puddle. Solution: Patience! Respect the 1-hour minimum chill time.
- Overmixing the Flour: As mentioned in Step 5, this creates a tough cookie. Solution: Use a gentle hand or fold the flour in with a spatula if you are heavy-handed with the mixer.
- Slicing While Too Hard: If the dough is rock hard from the fridge, it might crack when you slice it. Solution: Let the log sit on the counter for 5 minutes before slicing if it feels like a stone.
- Uneven Slices: Thick cookies will be underbaked while thin ones burn. Solution: Try to keep your knife cuts consistent at 1/4-inch.
Storing Tips
One of the best features of this recipe is its longevity.
- Room Temperature: Store baked cookies in an airtight container for up to 1 week. They actually taste better on day two!
- Freezing Dough: This is the ultimate hack. Wrap the dough logs tightly in plastic wrap, then in foil. They can be frozen for up to 3 months. Thaw in the fridge overnight before slicing.
- Freezing Baked Cookies: You can also freeze the finished cookies. Place parchment paper between layers to prevent sticking.
- Re-crisping: If the cookies soften over time due to humidity, pop them in a 300ºF oven for 3-4 minutes to restore their snap.
Conclusion
Mastering these Slice-And-Bake Butter Cookies is like unlocking a superpower in the kitchen. You get maximum flavor payoff for minimal active effort, and the ability to have fresh cookies on demand is a luxury everyone deserves. The combination of the rich butter flavor with the festive crunch of sprinkles makes them a crowd-pleaser for any age.
Try it out and let us know! Did you stick to vanilla or did you experiment with almond or lemon extract? Leave a comment below with your results—we love seeing your baking adventures. Don’t forget to rate the recipe and subscribe to our newsletter for more easy, delicious baking guides!
FAQs
Q1. Can I add mix-ins like chocolate chips or nuts?
Yes, absolutely! You can fold in about 1/2 cup of mini chocolate chips, finely chopped nuts (pecans or walnuts work well), or even dried cranberries during the final stage of mixing. Just make sure they are chopped small so they don’t interfere with slicing the rounds later.
Q2. Why did my cookies spread into flat discs?
This usually happens for two reasons: either the butter was too warm when it went into the oven, or there wasn’t enough flour. Ensure you measure your flour correctly (spoon and level method) and do not skip the 10-minute freeze step before baking. That blast of cold air “sets” the shape.
Q3. Can I use salted butter instead of unsalted?
You can, but it gives you less control over the saltiness. If you only have salted butter on hand, omit the 1/2 teaspoon of kosher salt listed in the ingredients to keep the flavor balanced.
Q4. How do I keep the dough log round on the bottom?
Gravity tends to flatten the bottom of the log while it sits in the fridge. To prevent this, you can slice a cardboard paper towel tube open lengthwise and rest the wrapped dough log inside it. This acts as a cradle to maintain that perfect cylindrical shape.
Print
Perfect Slice-And-Bake Butter Cookies: Easy & Melt-in-Your-Mouth
- Total Time: 1 hour 35 minutes
- Yield: 36 Cookies 1x
- Diet: Vegetarian
Description
There is something undeniably magical about “icebox cookies”—knowing you have a log of delicious dough waiting in the fridge, ready to be transformed into fresh treats. These cookies offer a nostalgic, bakery-style texture: crisp edges with a tender, buttery center that practically melts on your tongue. Whether you are prepping for a holiday cookie swap or just want a sweet treat for your coffee, these make-ahead cookies are versatile and foolproof.
Ingredients
- 3 cups All-Purpose Flour
- 1/2 teaspoon Baking Powder
- 1/2 teaspoon Kosher Salt
- 1 cup (2 sticks) Unsalted Butter, softened
- 1 1/3 cups Granulated Sugar
- 2 Large Eggs, room temperature
- 1 1/2 teaspoons Vanilla Extract
- As needed Sprinkles (optional, for coating edges)
Instructions
-
Sift Dry Ingredients: In a medium bowl, sift together the flour, baking powder, and kosher salt. Sifting aerates the flour and prevents salty clumps.
-
Cream Butter: In a stand mixer fitted with the paddle attachment, beat the butter on medium speed for about 2 minutes until smooth and velvety.
-
Aerate with Sugar: Add the sugar to the butter. Beat for about 3 minutes until the mixture is pale, light, and fluffy.
-
Add Wet Ingredients: Add the eggs one at a time, beating well after each. Pour in the vanilla extract and mix briefly.
-
Combine: Turn the mixer to low. Add the sifted dry ingredients. Beat just until combined. Stop mixing as soon as the white streaks of flour disappear to avoid tough cookies.
-
Shape and Chill: Divide dough in half. Shape into smooth logs on a lightly floured surface. Wrap securely in plastic wrap and refrigerate for at least 1 hour (or up to a week).
-
Coat and Slice: Remove logs from fridge. Unwrap and roll in sprinkles (if using). Slice into 1/4-inch thick rounds using a sharp knife.
-
The Freezer Trick: Preheat oven to 350ºF (175ºC). Arrange cookies on parchment-lined baking sheets. Place the baking sheets in the freezer for 10 minutes.
-
Bake and Cool: Bake for 12 to 15 minutes until set (dry on top, slightly golden edges). Cool on the sheet for 5 minutes, then transfer to a wire rack.
Notes
- The Freezer Trick: Placing the cut cookies in the freezer for 10 minutes before baking ensures the butter is cold when it hits the hot oven. This prevents spreading and keeps the edges sharp.
- Don’t Overmix: When adding the flour, stop mixing the moment the flour disappears. Overworking the dough activates gluten and makes the cookies tough.
- Make Ahead: The dough logs can sit in the fridge for up to a week, allowing the flavors to meld and deepen before baking.
- Prep Time: 20 minutes
- Chill Time: 1 hour
- Cook Time: 15 minutes
- Category: Dessert, Cookies
- Method: Baking, Slice-and-Bake
- Cuisine: American
Nutrition
- Serving Size: 1 cookie
- Calories: 110 kcal
- Sugar: 8 g
- Sodium: 45 mg
- Fat: 5 g
- Saturated Fat: 3 g
- Unsaturated Fat: 2 g
- Trans Fat: 0 g
- Carbohydrates: 16 g
- Fiber: 0 g
- Protein: 1 g
- Cholesterol: 15 mg