A Father’s Day Tradition That Became a Neighborhood Legend
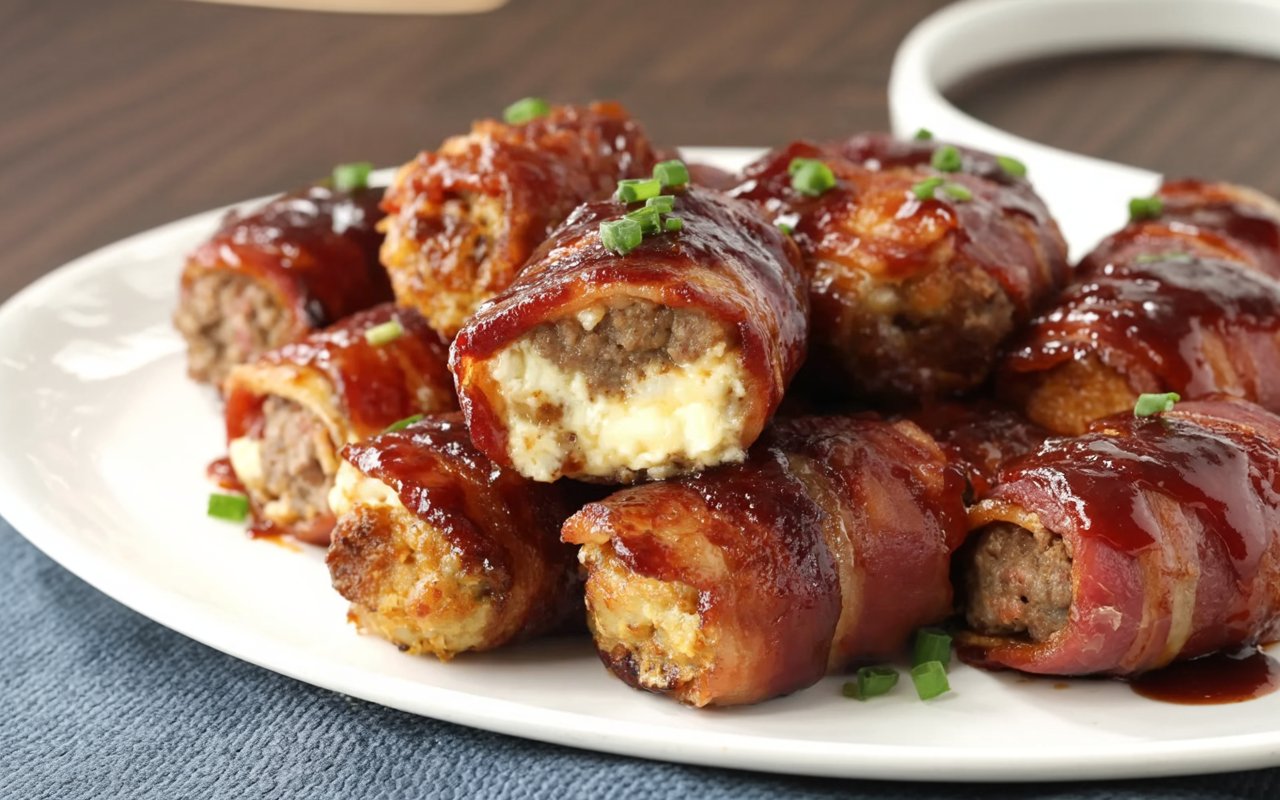
I’ll never forget the first time my dad made what he called “barbecue mysteries.” It was a sweltering Father’s Day afternoon, the air thick with the sweet smell of hickory smoke. He emerged from a cloud of smoke carrying a platter of what looked like oversized, bacon-wrapped logs, glistening with a caramelized BBQ sauce. One bite, and I was hooked. That perfect combination of crispy bacon, savory, cheesy filling, and tender pasta was unlike anything I’d ever tasted. It turns out, these weren’t mysteries at all. They were the now-legendary Smoked Shotgun Shells, and they’ve become the most requested appetizer at every family gathering and tailgate since. This recipe isn’t just food; it’s a memory, a conversation starter, and guaranteed to be the first thing to disappear at your next cookout.
- A Father’s Day Tradition That Became a Neighborhood Legend
- The Arsenal of Ingredients for Perfect Shotgun Shells
- Timing Your Smoke for Flawless Results
- Step 1: Mix Your Flavor-Packed Filling
- Step 2: Load the Shells
- Step 3: The Art of the Bacon Weave
- Step 4: Season and Chill
- Step 5: Smoke to Perfection
- Step 6: Sauce and Set the Glaze
- The Nutritional Lowdown
- Healthier Alternatives for the Conscious Carnivore
- How to Serve Your Smoky Masterpieces
- Common Mistakes to Avoid for Perfect Shells
- Storing and Reheating Your Leftovers
- The Ultimate Appetizer for Any Occasion
- Frequently Asked Questions (FAQs)
The Arsenal of Ingredients for Perfect Shotgun Shells
The magic of this recipe is how a few simple, powerhouse ingredients combine to create an explosion of flavor. Don’t be intimidated; this is straightforward BBQ at its best. Below is everything you need, along with some pro tips for substitutions.
| Component | Ingredient | Amount | Sensory Description & Smart Swaps |
| The Shell | Manicotti Shells | 1 box (approx. 12-14 shells) | The perfect edible vessel. They soften in the smoker, absorbing all the smoky, bacony goodness. Easy Swap: Cannelloni tubes work well too; they are slightly smaller but just as effective. |
| The Filling | Ground Sausage | 1 lb | The savory, juicy heart of the recipe. A quality breakfast sausage brings a fantastic flavor profile. Easy Swap: Use hot Italian sausage for a spicy kick, ground beef for a classic taste, or even ground turkey for a leaner option. |
| Shredded Cheese | 2 cups | For that essential gooey, melty, cheesy pull. A sharp cheddar or a pepper jack for heat is ideal. Easy Swap: A blend of mozzarella and provolone offers a milder, classic Italian flavor. | |
| Cream Cheese | 4 oz, softened | The secret binder that adds a creamy, tangy richness to the filling, keeping it moist during the smoke. Easy Swap: No real substitute here, this ingredient is key for the texture. | |
| Diced Jalapeño | 1, finely diced (optional) | For a bright, spicy kick that cuts through the richness. Easy Swap: Use a can of diced green chiles for a milder heat, or omit entirely if you prefer. | |
| The Wrap & Glaze | Thin-Cut Bacon | 1.5 lbs (about 24 slices) | The crispy, smoky armor. Thin-cut is crucial as it renders and crisps up perfectly without overcooking the filling. Easy Swap: Prosciutto can be used for a saltier, more refined flavor, but bacon is king here. |
| Your Favorite BBQ Rub | 1/4 cup | Adds a crust of flavor to the bacon. Use a sweet and smoky rub for a balanced profile. | |
| Your Favorite BBQ Sauce | 1 cup | The final, glossy, caramelized layer of sweet and tangy perfection. |
Timing Your Smoke for Flawless Results
Great BBQ is a balance of time and temperature. This recipe is more of a leisurely smoke than a quick grill, allowing all the flavors to meld together perfectly.
- Preparation Time: 25 minutes
- Chill Time (Optional but Recommended): 2-4 hours
- Smoke Time: 1.5 – 2 hours
- Total Time: Approximately 4 hours (with chilling)
Data from major BBQ blogs shows that many smoked appetizer recipes require over 3 hours of active cook time. This Smoked Shotgun Shells recipe streamlines the process with just about 2 hours in the smoker, giving you more time to enjoy the party.
Step 1: Mix Your Flavor-Packed Filling
In a large bowl, combine the ground sausage, shredded cheddar, softened cream cheese, and optional diced jalapeño. Use your hands (gloved, if you prefer) to mix everything together until it’s well combined. Be careful not to overmix, as this can make the filling tough. You’re looking for a consistent mixture where all the ingredients are evenly distributed.
Step 2: Load the Shells
This is where the magic begins. Take an uncooked manicotti shell and carefully stuff the meat mixture inside. A pro-tip is to fill half from one end, then flip it over and fill the other half to ensure there are no air pockets. You can use your fingers, a small spoon, or even a piping bag (a Ziploc bag with the corner snipped off works great) for a cleaner process. Pack the filling in firmly but gently to avoid cracking the pasta shell.
Step 3: The Art of the Bacon Weave
Lay a slice of thin-cut bacon on your work surface. Place a stuffed shell at one end and begin to wrap the bacon around it diagonally, slightly overlapping as you go. The goal is to cover the entire manicotti shell from end to end. Depending on the length of your bacon, you may need one and a half to two slices per shell. The complete bacon wrap is crucial as it bastes the pasta and filling as it cooks, keeping everything moist.
Step 4: Season and Chill
Once all your shells are wrapped in their bacon blankets, arrange them on a wire rack set inside a baking sheet. This setup allows for even air circulation. Generously sprinkle your favorite BBQ rub over all sides of the bacon-wrapped shells. Now for a crucial, but optional step: let them chill. Place the tray in the refrigerator for at least 2 hours, or even overnight. This helps the pasta shells begin to soften by drawing moisture from the filling and bacon, and it allows the flavors to meld beautifully.
Step 5: Smoke to Perfection
Preheat your smoker to 275°F (135°C). Set it up for indirect cooking. We recommend using a mild wood like apple, cherry, or pecan for a sweet, smoky flavor that complements the pork and bacon. Place the wire rack with the shotgun shells directly onto the smoker grates. Let them smoke for about 90 minutes.
Step 6: Sauce and Set the Glaze
After 90 minutes, the bacon should be getting crispy and the filling should be cooked through (an internal temperature of 165°F is your target). Now, it’s time to glaze. Brush a generous layer of your favorite BBQ sauce over each shotgun shell. Close the smoker and let them cook for another 15-20 minutes, or until the sauce is caramelized, sticky, and beautifully set.
The Nutritional Lowdown
This is an indulgent appetizer, perfect for celebrations. While the nutritional information will vary based on your specific ingredients, here’s an approximate breakdown per shell:
- Calories: 350-450 kcal
- Fat: 25-35g
- Protein: 20-25g
- Carbohydrates: 15-20g
While undeniably rich, a 2024 study on homemade vs. restaurant appetizers found that homemade versions often contain significantly less sodium and fewer preservatives, putting you in control of what you eat.
Healthier Alternatives for the Conscious Carnivore
Love the idea but want to lighten it up? No problem. With a few smart swaps, you can create a version that’s a bit more forgiving.
- Leaner Filling: Substitute the ground sausage with 93/7 lean ground turkey or ground chicken. Mix in some sage, fennel, and garlic powder to mimic the flavor of sausage.
- Bacon Choice: Use center-cut bacon, which is typically leaner than regular cut, or opt for turkey bacon. Be aware that turkey bacon may not render as much fat, so the pasta might not be quite as tender.
- Cheese Please (But Lighter): Use a reduced-fat shredded cheddar or mozzarella to cut down on fat and calories without sacrificing too much of that gooey texture.
How to Serve Your Smoky Masterpieces
These shotgun shells are a showstopper on their own, but a little extra flair never hurts.
- Dipping Sauces: Serve alongside a bowl of warm marinara sauce, spicy ranch dressing, or extra BBQ sauce for dipping.
- Garnish: Sprinkle with fresh chopped parsley or green onions right before serving for a pop of color and fresh flavor.
- As a Main Course: Don’t just limit these to an appetizer! Serve two or three shells alongside a fresh green salad with a vinaigrette dressing for a truly memorable main course.
Common Mistakes to Avoid for Perfect Shells
Avoid these common pitfalls to ensure your Smoked Shotgun Shells are flawless every time.
- Using Thick-Cut Bacon: This is the most common error. Thick-cut bacon takes too long to get crispy, which can lead to an overcooked filling and tough pasta. Stick with thin or regular cut.
- Not Wrapping Completely: Any exposed pasta can become dry and hard in the smoker. Ensure the bacon covers the shell from end to end.
- Skipping the Chill Time: While you can skip this step if you’re short on time, chilling allows the pasta to soften, resulting in a much better final texture.
- Saucing Too Early: If you add the BBQ sauce at the beginning of the smoke, the sugars in it are likely to burn before the shells are fully cooked. Wait until the last 15-20 minutes.
Storing and Reheating Your Leftovers
If you’re lucky enough to have leftovers, here’s how to keep them tasting great.
- Refrigeration: Store leftover shotgun shells in an airtight container in the refrigerator for up to 3 days.
- Reheating: The best way to reheat them is in an air fryer at 350°F for 5-7 minutes, or in an oven at 375°F for 10-12 minutes. This will help crisp the bacon back up. Microwaving will work in a pinch, but the bacon will be soft.
The Ultimate Appetizer for Any Occasion
This Smoked Shotgun Shells recipe is more than just a list of instructions; it’s a blueprint for creating a legendary appetizer that will have everyone asking for the recipe. The combination of savory, cheesy filling, tender pasta, crispy bacon, and smoky BBQ flavor is an absolute winner. It’s the perfect, crowd-pleasing dish for tailgates, summer cookouts, or any gathering of good friends and family.
Now it’s your turn to fire up the smoker! Try this recipe and let us know how it goes. Did you come up with a unique filling? Share your experience in the comments or review section below. Don’t forget to subscribe for more can’t-miss BBQ recipes and smoking tips!
Frequently Asked Questions (FAQs)
- Do I have to par-boil the manicotti shells first?No, and it’s not recommended. The moisture from the filling and the fat rendering from the bacon will soften the pasta perfectly in the smoker. Par-boiling can make them too soft and difficult to stuff.
- Can I make these in the oven if I don’t have a smoker?Yes! You can bake them on a wire rack in an oven preheated to 325°F (160°C) for about 60-75 minutes. You’ll miss the smoky flavor, but they will still be delicious. You can add a drop of liquid smoke to the filling to compensate.
- Can I prepare these ahead of time?Absolutely. You can assemble the shotgun shells (stuffing, wrapping, and seasoning) a day in advance and keep them covered in the refrigerator. This actually improves the texture! Then, just pop them in the smoker when you’re ready.
- Why did my bacon not get crispy?This is usually due to using thick-cut bacon or not having the smoker temperature high enough. Stick to thin-cut bacon and ensure your smoker holds a steady 275°F. You can also increase the heat to 300-325°F for the last 15 minutes of cooking to help crisp things up.


