The Secret to Ultimate Chicken Fried Chicken
What if I told you that the key to a truly spectacular, shatteringly crispy Chicken Fried Chicken recipe wasn’t some deep-seated family secret, but a simple scientific trick hiding in your pantry? For years, I chased that perfect diner-style crunch, the kind of coating that crackles audibly and stays crispy even when drenched in creamy country gravy. My attempts were often good, but never great—until I discovered the magic combination of baking powder and baking soda in the flour dredge. This isn’t just another fried chicken recipe; it’s the definitive guide to achieving that legendary crunch and tender, juicy interior every single time.
- The Secret to Ultimate Chicken Fried Chicken
- Your Toolkit for Southern Comfort
- Timing Your Path to Crispy Perfection
- Step 1: Prepare Your Dredging Station
- Step 2: Double-Dredge for Maximum Crunch
- Step 3: Fry to Golden-Brown Perfection
- Step 4: Make the Creamy Country Gravy
- Step 5: Serve and Enjoy
- Nutritional Insights
- Healthier Alternatives to Consider
- Sensational Serving Suggestions
- Common Mistakes to Avoid
- Storing and Reheating Tips
- Your New Comfort Food Classic
- Frequently Asked Questions
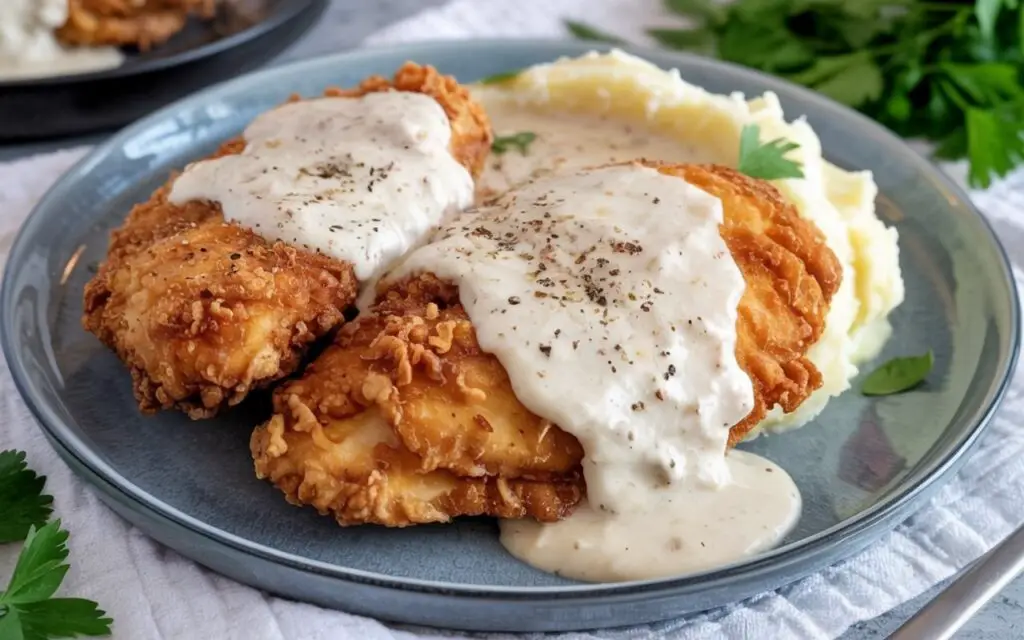
This is the ultimate comfort food, elevated. We’re talking about thin, tender chicken cutlets enveloped in a craggy, perfectly seasoned crust, pan-fried to a deep golden brown, and smothered in a rich, peppery white gravy made right in the same skillet. Get ready to master a Southern classic that will have everyone at your table asking for seconds.
Your Toolkit for Southern Comfort
Here is your complete shopping list for creating the most incredible Chicken Fried Chicken and a classic pan gravy. The beauty of this dish is how these simple, humble ingredients transform into something truly special.
| Ingredient | Amount | Substitution Suggestions & Notes |
| For the Crispy Chicken: | ||
| Thin sliced chicken breasts | 6-8 | You can pound regular chicken breasts to an even ¼-inch thickness. Chicken or pork tenderloins also work well. |
| All-purpose flour | 2 cups | |
| Baking powder | 2 tsp | This is crucial for a light, crispy crust. Don’t skip it! |
| Baking soda | 1 tsp | Works with the baking powder for maximum crispiness. |
| Salt | 1 tsp | Plus more for seasoning the chicken directly. |
| Black pepper | 1 tsp | Freshly ground is best for a peppery kick. |
| Garlic powder | 1 tsp | Onion powder can also be added for more flavor. |
| Buttermilk | 1 1/2 cups | To make your own, add 1 ½ Tbsp of lemon juice or white vinegar to regular milk and let it sit for 5 minutes. |
| Large egg | 1 | |
| Hot sauce | 1 Tbsp | Use your favorite brand, like Frank’s RedHot or Tabasco. This adds flavor, not significant heat. |
| Oil for frying (e.g., vegetable, canola, peanut) | ~1 inch deep | Use a neutral oil with a high smoke point. |
| For the Country Gravy: | ||
| Reserved oil from frying | 1/4 cup | This contains all the flavorful browned bits (fond)! |
| All-purpose flour | 1/3 cup | |
| Milk | 2 cups | Whole milk is recommended for a rich, creamy gravy. |
| Salt & pepper | To taste | Be generous with the black pepper for a classic country gravy flavor. |
Timing Your Path to Crispy Perfection
This show-stopping comfort meal comes together faster than you might think, making it an achievable and satisfying dinner any night of the week.
- Prep time: 15 minutes
- Cook time: 20-25 minutes
- Total time: 35-40 minutes
For a meal this impressive, the timeline is remarkably efficient. This recipe takes approximately 25% less time than many deep-fried chicken recipes, thanks to the use of thin cutlets that cook quickly.
Step 1: Prepare Your Dredging Station
The key to a flawless frying process is preparation. You’ll need two shallow dishes. In the first dish, whisk together the flour, baking powder, baking soda, salt, pepper, and garlic powder. In the second dish, whisk together the buttermilk, egg, and hot sauce until smooth. This two-step station is your assembly line for a perfect crust.
Step 2: Double-Dredge for Maximum Crunch
Pat your thin-sliced chicken breasts dry with a paper towel and season them lightly with salt and pepper. Now, for the secret to a thick, craggy crust: the double dredge. Working with one piece of chicken at a time, dredge it in the seasoned flour mixture, shaking off the excess. Next, dip it into the buttermilk mixture, allowing the excess to drip off. Finally, return it to the flour mixture for a second, heavy coating. Press the flour onto the chicken to ensure it adheres well. Place the coated chicken on a wire rack and repeat with the remaining pieces.
Step 3: Fry to Golden-Brown Perfection
Pour about 1 inch of oil into a large, heavy-bottomed skillet (a cast-iron skillet is perfect for this) and heat it over medium-high heat to about 350°F (175°C). If you don’t have a thermometer, the oil is ready when a pinch of flour sizzles and bubbles immediately. Carefully place 2-3 pieces of chicken in the hot oil, ensuring not to overcrowd the pan. Fry for 3-5 minutes per side, until deep golden brown, crispy, and cooked through. Transfer the cooked chicken to a wire rack to drain.
Step 4: Make the Creamy Country Gravy
This is where the magic happens. Carefully pour off all but about ¼ cup of the frying oil from the skillet, leaving the flavorful browned bits in the pan. Reduce the heat to medium and whisk the ⅓ cup of flour into the reserved oil until a smooth paste (a roux) forms. Cook for about one minute to toast the flour. Slowly pour in the milk while whisking constantly to prevent lumps. Continue to cook, whisking frequently, until the gravy thickens enough to coat the back of a spoon, about 5-7 minutes. Season generously with salt and lots of black pepper.
Step 5: Serve and Enjoy
Serve the crispy Chicken Fried Chicken hot, generously smothered in the warm country gravy.

Nutritional Insights
Here’s an approximate nutritional breakdown for one serving (one piece of chicken with gravy), assuming the recipe makes 6 servings:
- Calories: ~550 kcal
- Protein: ~35g
- Carbohydrates: ~40g
- Fat: ~28g
- Sodium: ~850mg (will vary based on salt and broth)
While this is classic comfort food, making it at home allows you to control the quality of the ingredients and the amount of oil used.
Healthier Alternatives to Consider
Craving that crunch without the guilt? Here are a few smart modifications.
- Air Fryer Method: For a significantly lower-fat version, preheat your air fryer to 400°F (200°C). After breading the chicken, spray it generously with cooking oil on both sides. Cook for 10-15 minutes, flipping halfway through, until golden, crispy, and cooked through.
- Baked Version: To bake, preheat your oven to 425°F (220°C). Place the breaded chicken on a wire rack set over a baking sheet and spray with cooking oil. Bake for 20-25 minutes, flipping once, until golden and crispy.
- Lighter Gravy: For the gravy, you can use a lower-fat milk (like 2%) and a chicken broth base to reduce the calories, though the richness will be milder.
Sensational Serving Suggestions
Chicken Fried Chicken is traditionally served with classic Southern sides that complement its rich flavor.
- Mashed Potato Mountain: The quintessential pairing. Serve the chicken and gravy over a generous scoop of creamy mashed potatoes.
- Green Bean Goodness: Simple steamed or sautéed green beans, corn on the cob, or collard greens provide a fresh, welcome contrast.
- Buttermilk Biscuits: A fluffy, warm buttermilk biscuit is the perfect tool for sopping up every last bit of that delicious country gravy.
- As a Sandwich: Place a piece of the crispy chicken in a soft potato roll with a smear of gravy and a few pickle slices for an incredible sandwich.
Common Mistakes to Avoid
For a flawless result every time, steer clear of these common frying faults:
- Oil Isn’t Hot Enough: Frying in oil that’s too cool will lead to a greasy, soggy crust. Let the oil come to temperature before adding the chicken.
- Crowding the Pan: This drops the oil temperature and causes the chicken to steam rather than fry. Cook in batches for the best results.
- Skipping the Double Dredge: The key to a thick, craggy crust is the flour-buttermilk-flour process. Don’t be tempted to skip a step!
- Draining on Paper Towels: Placing fried food directly on paper towels can trap steam and make the bottom side soggy. A wire rack allows air to circulate, keeping all sides crispy.
Storing and Reheating Tips
While Chicken Fried Chicken is best enjoyed immediately, leftovers can still be delicious.
- Refrigeration: Store leftover chicken and gravy in separate airtight containers in the refrigerator for up to 3 days.
- The Secret to Reheating: The best way to revive that crispy crust is in an oven or air fryer. Reheat the chicken at 375°F (190°C) for 10-15 minutes until hot and re-crisped. Gently reheat the gravy in a saucepan over low heat, adding a splash of milk to loosen it if needed.
Your New Comfort Food Classic
This Chicken Fried Chicken recipe is your ultimate guide to creating a truly iconic Southern dish at home. From the science behind the super-crispy crust to the rich, flavorful pan gravy, every step is designed for success. This is more than a meal; it’s a comforting, satisfying experience that brings a taste of classic diner cooking right into your kitchen.
I wholeheartedly encourage you to try this recipe and discover the joy of a perfectly executed classic. Let me know how it turns out in the comments below, and be sure to subscribe to our blog for more foolproof comfort food recipes!
Frequently Asked Questions
What is the difference between Chicken Fried Chicken and Country Fried Chicken?
The main difference is typically in the gravy. Chicken Fried Chicken is almost always served with a white, peppery country or cream gravy, like in this recipe. Country Fried Steak or Chicken is often served with a brown gravy.
Can I make this recipe gluten-free?
Yes. You can substitute the all-purpose flour with a good quality gluten-free all-purpose baking blend. Ensure your baking powder is also certified gluten-free.
Why did my breading fall off the chicken?
This can happen for a few reasons: the chicken was wet before the first dredge, you didn’t press the final flour coating on firmly enough, or the oil wasn’t hot enough. Patting the chicken dry and letting the coated chicken rest on a wire rack for a few minutes before frying can also help the coating adhere.
Can I prepare the chicken ahead of time?
You can bread the chicken a few hours ahead of time. Place the breaded cutlets on a wire rack, cover them loosely, and refrigerate. This can actually help the coating stick better during frying.