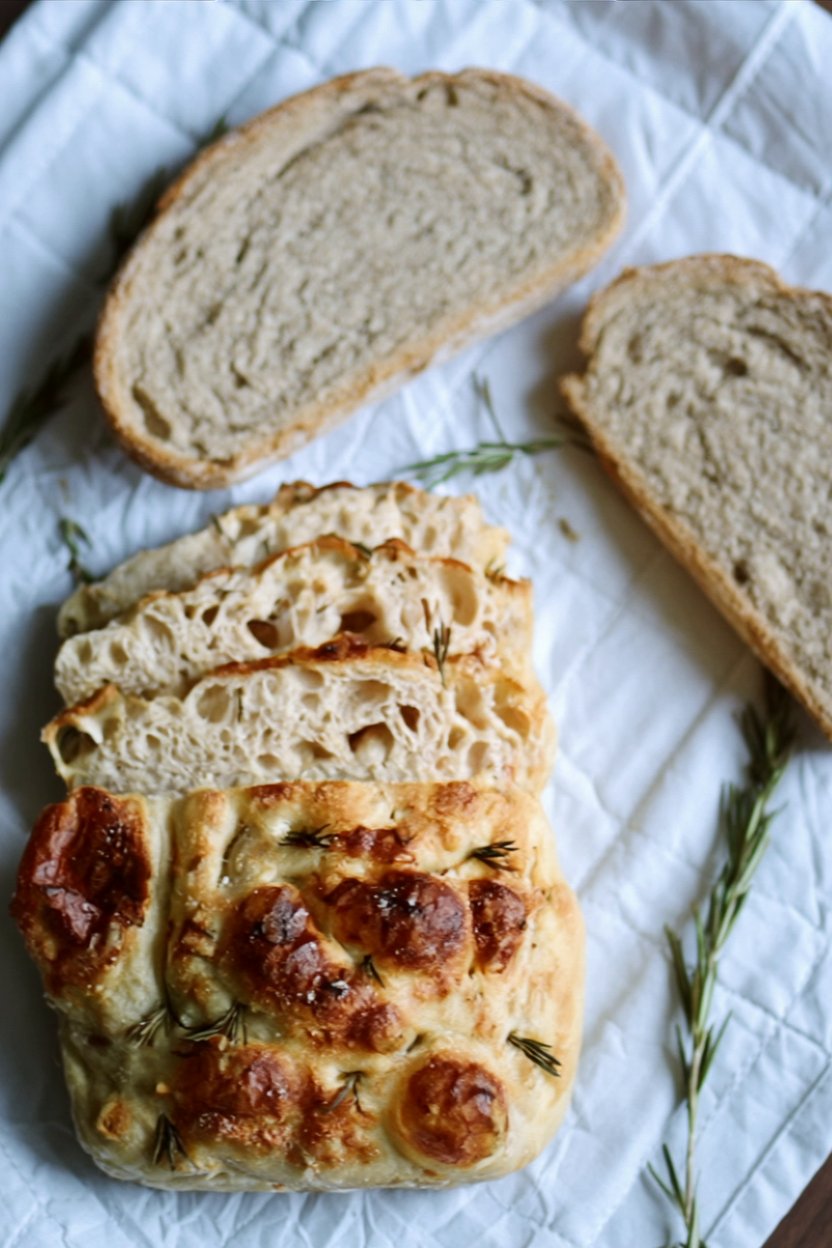
What if you could bake a slice of artisan, bakery-quality bread at home that has a shatteringly crispy, olive oil-rich crust and a soft, airy, and chewy inside? That is the magic of this Sourdough Focaccia. It’s the kind of bread that makes a whole meal. While many people are intimidated by sourdough, this recipe is one of the most forgiving and visually stunning ways to use your active starter.
- Ingredients for Sourdough Focaccia
- Timing
- Step-by-Step Instructions
- Step 1: Make the Dough
- Step 2: Rest the Dough (Autolyse)
- Step 3: Perform Stretch and Folds
- Step 4: Shape the Dough Ball
- Step 5: The Bulk Fermentation (First Rise)
- Step 6: The Second Proof in the Pan
- Step 7: Preheat and Dimple the Focaccia
- Step 8: Add Toppings
- Step 9: Bake to Golden Perfection
- Step 10: Cool and Serve
- Nutritional Information
- Healthier Alternatives
- Serving Suggestions
- Common Mistakes to Avoid
- Storing Tips
- Conclusion
- FAQs
- Q1. My sourdough starter isn’t “active.” Can I still use it?
- Q2. Can I use all-purpose flour instead of bread flour?
- Q3. Can I rush the 12-18 hour bulk fermentation?
- Q4. Why is my focaccia dense and not airy?
- Q5. Can I make this in a glass or ceramic dish?
- The Best Sourdough Focaccia Recipe (Crispy & Chewy)
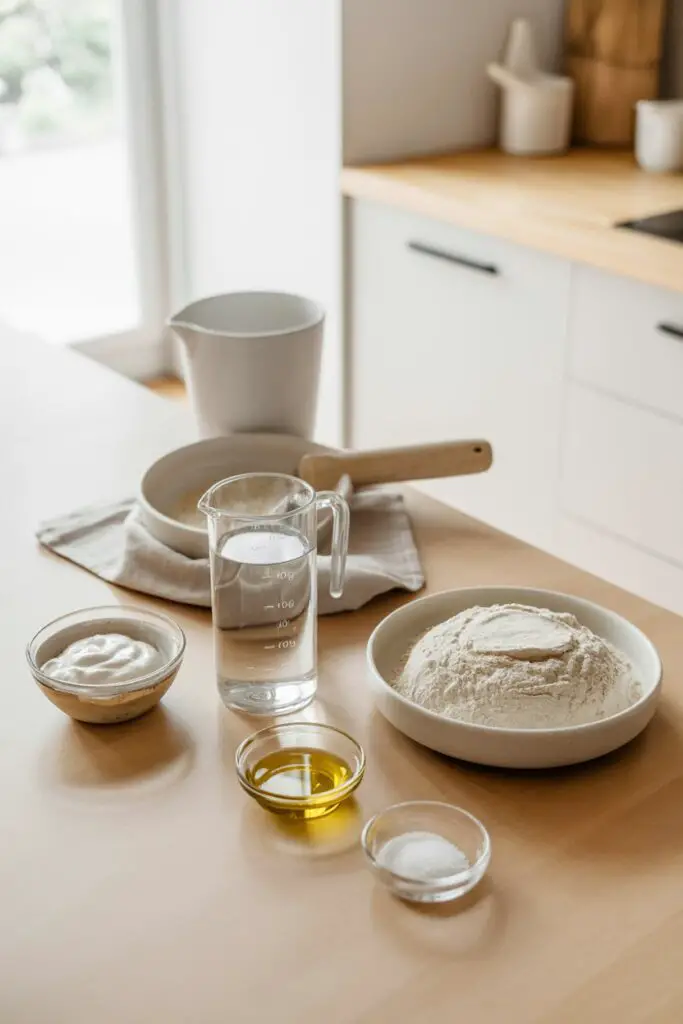
This recipe for The Best Sourdough Focaccia Bread transforms five simple ingredients—flour, water, salt, starter, and olive oil—into a masterpiece. It’s a high-hydration, “wet dough” recipe, which means you don’t need to do any complex kneading. Instead, we’ll use a simple “stretch and fold” technique to build strength, resulting in that beautiful, open crumb and those iconic dimples.
Ingredients for Sourdough Focaccia
This recipe’s beauty is in its simplicity. Use the best-quality ingredients you can find, especially the olive oil and flour.
| Ingredient | Amount/Quantity |
| Active sourdough starter | 50 grams |
| Filtered water (room temperature) | 400 grams |
| High-quality bread flour | 500 grams |
| Kosher or sea salt | 10 grams |
| Extra virgin olive oil | 28 grams (plus more for drizzling) |
| Flaky sea salt | To taste, for topping |
| Optional toppings | See notes below |

Timing
This is a long-fermentation recipe, which is key to developing its complex, tangy flavor. The vast majority of this time is completely hands-off.
- Prep time (Active): 45 minutes (Includes mixing and 3 sets of stretch-and-folds)
- Bulk Fermentation (1st Rise): 12 to 18 hours (Hands-off)
- Proof (2nd Rise): 1 to 4 hours (Hands-off)
- Bake time: 25 to 30 minutes
- Total time: Approximately 14 to 23 hours
Step-by-Step Instructions
Step 1: Make the Dough
In a large mixing bowl, add your 50g of active sourdough starter and 400g of filtered water. Use a Danish dough whisk or your hands to mix until the starter is dissolved and the liquid looks milky. To this, add your 500g of bread flour and 10g of salt. Mix by hand until a shaggy dough forms and no dry flour is visible.
- Tip: This is a high-hydration dough, so it will be very sticky and wet. This is completely normal! Resist the urge to add more flour.
Step 2: Rest the Dough (Autolyse)
Cover the bowl with a clean tea towel and let the dough rest for 30 minutes. This rest period, often called an “autolyse” or “fermentolyse,” allows the flour to fully absorb the water and makes the dough more elastic.
Step 3: Perform Stretch and Folds
This is how we build strength instead of kneading. Scrape the dough away from the sides of the bowl. With slightly wet hands, grab a section of the focaccia dough, stretch it up, and fold it over on top of itself. Rotate the bowl 90 degrees and repeat. Do this 3-4 times, until you’ve come full circle. You’ll feel the dough starting to tighten up.
Step 4: Shape the Dough Ball
After your first set of stretch and folds, the dough will look much smoother. Flip the dough ball over so the “seam” side is down. With wet hands, gently cup the sides of the dough, tucking the dough underneath itself to create a smooth, round ball. Do this about 10-20 times while turning the bowl.
Step 5: The Bulk Fermentation (First Rise)
Cover the bowl tightly with plastic wrap (or a reusable shower cap, which works great). Place the dough in a warm place to rise. This is the most “finicky” part of sourdough, as it’s not about the clock; it’s about the visual cues.
- Guide: In a 68-70°F (20-21°C) room, this can take 12 to 18 hours. A warmer room will be faster, a cooler one slower.
- What to look for:
- The dough should increase in size by about 75% (not quite doubled).
- It should look light, airy, and “jiggly” when you shake the bowl.
- You should see visible bubbles on the surface and sides.
Step 6: The Second Proof in the Pan
Line an 11.5 x 8 inch metal baking pan with parchment paper. Pour your 28g of olive oil into the bottom of the pan and spread it evenly to coat the bottom and sides.
- Tip: A metal pan is highly recommended as it conducts heat best and will give you that super crispy, golden-brown bottom.
Gently release the dough from the sides of the bowl with a dough scraper. Tilt the bowl and let the dough fall into the prepared pan. Pour the dough in, then take the top of the dough and fold it towards the middle. Repeat with the bottom of the dough, like folding a letter (a tri-fold). Now, flip the whole dough over so the seam side is down. Cover the dough and let it rise again for 1 to 4 hours, depending on your kitchen’s temperature.
Step 7: Preheat and Dimple the Focaccia
Once the dough has risen, it should fill most of the pan and be very light and jiggly. Preheat your oven to 425°F (220°C). Drizzle a little more olive oil on top of the dough and on your fingers.
To dimple the dough, gently press your fingers straight down into the focaccia until you lightly touch the bottom of the dish. Repeat this all over the dough. Be gentle and decisive—over-dimpling can pop all the lovely air pockets you’ve worked so hard to create.
Step 8: Add Toppings
Sprinkle the entire surface of the sourdough with flaky sea salt. This is the classic topping, but you can also add others. Gently press any toppings into the dimpled dough.
- Topping Ideas:
- Fresh herbs (rosemary, thyme, oregano). Toss them in oil first to prevent burning.
- Sliced cherry tomatoes
- Caramelized onions
- Sliced olives
- Pesto
- Shredded parmesan or asiago cheese
Step 9: Bake to Golden Perfection
Place the Sourdough Focaccia on the lowest rack in your preheated oven. Bake for 20-25 minutes. This low-rack position is the secret to a crispy, fried-like bottom.
After 20-25 minutes, check the bread. If the bottom is golden and crispy, move the pan to the top rack and bake for 5 more minutes, or until the top of the bread is a beautiful golden brown to your liking.
Step 10: Cool and Serve
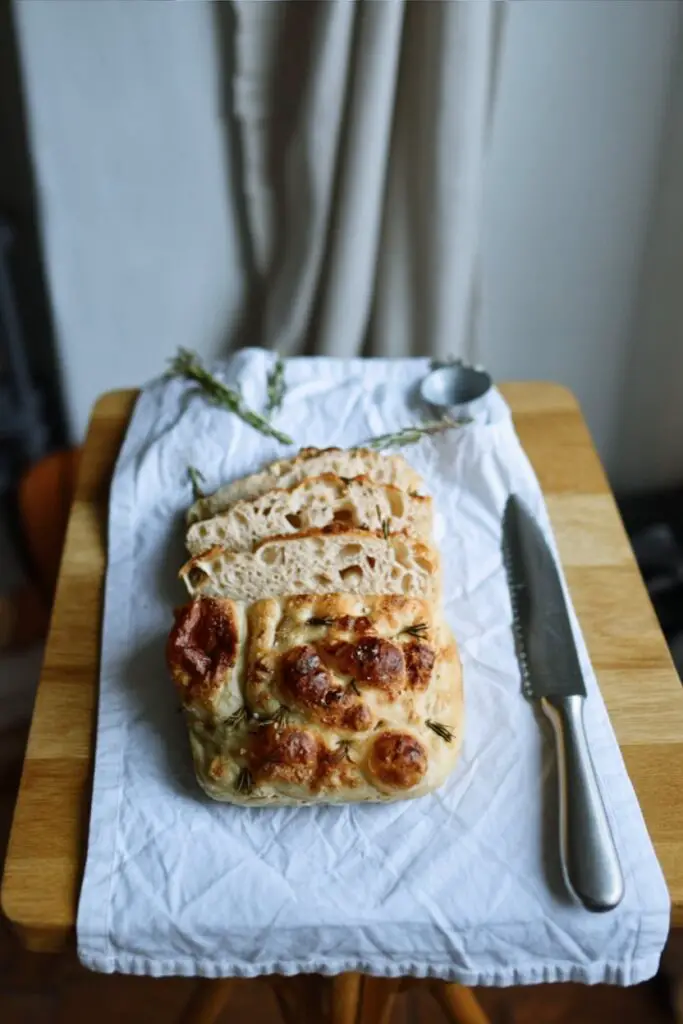
Remove the pan from the oven. Let the focaccia cool in the pan for 5-10 minutes, then use the parchment paper “handles” to lift it out and place it on a wire rack to finish cooling. This step is crucial for preventing a soggy bottom! Once cooled slightly, slice and enjoy.
Nutritional Information
This is a rich, artisan bread. The nutritional information is an estimate per slice, assuming the loaf is cut into 12 slices.
- Calories: ~210 kcal
- Protein: 5 g
- Carbohydrates: 36 g
- Fat: 5 g (primarily from olive oil)
- Sugar: <1 g
(Disclaimer: These values are estimates and will vary based on your specific ingredients and topping choices.)
Healthier Alternatives
This recipe is a classic indulgence, but you can make a few small adjustments.
- Flour: For more fiber, substitute 10-20% of the bread flour (50g-100g) with whole wheat flour. Be aware that this will create a slightly denser crumb.
- Toppings: Stick to healthy toppings like fresh herbs, tomatoes, and olives rather than heavy cheeses or cured meats.
- Sodium: You can lightly reduce the flaky salt topping, but the 10g of salt in the dough is essential for fermentation and flavor.
Serving Suggestions

This Sourdough Focaccia is incredibly versatile and deserves to be the star of the show!
- Classic Dip: Serve it warm with a small bowl of high-quality olive oil and a splash of balsamic vinegar for dipping.
- Sandwich Star: Slice the entire loaf in half horizontally to create the most epic sandwich bread you’ve ever had.
- With Soup or Stew: It’s the perfect vessel for sopping up the last bits of a hearty minestrone, tomato soup, or beef stew.
- Appetizer Board: Cut it into small squares and serve it on a charcuterie board with cheeses, cured meats, and jams.
Common Mistakes to Avoid
- Clock-Watching, Not Dough-Watching: The #1 mistake in all sourdough baking is following the clock, not the dough.
- Solution: Your dough is ready for the next step when it looks ready. Use the visual cues: 75% rise, jiggly, and full of bubbles. A cold kitchen may take 18+ hours; a warm one might be done in 10.
- Over-Dimpling: It’s fun, but being too aggressive or dimpling multiple times will deflate all the air from your second rise.
- Solution: Dimple once, firmly but gently. Press your fingers all the way to the bottom and lift them straight back out.
- Soggy Bottom: This happens from not using a metal pan or letting it cool in the pan.
- Solution: Use a light-colored metal pan for the best heat conduction. And always move the focaccia to a wire rack after 5-10 minutes to let the steam escape from the bottom.
- Dough Is Too Sticky: New bakers often panic at this high-hydration dough.
- Solution: Trust the process! Do not add more flour. Use wet hands when performing stretch and folds, and a dough scraper to manage the dough. The stickiness is what creates the open, airy crumb.
Storing Tips
- To Store: Focaccia is best eaten on the day it’s made. To store, keep it unsliced in a paper bag or bread box at room temperature for up to 2 days. Do not store in plastic, as it will make the crust soft.
- To Reheat: The best way to revive focaccia is in the oven. Place a slice (or the whole loaf) in a 400°F (200°C) oven for 5-10 minutes until the crust is crispy and the center is warm.
- To Freeze: This bread freezes beautifully. Slice it into squares, wrap them tightly, and freeze for up to 3 months. Reheat directly from frozen in the oven.
Conclusion
Baking Sourdough Focaccia is one of the most rewarding experiences. It’s an art and a science that results in a truly delicious, rustic bread. While it takes time, almost all of it is hands-off, letting your sourdough starter do the hard work of developing incredible flavor. Once you feel that jiggly, airy, risen dough and see that golden, dimpled crust come out of the oven, you’ll be hooked.
We hope you enjoy making and savoring this recipe! Try it out and let us know in the comments how it turned out for you. We’d love to hear your feedback and see what toppings you chose. Don’t forget to rate the recipe!
FAQs
Q1. My sourdough starter isn’t “active.” Can I still use it?
No. This recipe relies 100% on the yeast in your starter for its rise. Your starter must be “active” or “peaked”—meaning you’ve fed it, and it has doubled (or more) in size, is full of bubbles, and is visibly light and airy.
Q2. Can I use all-purpose flour instead of bread flour?
Yes, you can. All-purpose flour will work, but it has a lower protein content, so your final focaccia might be slightly less chewy and have a more tender, cake-like crumb. Bread flour is what gives it that signature “pull” and chew.
Q3. Can I rush the 12-18 hour bulk fermentation?
You can speed it up, but you can’t rush it. Fermentation is where the flavor is developed. To speed it up, place your dough in a warmer spot (like an OFF oven with the light on, or a proofing box) at around 75-80°F (24-27°C). It might be ready in 6-8 hours, but you must watch for the visual cues (75% rise, bubbles, jiggly).
Q4. Why is my focaccia dense and not airy?
This is almost always due to under-fermentation. You likely moved on to the next step before your dough had risen enough and built up enough gas. Be patient during the bulk fermentation and wait for that 75% rise and those jiggles!
Q5. Can I make this in a glass or ceramic dish?
You can, but the data (and my experience) strongly recommends a metal pan. Glass and ceramic are insulators and don’t conduct heat as well, meaning you will likely get a softer, paler bottom crust instead of that crispy, golden, almost-fried texture.
Print
The Best Sourdough Focaccia Recipe (Crispy & Chewy)
- Total Time: 14 hours 15 minutes
- Yield: 12 Slices 1x
- Diet: Vegetarian
Description
What if you could bake a slice of artisan, bakery-quality bread at home that has a shatteringly crispy, olive oil-rich crust and a soft, airy, and chewy inside? That is the magic of this Sourdough Focaccia. It’s a high-hydration, “wet dough” recipe where you don’t need to knead. Instead, a simple “stretch and fold” technique builds strength, resulting in that beautiful, open crumb and those iconic dimples.
Ingredients
- 50 grams Active sourdough starter
- 400 grams Filtered water (room temperature)
- 500 grams High-quality bread flour
- 10 grams Kosher or sea salt
- 28 grams Extra virgin olive oil (plus more for drizzling)
- Flaky sea salt, to taste, for topping
- Optional toppings: Fresh herbs (rosemary, thyme), cherry tomatoes, olives, parmesan
Instructions
-
Make the Dough: In a large mixing bowl, add 50g of active sourdough starter and 400g of filtered water. Mix until the starter is dissolved. Add 500g of bread flour and 10g of salt. Mix by hand until a shaggy, sticky dough forms and no dry flour is visible.
-
Rest the Dough (Autolyse): Cover the bowl with a clean tea towel and let the dough rest for 30 minutes.
-
Perform Stretch and Folds: With slightly wet hands, grab a section of the dough, stretch it up, and fold it over on top of itself. Rotate the bowl 90 degrees and repeat. Do this 3-4 times.
-
Shape the Dough Ball: Flip the dough ball over so the “seam” side is down. With wet hands, gently cup and tuck the sides of the dough underneath itself to create a smooth, round ball.
-
Bulk Fermentation (First Rise): Cover the bowl tightly. Let the dough rise in a warm place for 12 to 18 hours. The dough should increase in size by about 75% and look light, jiggly, and bubbly.
-
Second Proof in Pan: Line an 11.5 x 8 inch metal baking pan with parchment paper. Pour 28g of olive oil into the pan. Gently release the dough into the pan. Fold the top of the dough to the middle, then the bottom over (like a letter). Flip the dough over so the seam side is down. Cover and let it rise again for 1 to 4 hours, until it fills the pan and is jiggly.
-
Preheat and Dimple: Preheat your oven to 425°F (220°C). Drizzle a little more olive oil on top of the dough and on your fingers. Gently press your fingers straight down into the focaccia until you lightly touch the bottom of the dish. Repeat this all over the dough.
-
Add Toppings: Sprinkle the entire surface with flaky sea salt. Add any other optional toppings (like rosemary, tomatoes, or olives) by gently pressing them into the dimpled dough.
-
Bake: Place the focaccia on the lowest rack in your preheated oven. Bake for 20-25 minutes. If the bottom is golden, move the pan to the top rack and bake for 5 more minutes, until the top is golden brown.
-
Cool and Serve: Let the focaccia cool in the pan for 5-10 minutes, then use the parchment paper “handles” to lift it out and place it on a wire rack to finish cooling.
Notes
- Sticky Dough: This is a high-hydration dough, so it will be very sticky and wet. This is completely normal! Resist the urge to add more flour.
- Metal Pan: A metal pan is highly recommended as it conducts heat best and will give you that super crispy, golden-brown bottom.
- Dimpling: Be gentle and decisive when dimpling the dough. Over-dimpling can pop all the lovely air pockets you’ve worked to create.
- Low Rack: Baking on the low rack is the secret to a crispy, “fried-like” bottom crust.
- Cool on Rack: Lifting the focaccia onto a wire rack to cool is crucial for preventing a soggy bottom!
- Prep Time: 45 minutes (Active)
- Cook Time: 30 minutes
- Category: Bread, Side Dish, Appetizer
- Method: Baking
- Cuisine: Italian
Nutrition
- Serving Size: 1 slice
- Calories: 210 kcal
- Sugar: <1 g
- Sodium: 500 mg
- Fat: 5 g
- Saturated Fat: 0.7 g
- Unsaturated Fat: 4.3 g
- Trans Fat: 0 g
- Carbohydrates: 36 g
- Fiber: 1.5 g
- Protein: 5 g
- Cholesterol: 0 mg