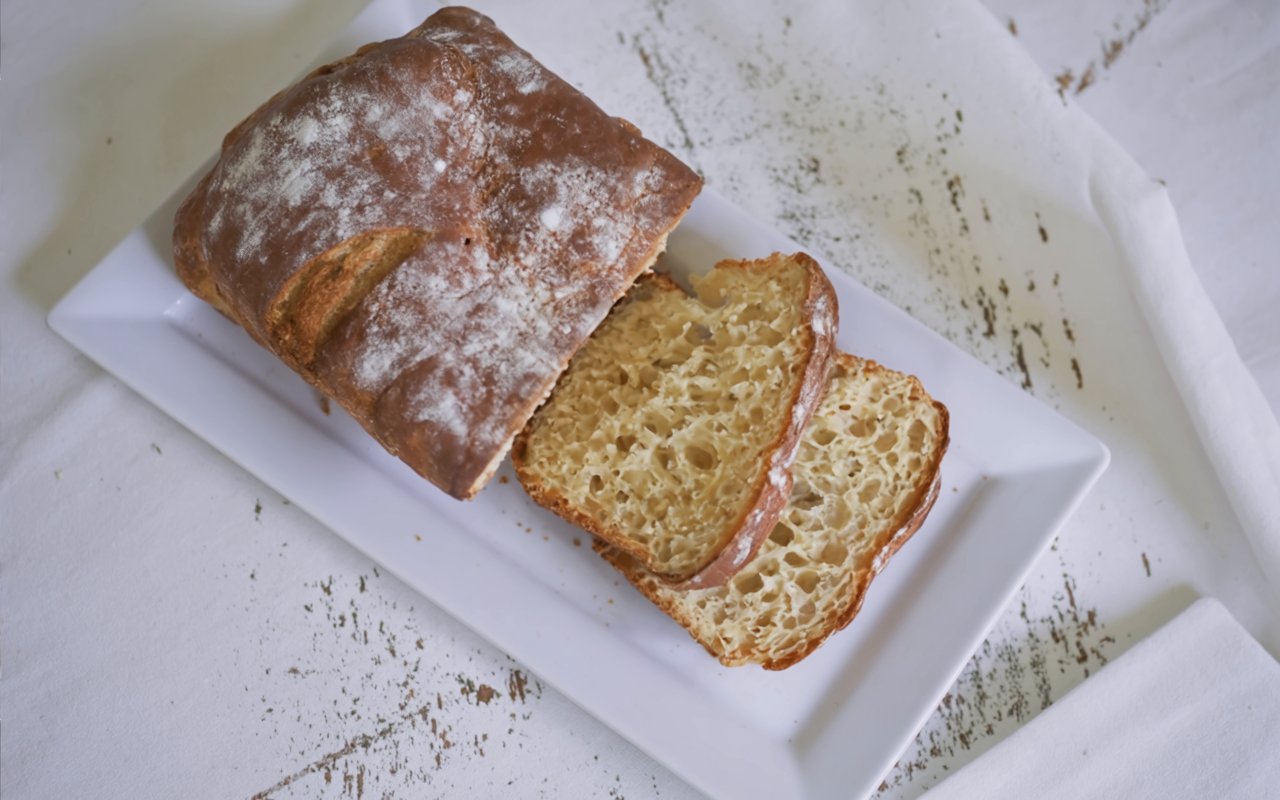
The “Nooks and Crannies” Loaf You Can Make in an Hour
My favorite childhood weekend mornings weren’t about cartoons; they were about the sound of my dad in the kitchen and the incredible aroma that would soon fill the house. He had a secret weapon for making breakfast feel special: a bread recipe so simple, it required no kneading, no complicated shaping, and only one quick rise. What if you could have all the glorious, butter-trapping “nooks and crannies” of an English muffin, but in an effortlessly sliceable, toastable loaf? This is that recipe. This is the ultimate English Muffin Bread Recipe, a life-changing loaf that gives you all the reward of homemade bread with almost none of the work.
- The “Nooks and Crannies” Loaf You Can Make in an Hour
- Your Simple Ingredient List for the Perfect Loaf
- Timing: From Bowl to Golden Loaf in About an Hour
- Step 1: Wake Up the Yeast
- Step 2: Create the “Goopy” Dough
- Step 3: Prepare the Loaf Pans
- Step 4: The One and Only Rise
- Step 5: Bake to Golden Perfection
- Step 6: Cool, Slice, and Admire
- A Look at the Nutritional Side
- Healthier Alternatives & Fun Variations
- Creative Serving Suggestions
- Common Mistakes to Avoid for the Perfect Loaf
- Storing Tips to Keep Your Bread Fresh
- The Easiest Homemade Bread You’ll Ever Make
- FAQs: Your English Muffin Bread Questions Answered
- The Easiest English Muffin Bread (No Kneading Required!)
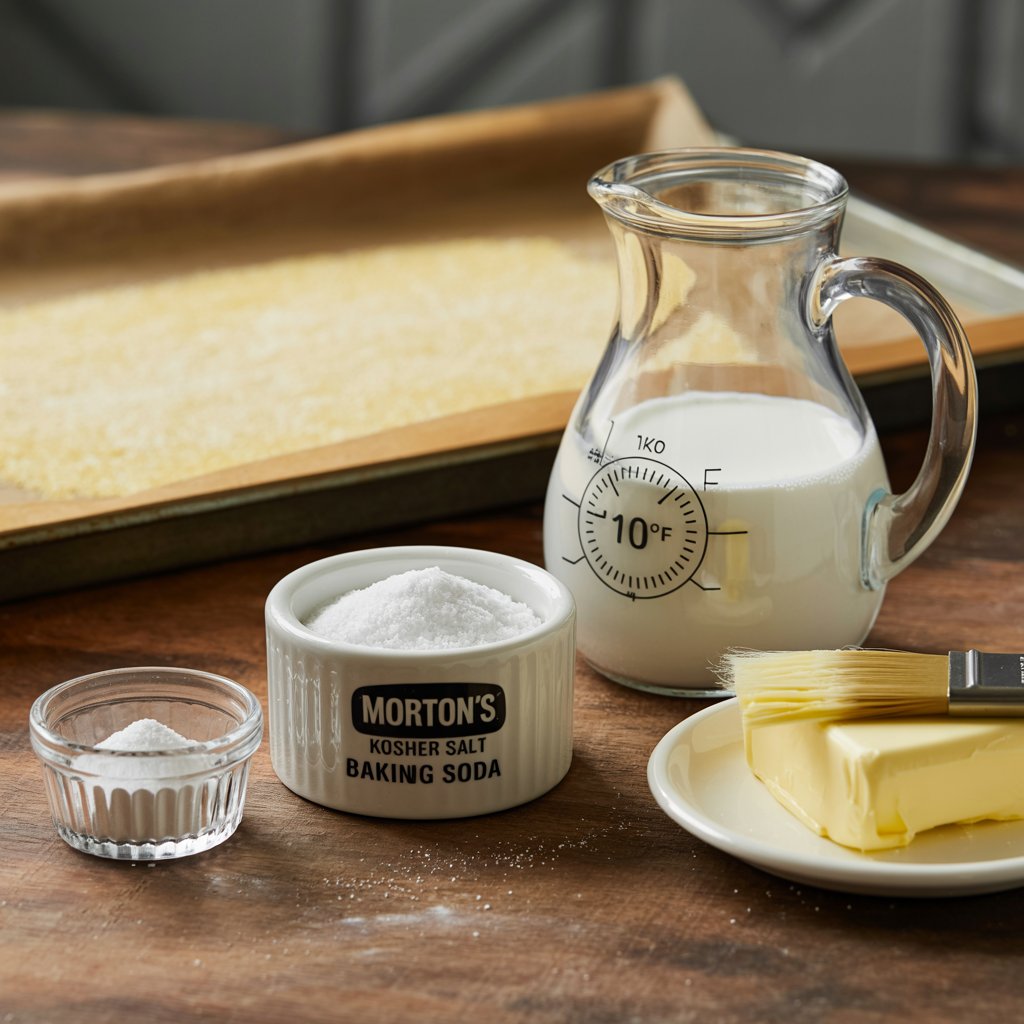
Your Simple Ingredient List for the Perfect Loaf
The magic of this bread is its incredibly simple and forgiving nature. A few pantry staples are all you need to create a loaf that’s soft, chewy, and absolutely perfect for toasting.
| Component | Ingredient | Amount & Description |
| For Proofing the Yeast | Yeast & Honey (or Sugar) | 2 tablespoons (2 packets) & 1 tablespoon – The powerhouse duo that gives our bread its signature airy texture and bubbles. |
| Warm Water | ¼ cup (110°F/43°C) – Must be warm to the touch, like a baby’s bath, to activate the yeast perfectly. | |
| The Bread Dough | All-Purpose Flour | 4 ½ cups, approximately – The structural heart of the loaf. |
| Kosher Salt & Baking Soda | 2 teaspoons & ¼ teaspoon – For flavor and a tender crumb. | |
| Warm Milk | 2 ¼ cups (110°F/43°C) – Adds richness and softness to the dough. | |
| For Preparing the Pans | Butter & Cornmeal | As needed – For greasing the pans and creating that classic, slightly crisp, non-stick English muffin coating. |

Timing: From Bowl to Golden Loaf in About an Hour
This recipe is a game-changer for anyone who thought yeast breads were an all-day affair. The single, quick rise makes it one of the fastest loaf recipes you’ll find.
- Preparation Time: 15 minutes
- Rise Time: 30-45 minutes
- Baking Time: 15-25 minutes
- Total Time: Approximately 1 hour to 1.5 hours
A standard kneaded sandwich loaf can take 2-3 hours from start to finish, often including two separate, long rising periods. This no-knead English Muffin Bread Recipe is ready for the oven after just one quick rise, making it over 50% faster than many traditional yeast bread recipes and perfect for a spontaneous baking session.
Step 1: Wake Up the Yeast
In a small bowl, stir together the yeast, honey (or sugar), and the ¼ cup of warm water. Set it aside for 5-10 minutes. This process, called “proofing,” ensures your yeast is alive and active. You’ll know it’s ready when the mixture becomes foamy and bubbly. If it doesn’t foam, your yeast may be old, and it’s best to start over.
Step 2: Create the “Goopy” Dough
In the bowl of your stand mixer (or a very large bowl if mixing by hand), stir together the kosher salt, baking soda, and 1 cup of the flour. Add the warm milk to your proofed yeast mixture, then pour this liquid into the flour mixture and blend well. With the mixer on low speed (or using a sturdy wooden spoon), begin adding the remaining flour, about a cup at a time. The key here is to create a very soft, sticky, goopy dough. It will not form a clean ball like traditional bread dough. It should be shaggy and wet. This is the secret to all those nooks and crannies!
Step 3: Prepare the Loaf Pans
This step is essential for that classic English muffin texture and for preventing the sticky dough from adhering to the pans. Generously grease two standard 8×4 or 9×5 inch loaf pans with butter. Sprinkle the inside of the pans with cornmeal, tilting the pan to coat the bottom and all sides. Tap out any excess.
Step 4: The One and Only Rise
Using a spatula, evenly divide and spoon the goopy dough into your two prepared loaf pans. The dough is too sticky to handle, so just spoon it in and gently spread it out. Set the pans aside in a warm, draft-free place for 30 to 45 minutes. The dough is ready when it has doubled in size and risen to the top of the pans, or even slightly above.
Step 5: Bake to Golden Perfection
While the dough is rising, preheat your oven to 425°F (218°C). Just before baking, lightly dust the tops of the risen loaves with a little more cornmeal. Bake for 15-25 minutes. You’ll know the bread is done when it’s golden brown and sounds hollow when you tap the top. For a perfectly cooked loaf, the internal temperature should register 190°F-200°F (88°C-93°C) on an instant-read thermometer. For a softer crust, bake for 15-20 minutes. For a crisper, more golden crust, bake for the full 20-25 minutes.
Step 6: Cool, Slice, and Admire

Remove the loaves from the oven and let them cool in the pans for a few minutes before turning them out onto a wire rack to cool completely. It will be tempting to slice into the warm bread, but resist! Letting it cool completely allows the interior crumb to set, ensuring perfect, clean slices.
A Look at the Nutritional Side
This is a simple, lean bread, perfect for a wholesome breakfast. Here is an approximate nutritional breakdown for one slice, assuming each loaf is cut into 12 slices.
- Calories: Approximately 130-150 kcal
- Protein: 4g
- Fat: 1.5g
- Carbohydrates: 25g
- Sugar: 2g
- Sodium: 220mg
Healthier Alternatives & Fun Variations
This simple recipe is a fantastic base for experimentation.
- Whole Grain Goodness: Substitute 1 to 1.5 cups of the all-purpose flour with whole wheat flour for a heartier, more fibrous loaf. Note that the texture will be a bit denser.
- Dairy-Free Version: Easily make this recipe dairy-free by using an unsweetened plant-based milk (like almond or soy milk) and greasing the pans with oil instead of butter.
- Savory Herb Loaf: Add 1-2 tablespoons of your favorite dried herbs, like rosemary, thyme, or an Italian blend, to the dry ingredients for a delicious savory twist.
Creative Serving Suggestions
This bread is truly made for toasting! The nooks and crannies are the perfect vehicle for all your favorite toppings.
- The Classic: Toasted and slathered with a generous amount of butter and your favorite jam, marmalade, or honey.
- The Ultimate Breakfast Sandwich: Use toasted slices as the base for a breakfast sandwich with a fried egg, cheese, and bacon or sausage.
- Eggs Benedict Base: This is the perfect bread for a cheater’s Eggs Benedict. Just toast a thick slice and top with a poached egg and hollandaise sauce.
- Avocado Toast: A thick, toasted slice provides a sturdy and delicious base for mashed avocado and your favorite seasonings.
Common Mistakes to Avoid for the Perfect Loaf
This recipe is forgiving, but these tips will guarantee success.
- Worrying That the Dough is “Wrong”. I can’t stress this enough: the dough is supposed to be a wet, sticky, goopy mess. It will not look like traditional bread dough. This high hydration is precisely what creates the open, airy, English muffin-like texture.
- Killing the Yeast. Your water and milk must be warm, not hot. If the liquid is too hot (over 120°F/49°C), it will kill the yeast, and your bread will not rise.
- Skipping the Pan Prep. The sticky dough will weld itself to an unprepared pan. The combination of grease and a generous dusting of cornmeal is essential for a clean release.
- Slicing the Bread While It’s Still Hot. Slicing hot bread is tempting, but it will compress the soft interior crumb and result in a gummy texture. For those perfect, open-textured slices, you must let the loaf cool completely.
Storing Tips to Keep Your Bread Fresh
Proper storage will keep your delicious homemade bread ready for toasting.
- At Room Temperature: Store the cooled loaf, either whole or sliced, in a bread bag or airtight container at room temperature for 3-4 days.
- Freezer-Friendly: This bread freezes beautifully. For the ultimate convenience, slice the entire loaf and store it in a freezer-safe bag. You can pull out individual slices and pop them directly into the toaster.
The Easiest Homemade Bread You’ll Ever Make
This English Muffin Bread Recipe is a true kitchen miracle. It delivers all the satisfying texture of a classic English muffin in a convenient, sliceable loaf, all without any of the kneading or fuss of traditional bread making. It’s a simple, quick, and incredibly rewarding recipe that will transform your breakfast routine and fill your home with the unbeatable aroma of freshly baked bread.
We are so excited for you to try this incredibly easy recipe! Bake a loaf this weekend and let us know what you think in the comments below. For more simple and satisfying bread recipes, be sure to subscribe.
FAQs: Your English Muffin Bread Questions Answered
Q1: My dough is incredibly sticky and wet. Did I do something wrong?
No, you did it perfectly! This is the most common question, and the answer is that the “goopy” and wet texture is exactly right for this recipe. It’s what creates the signature light, airy crumb with all the nooks and crannies.
Q2: Can I make this recipe without a stand mixer?
Absolutely. This recipe was originally made long before stand mixers were common. You’ll just need a large bowl, a sturdy wooden spoon, and a little bit of arm strength to beat the dough vigorously for a minute or two.
Q3: What is the best way to slice this bread?
For the cleanest cuts, use a long, serrated bread knife and a gentle sawing motion. Make sure the bread is completely cool before you attempt to slice it.
Q4: Can I use active dry yeast instead of instant yeast?
Yes. The first step of the recipe, where you “proof” the yeast in warm water with a little honey or sugar, is actually the exact method needed to activate active dry yeast. So, you can use them interchangeably in this recipe without any changes.
Q5: Why doesn’t this bread recipe require any kneading?
This is a high-hydration dough, which means it has a much higher ratio of liquid to flour than traditional bread doughs. This wet environment, combined with the work of the yeast during the rise, allows the gluten strands to develop and align on their own without the need for mechanical kneading.
Print
The Easiest English Muffin Bread (No Kneading Required!)
- Total Time: 1 hour 25 minutes
- Yield: 2 loaves 1x
Description
Your Simple Ingredient List for the Perfect Loaf. A quick, no‑knead English muffin bread that bakes up soft and chewy with classic cornmeal crust—ideal for toasting and ready after just one rise.
Ingredients
For Proofing the Yeast
- 2 Tbsp yeast (or 2 packets active dry; proofing)
- 1 Tbsp honey or sugar
- 1/4 cup warm water (110°F/43°C) (warm to the touch)
The Bread Dough
- 4 1/2 cups all‑purpose flour (approximately; provides structure)
- 2 tsp kosher salt
- 1/4 tsp baking soda (for a tender crumb)
- 2 1/4 cups warm milk (110°F/43°C) (adds richness & softness)
For Preparing the Pans
- butter (for greasing pans)
- cornmeal (for non‑stick, classic crust)
Instructions
- Wake up the yeast: In a small bowl, combine yeast, honey (or sugar), and warm water (110°F/43°C). Let stand 5–10 minutes until foamy. If it doesn’t foam, start over with fresh yeast.
- Create the goopy dough: In a stand mixer bowl (or large bowl), stir salt, baking soda, and 1 cup flour. Add warm milk to the proofed yeast, then pour into the bowl and blend. On low speed, add remaining flour about 1 cup at a time until a very soft, sticky, shaggy dough forms—no firm ball.
- Prep pans: Generously grease two 8×4 or 9×5‑inch loaf pans with butter. Dust the bottoms and sides with cornmeal; tap out excess.
- One quick rise: Divide and spoon the sticky dough into pans. Smooth tops with a spatula. Let rise in a warm, draft‑free place 30–45 minutes, until doubled and at or just above the rim.
- Bake: Preheat oven to 425°F (218°C). Dust tops lightly with cornmeal. Bake 15–25 minutes until golden and the loaves sound hollow when tapped. Internal temp should reach 190–200°F (88–93°C). For softer crust bake 15–20 minutes; for crisper, bake 20–25.
- Cool & slice: Cool in pans a few minutes, then turn out to a wire rack to cool completely before slicing for the best crumb and clean slices.
Notes
Faster than classic loaves: Ready after just one rise—often 50% faster than traditional two‑rise sandwich bread. Toast slices to highlight nooks & crannies.
- Prep Time: 15 minutes
- Cook Time: 25 minutes
- Category: Bread, Breakfast
- Cuisine: American
Nutrition
- Calories: 145
- Sugar: 2
- Sodium: 220
- Fat: 1.5
- Carbohydrates: 25
- Protein: 4