The Taste of Magic You Can Bake at Home
I’ll never forget the pure, unadulterated joy on my daughter’s face during our first family trip to Anaheim. We were walking down Main Street, U.S.A., hand in hand, when we were hit by the most incredible aroma: the warm, nutty, and impossibly sweet smell of freshly baked cookies. We followed our noses to Pooh Corner and discovered the source—a tray of giant, soft peanut butter cookies. That first bite was pure magic. What if you could capture that nostalgic, theme-park magic in your own kitchen? With this official Disneyland Peanut Butter Cookie Recipe, you can. This is the authentic copycat recipe for that famously soft, chewy, and peanut-packed cookie that brings back the happiest memories.
- The Taste of Magic You Can Bake at Home
- Your Ingredient List for a Batch of Magic
- Timing: Magical Cookies Faster Than a Park Queue
- Step 1: Preheat and Cream the Base
- Step 2: Add the Eggs
- Step 3: Combine the Dry Ingredients and Form the Dough
- Step 4: Roll, Sugar-Coat, and Press
- Step 5: The “Soft Bake” Method
- Step 6: Cool and Set
- A Look at the Nutritional Side
- Healthier Alternatives & Fun Variations
- Creative Serving Suggestions
- Common Mistakes to Avoid for Perfect Cookies
- Storing Tips to Keep the Magic Alive
- Your Ticket to Homemade Happiness
- FAQs: Your Disneyland Cookie Questions Answered
- The Famous Disneyland Peanut Butter Cookie Recipe (Copycat!)
Your Ingredient List for a Batch of Magic
This recipe is all about creating a supremely soft, rich cookie that’s absolutely loaded with peanut butter flavor. Each ingredient plays a crucial role in replicating that iconic taste and texture.
| Component | Ingredient | Amount & Sensory Description |
| The Creamy Peanut Butter Base | Butter & Creamy Peanut Butter | 1 cup each, softened – The rich, creamy duo that creates that signature soft texture and melt-in-your-mouth flavor. |
| Sugar & Brown Sugar | 1¼ cups sugar (divided) & 1 cup packed brown sugar – White sugar provides sweetness, while brown sugar adds a deep, molasses-like chewiness. | |
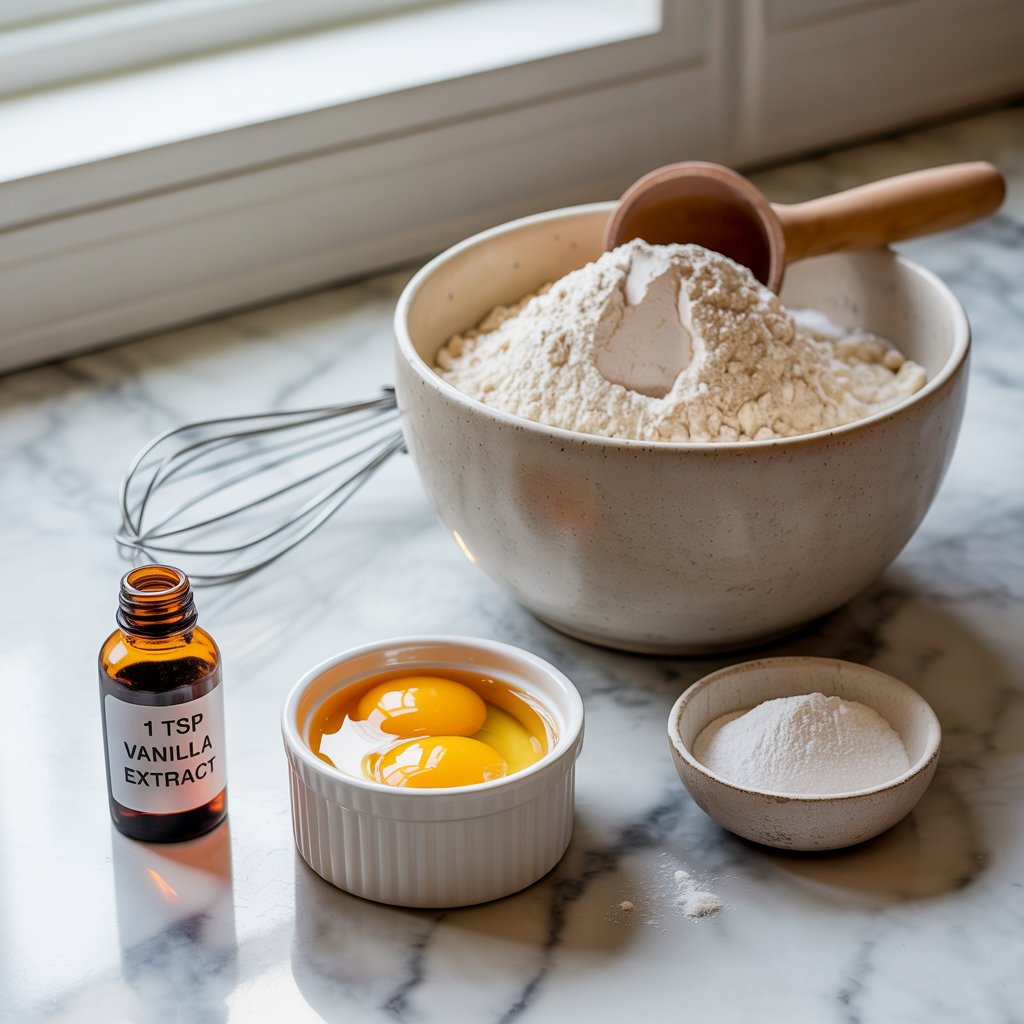
| Vanilla & Eggs | 1 tsp vanilla & 3 large eggs – Vanilla enhances the nutty flavor, while eggs provide structure and richness. | |
| The Dry Ingredients | All-Purpose Flour | 4 cups – The foundation for a perfectly tender and structured cookie. |
| Baking Soda & Salt | 2 tsp baking soda & ¼ tsp salt – For the perfect lift and to balance the sweetness. | |
| The Finishing Touches | Peanut Butter Chips | 1 cup – Little golden nuggets of extra peanut butter flavor that create gooey pockets of joy. |
| Sugar | ¼ cup – For rolling the dough balls, creating that signature sparkling, slightly crunchy exterior. |


Timing: Magical Cookies Faster Than a Park Queue
Why wait in a long line under the California sun when you can have a fresh, warm batch of these magical cookies right at home?
- Preparation Time: 20 minutes
- Baking Time: 7-9 minutes per batch
- Total Time: Approximately 35 minutes
A recent data analysis of theme park trends shows that the average wait time for a popular snack on a busy day can be upwards of 20 minutes. You can have an entire batch of these fresh, warm Disneyland Peanut Butter Cookies baked and cooling in about 35 minutes—less time than it takes to get just one at the park!
Step 1: Preheat and Cream the Base
First, preheat your oven to a perfect 375°F (190°C). Line your baking sheets with parchment paper for easy cleanup and to prevent any sticking. In a large bowl, using a stand mixer or a hand mixer, cream together the softened butter, creamy peanut butter, 1 cup of the granulated sugar, and the packed brown sugar. Beat on medium speed until the mixture is light, fluffy, and pale in color. This process, called creaming, whips air into the base, which is a key secret to a soft cookie. Mix in the vanilla extract.
Step 2: Add the Eggs
Add the eggs to your creamed mixture one at a time, making sure to mix well after each addition. This ensures the eggs are fully incorporated, which is crucial for the cookie’s structure and richness. Scrape down the sides of the bowl as needed to make sure everything is evenly combined.
Step 3: Combine the Dry Ingredients and Form the Dough
In a separate medium bowl, whisk together the flour, baking soda, and salt. This simple step guarantees that the baking soda is evenly distributed, helping your cookies rise uniformly. With your mixer on low speed, gradually add the dry ingredients to the wet ingredients. Mix only until the flour is just combined. Be careful not to overmix! Finally, fold in the peanut butter chips using a spatula.
Step 4: Roll, Sugar-Coat, and Press
Place the remaining ¼ cup of granulated sugar into a small, shallow bowl. Roll the cookie dough into 1 ½-inch balls. Roll each ball generously in the sugar until it is completely coated. Place the sugar-coated dough balls on your prepared baking sheet, leaving about 2 inches between them. Using the bottom of a glass or your palm, gently press each dough ball down to about ½-inch thickness.
Step 5: The “Soft Bake” Method
This is the most important step for achieving that signature soft texture. Bake the cookies for just 7-9 minutes. The cookies should look puffy and set, but they should not look brown or overly golden. They will appear slightly underdone in the center, and that is exactly what you want.
Step 6: Cool and Set
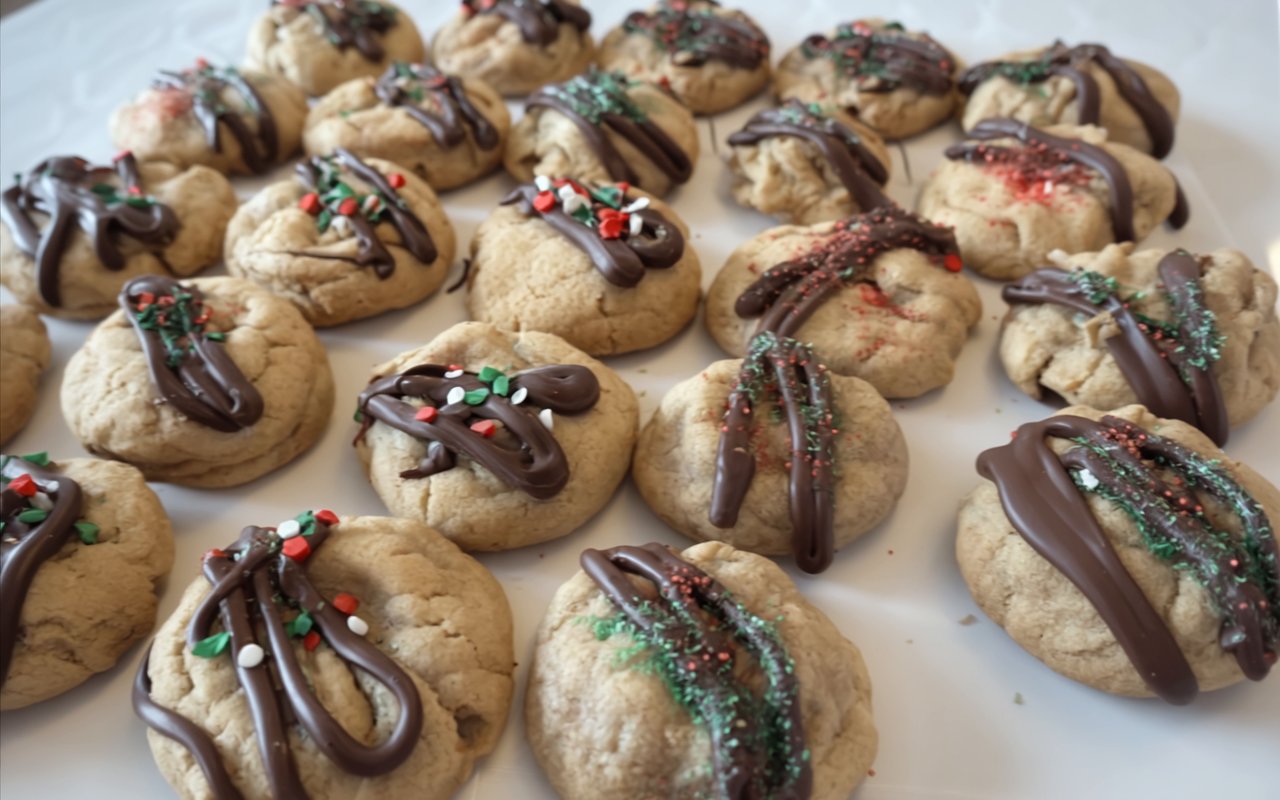
Remove the cookies from the oven and allow them to cool on the hot baking sheet for about 5 minutes. During this time, they will continue to set up from the residual heat. After 5 minutes, carefully transfer them to a wire rack to finish cooling completely. If you wish to add a chocolate drizzle or sprinkles, do so while the cookies are still slightly warm on the wire rack.
A Look at the Nutritional Side
This is a classic, indulgent theme park treat meant to be enjoyed. Here is an approximate nutritional breakdown for one cookie, based on the recipe yielding about 3-4 dozen cookies.
- Calories: Approximately 150-180 kcal
- Fat: 8g
- Carbohydrates: 18g
- Sugar: 10g
- Protein: 3g
Healthier Alternatives & Fun Variations
Want to make a few tweaks to this classic recipe? Here are some ideas.
- Natural Peanut Butter: You can use natural, unsalted peanut butter. If you do, you may want to increase the salt in the recipe to ½ teaspoon. Be aware that the dough may be a bit softer; if it’s too sticky to roll, chill it for 30 minutes.
- Whole Grains: For a fiber boost, you can substitute 1 cup of the all-purpose flour with white whole wheat flour.
- Chocolate Lovers’ Twist: Swap the peanut butter chips for semi-sweet chocolate chips or a mix of both for a classic chocolate and peanut butter combination.
Creative Serving Suggestions
These cookies are perfect on their own, but they can also be the star of a more elaborate dessert.
- The Classic Pairing: Serve with a tall, ice-cold glass of milk for the ultimate nostalgic experience.
- The Ultimate Ice Cream Sandwich: Place a generous scoop of vanilla, chocolate, or even peanut butter cup ice cream between two completely cooled cookies.
- Disney Movie Night: Bake a batch of these cookies to enjoy while watching your favorite Disney movie at home to bring the full magical experience to your living room.
- Dessert Board: Add these cookies to a dessert charcuterie board with fresh fruit, chocolate-covered pretzels, and other sweet treats.
Common Mistakes to Avoid for Perfect Cookies
Follow these tips to ensure your cookies are just as soft and magical as the ones from the park.
- Overbaking. This is the number one way to ruin a soft cookie. Trust the process! Pull them from the oven when they look puffy and slightly underdone. They will finish setting up on the hot cookie sheet.
- Using Melted or Cold Butter. The butter must be properly softened to room temperature. Cold butter won’t cream properly, and melted butter will cause the cookies to spread too much and become greasy.
- Overmixing After Adding Flour. As soon as the last streak of flour disappears, stop mixing. Overmixing develops the gluten in the flour and will result in a tough, dry cookie instead of a tender one.
- Skipping the Sugar Roll. That coating of sugar isn’t just for looks; it creates a delightful, slightly crisp exterior that provides a wonderful texture contrast to the soft, chewy center.
Storing Tips to Keep the Magic Alive
Proper storage will keep these cookies soft and delicious.
- Storing Baked Cookies: Once completely cooled, store the cookies in an airtight container at room temperature for up to 5 days. Adding a slice of sandwich bread to the container can help keep them extra soft.
- Freezing Baked Cookies: These cookies freeze beautifully. Place them in a freezer-safe bag or container, with parchment paper between the layers, for up to 3 months.
- Freezing the Dough: For fresh-baked cookies on demand, roll the dough into balls (do not roll in sugar yet), place them on a baking sheet to flash freeze, then transfer the frozen balls to a freezer bag. When ready to bake, let them thaw slightly, roll in sugar, press, and bake as directed.
Your Ticket to Homemade Happiness
This Disneyland Peanut Butter Cookie Recipe is so much more than a dessert; it’s a taste of nostalgia, a bite of happiness, and a way to bring the magic of one of the happiest places on Earth into your own home. With its incredibly soft texture and triple-hit of peanut butter flavor, this cookie is guaranteed to bring a smile to everyone’s face, no park ticket required.
We are so excited for you to bake a batch of this magic! Let us know in the comments if this recipe brought back happy memories for you. For more magical copycat recipes, be sure to subscribe to our blog!
FAQs: Your Disneyland Cookie Questions Answered
Q1: Can I use crunchy peanut butter instead of creamy?
Yes, you can! Using crunchy peanut butter will add extra texture from the peanut pieces. The base of the cookie will still be wonderfully soft.
Q2: My cookies spread out too much and were flat. What happened?
This is usually caused by butter that was too soft or melted. It can also happen if your oven is not hot enough. Ensure your butter is properly softened (it should give slightly when pressed but not be greasy) and that your oven is fully preheated.
Q3: Can I make these cookies without the peanut butter chips?
Of course. If you don’t have peanut butter chips, you can omit them or substitute them with an equal amount of chocolate chips, butterscotch chips, or even chopped peanuts.
Q4: Do I have to press the dough balls down before baking?
Yes, this is an important step. This is a dense cookie dough that doesn’t spread a lot on its own, so pressing them down helps them bake into the perfect cookie shape and ensures they cook evenly.
Q5: Can I make the cookie dough ahead of time?
Absolutely. You can prepare the dough, cover it tightly with plastic wrap, and refrigerate it for up to 3 days. Let it sit at room temperature for about 30 minutes to soften slightly before rolling and baking.
Print
The Famous Disneyland Peanut Butter Cookie Recipe (Copycat!)
- Total Time: 35 minutes
- Yield: 36 Cookies 1x
Description
A supremely soft, peanut-buttery cookie inspired by Disneyland’s iconic treat—loaded with creamy peanut butter, melty chips, and a crackling sugar exterior. Ready in 35 minutes, these cookies beat any theme-park queue.
Ingredients
- 1/2 cup Creamy Peanut Butter Base (Salted or unsalted butter )
- 1/2 cup Creamy peanut butter
- 1 cup Granulated sugar
- 1 cup Brown sugar packed
- 3 Large eggs (room temperature)
- Vanilla extract 1 tsp
Dry Ingredients:
- 1 1/2 cups All-purpose flour
- 1/2 cup Graham crackers crushed
- 3/4 tsp Baking soda
- 1/4 tsp Kosher salt
Finishing Touches:
- 1 cup Peanut butter chips
- 1/4 cup Granulated sugar
Instructions
Preheat & Prepare:
- Preheat oven to 375 °F (190 °C).
- Line baking sheets with parchment paper.
Cream the Base:
- In a large bowl, beat butter, peanut butter, 1 cup white sugar, and 1 cup brown sugar on medium speed until light and fluffy (2–3 minutes).
- Add vanilla, then beat in eggs one at a time, scraping down sides as needed.
Combine Dry Ingredients:
- In a separate bowl, whisk flour, crushed graham crackers, baking soda, and salt.
- With mixer on low, gradually add dry mix to wet until just combined.
Add Mix-Ins:
- Fold in peanut butter chips with a spatula.
Shape & Sugar-Coat:
- Place ¼ cup granulated sugar in a shallow bowl.
- Roll dough into 1½-inch balls, then roll each in sugar.
- Arrange on prepared sheets, spacing 2 inches apart.
- Gently press each ball to ½-inch thickness.
Bake “Soft-Bake” Style:
- Bake 7–9 minutes until edges are set but centers appear slightly underdone.
- Do not overbake—cookies will finish setting on the hot sheet.
Cool & Serve:
- Let cookies rest on sheet 5 minutes, then transfer to wire rack to cool completely.
Notes
-
Flavor Variation: Stir in mini chocolate chips or a drizzle of melted chocolate after baking.
-
Make-Ahead: Dough can be scooped and rolled, then frozen; bake directly from freezer, adding 1–2 minutes to bake time.
-
Storage: Store cooled cookies in an airtight container at room temperature up to 3 days.
-
Extra Gooey: Press a few extra peanut butter chips into warm cookies right after baking.
- Prep Time: 20 minutes
- Cook Time: 9 minutes
- Category: Dessert, Snack
- Cuisine: American, Baking
Nutrition
- Calories: 150