If you are living a gluten-free lifestyle, you know the heartache of missing out on a truly authentic Tiramisu. The missing link is almost always the sponge fingers. Store-bought options are often hard to find, expensive, and frankly, taste a bit like sweetened cardboard. But I have good news: making the perfect gluten free ladyfingers (or Savoiardi as they are known in Italy) at home is easier than you think, and the results are infinitely better.
- Ingredients
- Timing
- Step-by-Step Instructions
- Step 1: Preheat and Prep
- Step 2: Whip the Yolks
- Step 3: Create the Meringue
- Step 4: Fold the Eggs
- Step 5: Incorporate Dry Ingredients
- Step 6: Pipe the Ladyfingers
- Step 7: The Double Dusting
- Step 8: The Two-Stage Bake
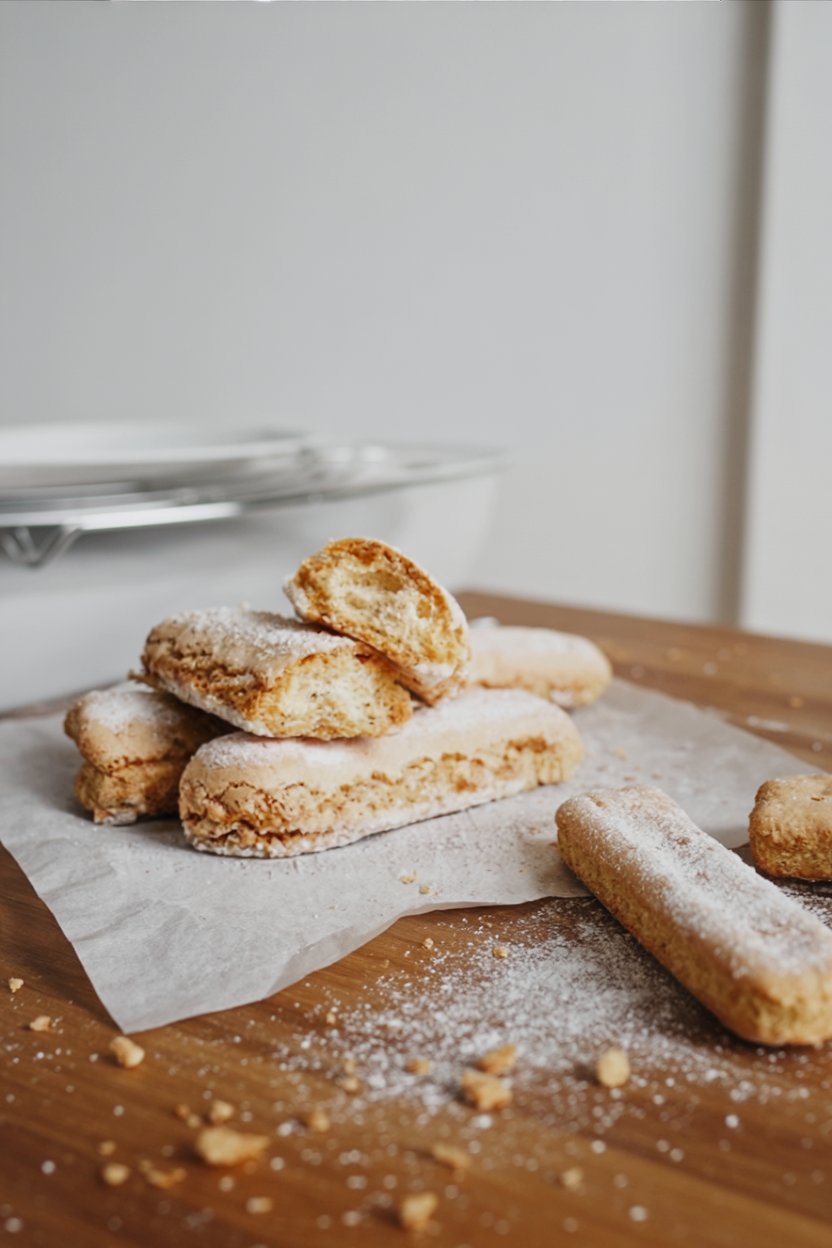
- Step 9: Cool and Crisp
- Nutritional Information
- Healthier Alternatives
- Serving Suggestions
- Common Mistakes to Avoid
- Storing Tips
- Conclusion
- FAQs
- Q1. Can I use a flour blend that already has xanthan gum?
- Q2. Why did my ladyfingers spread flat?
- Q3. Can I make these without a piping bag?
- Q4. Are these dairy-free?
- The Perfect Gluten Free Ladyfingers Recipe: Light & Crispy
This recipe yields light, airy, and perfectly crisp cookies that soak up espresso without disintegrating—the holy grail of gluten-free baking. We achieve this through a classic meringue method and a unique double-baking technique that dries them out to perfection. Whether you are building a show-stopping trifle or simply want a sweet treat to dip in your afternoon coffee, these homemade sponge fingers are a game-changer. Let’s reclaim your favorite desserts!
Ingredients
To achieve that iconic airy texture without wheat, we rely on a specific blend of gluten-free flours and the structure of whipped eggs. Here is what you need:
| Ingredient Category | Ingredient | Amount/Quantity |
| The Structure (Eggs) | Egg Yolks | 2 large (room temp) |
| Egg Whites | 3 large (room temp) | |
| Sweetener | Granulated Sugar | 5/8 cup (120 g), divided |
| Dry Ingredients | Plain Gluten-Free Flour Blend | 1 1/8 cup (140 g) *See note below |
| Cornstarch | 1 tbsp (10 g) | |
| Xanthan Gum | 1/4 tsp | |
| Baking Powder | 1 tsp | |
| The “Crunch” Dusting | Powdered Sugar | 1/2 cup (65 g) |
| Granulated Sugar | 1/2 cup (100 g) |

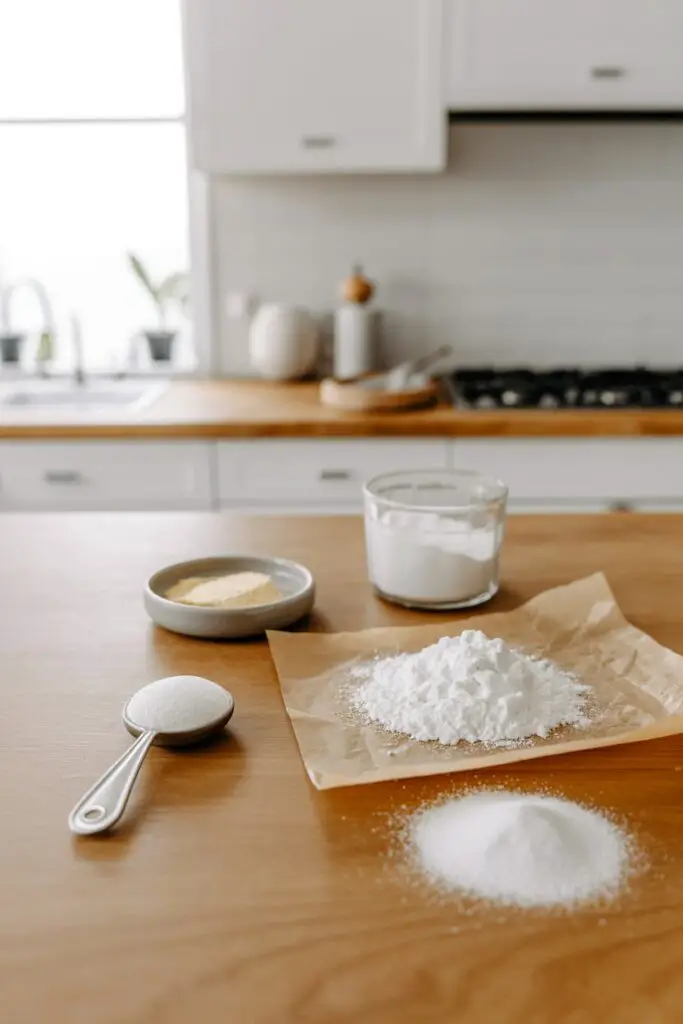
Note: For the flour blend, I used a simple store-bought mix of rice, potato, and maize flour containing no added xanthan gum. If your blend already has gum, omit the 1/4 tsp listed above.
Timing
These cookies require a bit of patience during the baking process to ensure they dry out properly, but the active prep time is short.
- Prep Time: 25 minutes
- Bake Time: 30 minutes (in two stages)
- Cooling Time: 15 minutes
- Total Time: ~70 minutes (About the same time as baking a standard cake, but worth it for the crunch!)
Step-by-Step Instructions
Step 1: Preheat and Prep
Preheat your oven to 355ºF (180ºC). Line two large baking sheets with baking parchment paper. This ensures the delicate meringue-based batter doesn’t stick.
Step 2: Whip the Yolks
In a stand mixer or using a hand mixer with a double beater attachment, whip the 2 egg yolks and half of the granulated sugar (approx. 60g). Continue whipping until the mixture has significantly increased in volume and has turned pale yellow and fluffy. This “ribbon stage” creates the base richness of the cookie.
Step 3: Create the Meringue
In a completely clean, separate bowl, whip the 3 egg whites with the remaining half of the granulated sugar. Beat on medium-high speed until you achieve a stiff-peak meringue. When you lift the beater, the whites should stand straight up without drooping. This air is essential for the lift, as gluten-free flour is naturally heavier.
Step 4: Fold the Eggs
Gently fold the whipped egg yolks into the stiff egg whites using a spatula. Use a gentle “under and over” motion. You want to incorporate the yellow into the white without knocking out the air bubbles you worked so hard to create. Stop mixing as soon as it is just incorporated.
Step 5: Incorporate Dry Ingredients
Sift the gluten-free flour blend, cornstarch, xanthan gum, and baking powder directly into the egg mixture. Sifting is non-negotiable here—it prevents heavy clumps from deflating your batter. Fold everything together gently until no flour streaks remain. Again, be extremely careful not to overmix and lose volume.
Step 6: Pipe the Ladyfingers
Transfer the batter into a piping bag fitted with a large round nozzle. The diameter of the nozzle dictates the thickness of your cookies, so choose according to your preference. Pipe lines of batter about 4 inches (10 cm) long onto the prepared baking sheets.
Tip: Leave about 3/4 inch (2 cm) of space between each cookie, as they will spread slightly while baking.
Step 7: The Double Dusting
Mix the powdered sugar and granulated sugar for the dusting topping. Using a small sieve, generously dust the piped ladyfingers with this sugar mixture. Don’t worry if sugar gets all over the baking paper; it will caramelize harmlessly. This sugar crust creates the signature crackly top of a classic Savoiardi.
Step 8: The Two-Stage Bake
This is the secret to crispness.
- Bake at 355ºF (180ºC) for 15 minutes.
- Reduce the oven temperature to 300ºF (150ºC) (do not open the door yet!) and bake for a further 12–15 minutes.
The second stage at a lower temperature dries out the center of the cookie without burning the outside, ensuring they snap rather than bend.
Step 9: Cool and Crisp

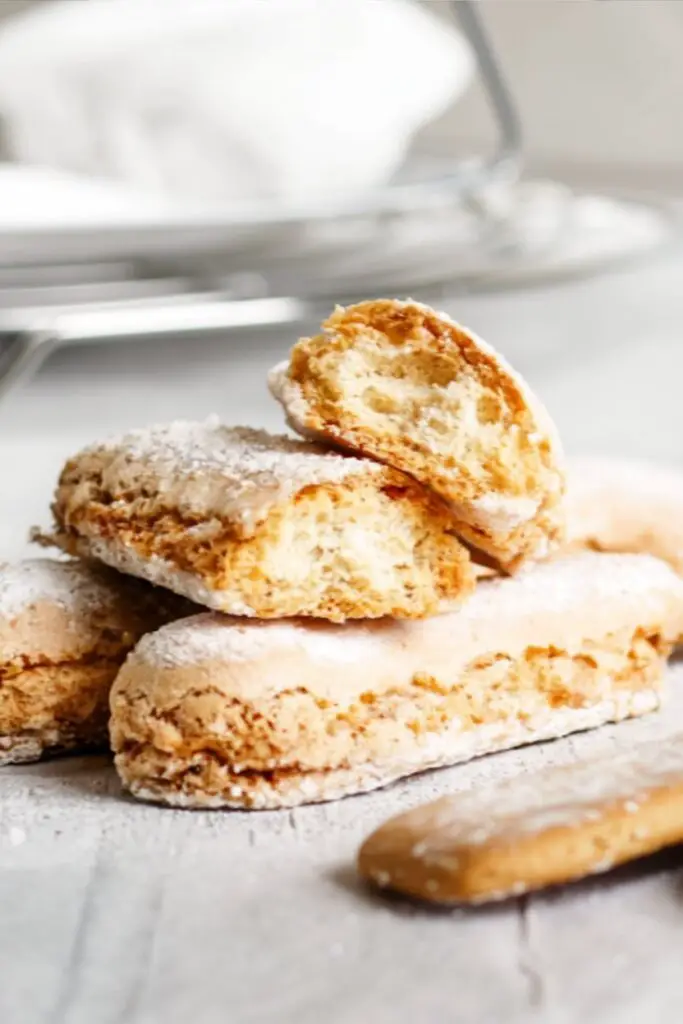
Remove from the oven and transfer the ladyfingers to a wire cooling rack. They will continue to crisp up as they cool. Enjoy them immediately or store them for your next dessert project!
Nutritional Information
Here is an estimated nutritional breakdown per serving (assuming the batch makes about 24 ladyfingers, serving size 2 cookies):
- Calories: ~90 kcal
- Carbohydrates: 18 g (Sugar: 12 g)
- Protein: 2 g
- Fat: 1 g
- Cholesterol: 30 mg
- Sodium: 25 mg
- Gluten: 0 g
Note: These are low in fat since they use no butter or oil, but the sugar content provides the energy and texture.
Healthier Alternatives
While these are a treat, there are ways to tweak the recipe for specific dietary needs:
- Lower Sugar: You can reduce the sugar in the batter by about 10-15% without ruining the structure, though they may be less glossy. For the dusting, you can use very fine granulated erythritol for a sugar-free crunch.
- Corn-Free: If you cannot tolerate corn, swap the cornstarch for arrowroot powder or potato starch in equal amounts.
- Whole Grain Blend: For a fiber boost, use a gluten-free flour blend that includes sorghum or brown rice flour, though be aware this will make the ladyfingers darker in color.
Serving Suggestions
These gluten free ladyfingers are versatile kitchen staples.
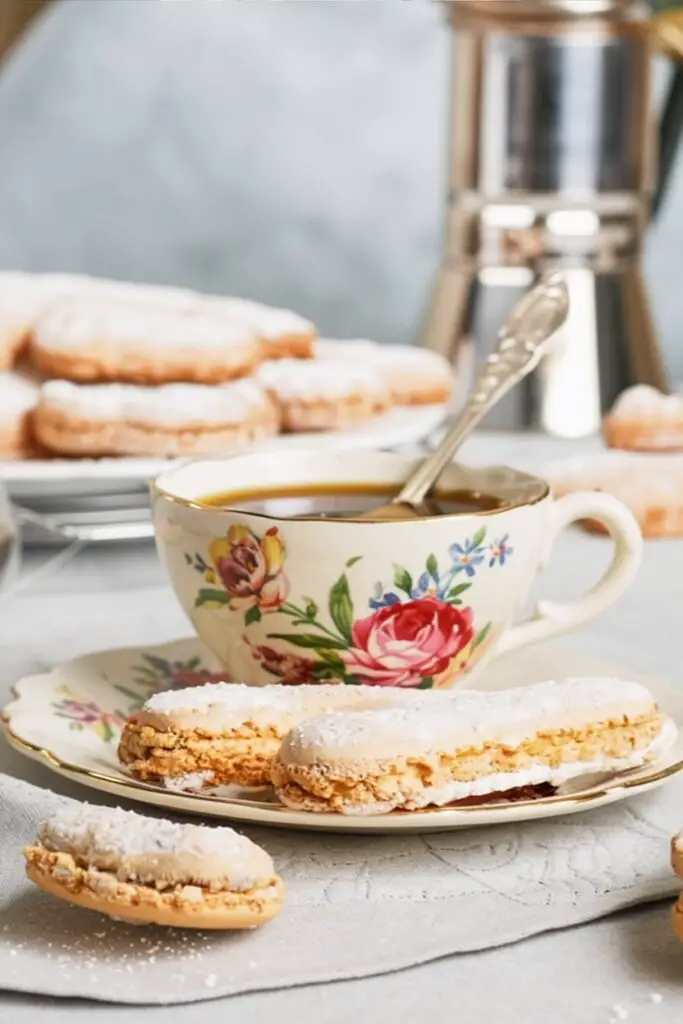
- Classic Tiramisu: This is their true calling. Their airy texture absorbs coffee and mascarpone cream perfectly without turning into mush.
- Fruit Trifle: Layer them with custard, sherry, and fresh berries for a stunning summer dessert.
- Charlotte Cake: Use them to line the outside of a mousse cake for an elegant French presentation.
- Coffee Companion: Serve them plain alongside an espresso or cappuccino for an authentic Italian breakfast experience.
Common Mistakes to Avoid
Gluten-free baking is chemistry. Avoid these pitfalls to ensure success:
- Over-folding the batter:
- The Mistake: Mixing vigorously until the batter is smooth and liquid.
- Solution: Stop folding the moment the flour disappears. The batter should look foamy and thick, not runny.
- Skipping the Sifting:
- The Mistake: Dumping the flour straight in.
- Solution: Gluten-free flour clumps easily. Sifting ensures a light sponge.
- Under-baking:
- The Mistake: Taking them out after the first 15 minutes because they look done.
- Solution: They will be soft inside if you skip the second drying stage. Trust the timing to get that necessary snap.
- Crowding the Pan:
- The Mistake: Piping them too close together.
- Solution: They will puff up! Give them room to breathe so they bake evenly.
Storing Tips
Since we have dried these out thoroughly, they have an excellent shelf life compared to other GF baked goods.
- Room Temperature: Store the completely cooled ladyfingers in an airtight container (like a tin or Tupperware) in a cool, dry place. They will keep well for 1–2 weeks.
- Avoid Moisture: Do not store them in the fridge, as the humidity will make them soft and sticky.
- Freezing: You can freeze these in a freezer-safe bag for up to 2 months. Thaw at room temperature for 15 minutes before using in a recipe.
Conclusion
There is no reason a gluten-intolerance should stand between you and a delicious dessert. These Perfect Gluten Free Ladyfingers are a testament to the fact that with the right technique—specifically the egg separation and double baking—you can recreate the classics.
They are crisp, sweet, and airy, ready to be soaked in espresso for your next Tiramisu or enjoyed on their own. Try it out and let us know in the comments how they turned out for you! Did you use them in a dessert or eat them straight off the tray? We’d love to hear your feedback. Don’t forget to rate the recipe and subscribe to our blog for more gluten-free baking secrets delivered to your inbox.
FAQs
Q1. Can I use a flour blend that already has xanthan gum?
Yes, absolutely. If your store-bought blend lists xanthan gum as an ingredient, simply omit the 1/4 teaspoon called for in the recipe. Adding too much gum can make the cookies gummy rather than crisp.
Q2. Why did my ladyfingers spread flat?
This usually happens for two reasons: either the egg whites weren’t whipped to stiff enough peaks, or the batter was over-mixed when folding in the flour, knocking out the air bubbles. Be gentle and ensure your meringue is strong!
Q3. Can I make these without a piping bag?
If you don’t have a piping bag, you can use a large Ziploc bag with the corner snipped off. However, for the most professional “finger” shape, a piping bag with a round nozzle is best. In a pinch, you can spoon rounds onto the sheet for “sponge drops” instead of fingers.
Q4. Are these dairy-free?
Yes! The recipe naturally contains no butter or milk. It relies entirely on eggs for fat and structure, making it safe for those who are both gluten and dairy-free.
PrintThe Perfect Gluten Free Ladyfingers Recipe: Light & Crispy
- Total Time: 1 hour 10 minutes
- Yield: 12 servings (2 cookies each) 1x
Description
Airy, crisp, and espresso-ready: these gluten-free savoiardi use a classic yolk-and-meringue base plus a two‑stage bake for the perfect snap. Ideal for tiramisu, trifles, or coffee-dipping.
Ingredients
The Structure (Eggs)
- 2 large egg yolks (room temperature)
- 3 large egg whites (room temperature)
Sweetener
- 5/8 cup granulated sugar, divided (about 120 g; half for yolks, half for whites)
Dry Ingredients
- 1 1/8 cup plain gluten‑free flour blend (no added xanthan gum)
- 1 tbsp cornstarch
- 1/4 tsp xanthan gum (omit if blend already contains gum)
- 1 tsp baking powder
The “Crunch” Dusting
- 1/2 cup powdered sugar
- 1/2 cup granulated sugar
Instructions
- Preheat & Prep: Heat oven to 355°F (180°C). Line two large baking sheets with parchment.
- Whip Yolks: Beat yolks with half the granulated sugar (about 60 g) until pale, thick, and tripled in volume (ribbon stage).
- Make Meringue: In a clean bowl, beat whites to soft peaks. Gradually add remaining granulated sugar; whip to stiff, glossy peaks.
- Fold Eggs: Gently fold yolk mixture into meringue with a spatula until just combined, keeping as much air as possible.
- Sift & Fold Dries: Sift flour blend, cornstarch, xanthan gum, and baking powder over the foam. Fold gently until no streaks remain.
- Pipe: Transfer batter to a piping bag with a large round tip. Pipe 4-inch (10 cm) lines, leaving 3/4 inch (2 cm) between cookies.
- Double Dust: Combine powdered sugar and granulated sugar. Sieve generously over piped fingers to create a crackly crust.
- Two‑Stage Bake: Bake 15 minutes at 355°F (180°C). Without opening the door, lower to 300°F (150°C) and bake 12–15 minutes more to dry the centers.
- Cool & Crisp: Transfer to a wire rack; cool 15 minutes. Cookies firm up as they cool. Store airtight once fully cool.
Notes
Flour blend note: if using a GF blend that already contains xanthan gum, omit the listed gum. For ultra‑dry tiramisu fingers, return cooled cookies to a 225°F (110°C) oven for 10–15 minutes, then cool again before storing.
- Prep Time: 25 minutes
- Cook Time: 30 minutes
- Category: Baking, Dessert
- Cuisine: Italian
Nutrition
- Calories: 90
- Sugar: 12
- Sodium: 25
- Fat: 1
- Carbohydrates: 18
- Protein: 2
- Cholesterol: 30