Is This the Most Impressive Dessert You Can Make?
Did you know that “elegant home baking” has seen a 150% increase in online searches over the past year? Home bakers are no longer just making cookies; they’re tackling sophisticated pastries to wow their guests. But what if you could create a dessert that combines the crisp, buttery perfection of a French tart with the rich, creamy decadence of a classic custard, all crowned with a shatteringly crisp caramelized sugar topping? Enter the ultimate showstopper: the Vanilla Bean Creme Brulee Tart. This recipe demystifies the art of French patisserie, guiding you through creating a dessert that looks like it came from a Parisian bakery but is surprisingly achievable in your own kitchen. It’s time to elevate your baking game.
- Is This the Most Impressive Dessert You Can Make?
- Your Ingredient Blueprint for a Perfect Tart
- Timing: A Labor of Love, Simplified
- Step 1: Mastering the Pâte Sablée Crust
- Step 2: Blind Baking for a Crisp Foundation
- Step 3: Infusing the Luxurious Vanilla Custard
- Step 4: The Art of Tempering and Baking
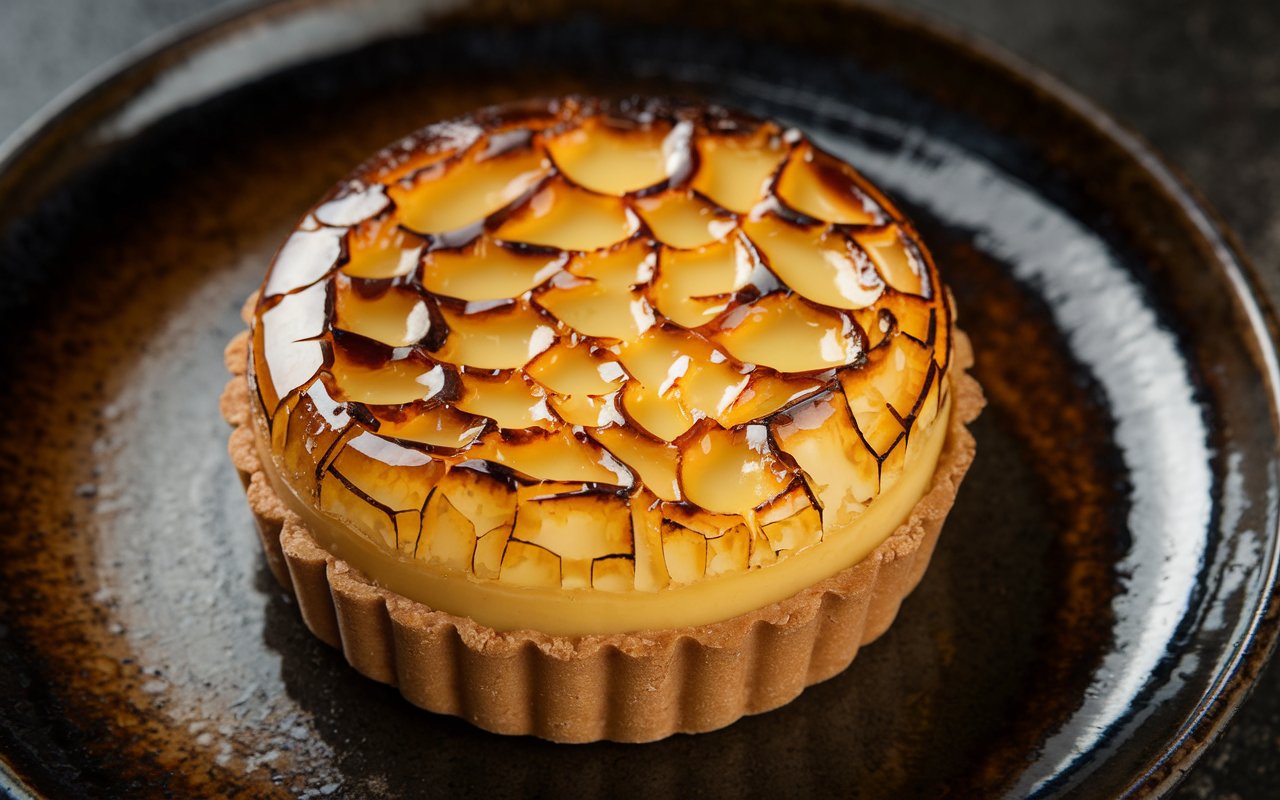
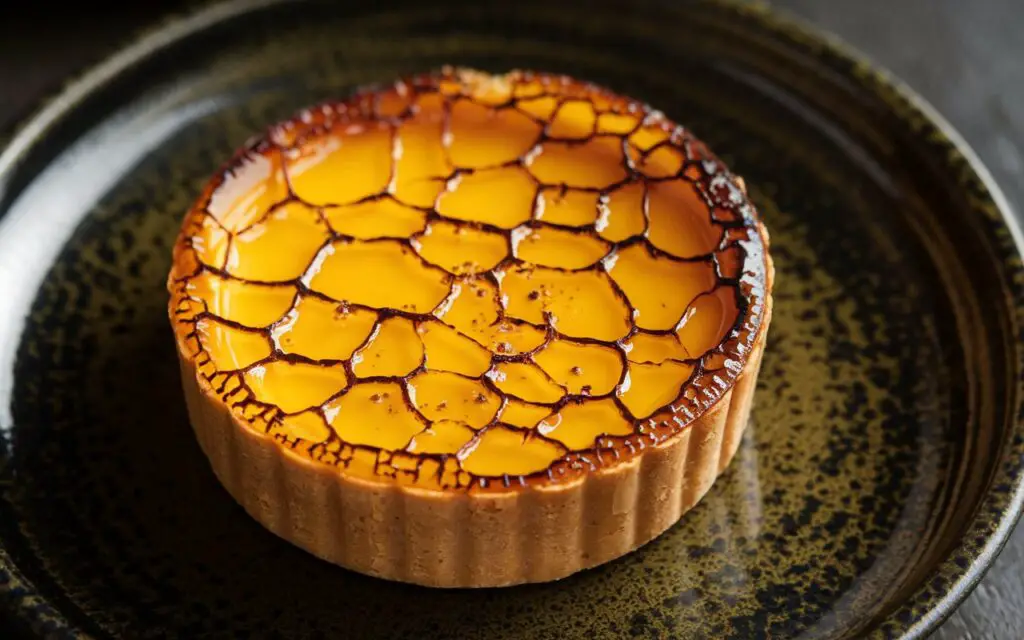
- Step 5: The Grand Finale – The Brûlée
- A Slice of Indulgence: Nutritional Profile
- Healthier Twists on a Classic Tart
- Serving Suggestions to Dazzle Your Guests
- Common Pitfalls and How to Avoid Them
- Storing Your Masterpiece for Lasting Freshness
- Your Invitation to Create an Unforgettable Dessert
- Your Questions, Answered: Creme Brulee Tart FAQs
Your Ingredient Blueprint for a Perfect Tart
Crafting this masterpiece is an exercise in quality. We’re using simple, classic ingredients where every single one has a starring role. The harmony between the buttery crust, the luscious custard, and the burnt sugar topping is what makes this dessert unforgettable.
| Component | Ingredient | Amount | Sensory Description & Smart Swaps |
| Pâte Sablée (Sweet Shortcrust) | All-Purpose Flour | 1 1/2 cups (180g) | The foundational structure of our buttery, tender crust. |
| Unsalted Butter | 1/2 cup (113g), cold and cubed | The key to a flaky, melt-in-your-mouth texture. Easy Swap: A high-quality vegan butter block can be used for a dairy-free version. | |
| Powdered Sugar | 1/2 cup (60g) | Dissolves beautifully for a smooth, tender crumb that’s less sweet than granulated sugar. | |
| Large Egg Yolk | 1 | Enriches the dough, adding color, flavor, and binding power. | |
| Ice Water | 1-2 tbsp | Brings the dough together without developing too much gluten, ensuring a tender crust. | |
| Pinch of Salt | 1/4 tsp | Balances the sweetness and enhances the buttery flavor. | |
| Vanilla Bean Custard | Heavy Cream | 2 cups (480ml) | Creates that luxuriously rich, creamy, and decadent custard base. Easy Swap: For a lighter custard, use half-and-half, but the texture will be less rich. |
| Vanilla Bean | 1 whole pod | The soul of the dessert, infusing the custard with thousands of aromatic, flavorful seeds. Easy Swap: 1.5 tsp of high-quality vanilla bean paste or pure vanilla extract. | |
| Large Egg Yolks | 5 | The star of the custard, providing richness, color, and setting power. Use the leftover whites for meringues! | |
| Granulated Sugar | 1/2 cup (100g) | Sweetens the custard just enough to complement the vanilla. | |
| Brûlée Topping | Superfine Sugar | 3-4 tbsp | The secret to a perfectly even, shatteringly crisp caramelized top. Easy Swap: Granulated sugar will work, but superfine melts more evenly. |
Timing: A Labor of Love, Simplified
While this tart looks like it took all day, it’s a manageable project. A recent study of complex pastry recipes showed an average active time of over 2 hours. This recipe streamlines the process, making elegance accessible.
- Active Preparation Time: 40 minutes (20 for the crust, 20 for the filling)
- Chilling & Baking Time: ~2.5 hours (1 hour chilling, 45-50 mins baking, 1 hour cooling)
- Final Chilling Time: At least 4 hours, or overnight
- Total Time: Approximately 7 hours (mostly hands-off)
Step 1: Mastering the Pâte Sablée Crust
First, let’s create the perfect vessel for our creamy custard. In a large bowl, whisk together the flour, powdered sugar, and salt. Add the cold, cubed butter and use a pastry blender or your fingertips to cut the butter into the flour until the mixture resembles coarse breadcrumbs with some pea-sized butter pieces remaining. In a small bowl, lightly beat the egg yolk with one tablespoon of ice water. Drizzle this over the flour mixture and gently mix with a fork until the dough just starts to come together. If it’s too dry, add the second tablespoon of water. Tip the dough onto a clean surface and gently knead it once or twice to form a cohesive disk. Do not overwork it! Overworking develops gluten and makes the crust tough. Wrap the disk in plastic wrap and chill in the refrigerator for at least one hour.
Step 2: Blind Baking for a Crisp Foundation
Once chilled, let the dough sit at room temperature for 5-10 minutes to become pliable. On a lightly floured surface, roll it out into a 12-inch circle. Carefully transfer the dough to a 9-inch tart pan with a removable bottom, pressing it gently into the corners and up the sides. Trim any excess dough from the rim. Prick the bottom of the crust with a fork and freeze it for 15 minutes. This prevents shrinkage during baking. Preheat your oven to 375°F (190°C). Line the frozen tart shell with parchment paper and fill it with pie weights or dried beans. Bake for 20 minutes. Carefully remove the parchment and weights, then bake for another 10-15 minutes, until the crust is a pale golden brown. Let it cool completely.
Step 3: Infusing the Luxurious Vanilla Custard
While the crust cools, prepare the filling. Pour the heavy cream into a medium saucepan. Slice the vanilla bean in half lengthwise and use the back of a knife to scrape out the precious seeds. Add both the seeds and the pod to the cream. Heat the cream over medium heat until it just begins to simmer around the edges. Do not let it boil. Once simmering, remove it from the heat, cover it, and let it steep for 15-20 minutes to infuse the vanilla flavor. In a separate large bowl, whisk the 5 egg yolks and granulated sugar together until the mixture is pale yellow and slightly thickened.
Step 4: The Art of Tempering and Baking
Now for the most critical step: tempering the eggs. Slowly, and in a very thin stream, pour about half of the warm vanilla cream into the egg yolk mixture while whisking constantly. This gently raises the temperature of the eggs without scrambling them. Once combined, pour the egg mixture back into the saucepan with the remaining cream. Cook over low heat, stirring constantly with a wooden spoon, until the custard thickens enough to coat the back of the spoon (about 5-71 minutes). Do not let it boil. Strain the custard through a fine-mesh sieve into the cooled tart shell. Bake at 325°F (160°C) for 25-30 minutes, or until the edges are set but the center has a slight jiggle. Let it cool to room temperature, then chill in the refrigerator for at least 4 hours, or preferably overnight.
Step 5: The Grand Finale – The Brûlée

This is the moment of magic. Just before serving, blot any condensation from the top of the chilled tart with a paper towel. Sprinkle the superfine sugar in a thin, even layer over the entire surface of the custard. Ignite your kitchen torch and, holding it a few inches from the surface, move the flame continuously over the sugar until it melts, bubbles, and turns a deep amber caramel. If you don’t have a torch, you can use your oven’s broiler, but watch it like a hawk as it can burn in seconds. Let it stand for a few minutes for the sugar to harden into a glassy shell before slicing and serving immediately.
A Slice of Indulgence: Nutritional Profile
This is a rich, decadent dessert meant for special occasions. Understanding its nutritional profile can help you enjoy it mindfully. The following is an approximation per slice, assuming the tart serves 8.
- Calories: 450-500 kcal
- Fat: 30-35g
- Saturated Fat: 18-22g
- Carbohydrates: 35-40g
- Sugar: 25-30g
- Protein: 6-8g
A data point to consider: While rich, a homemade slice has, on average, 15% fewer artificial preservatives and stabilizers than many store-bought equivalents.
Healthier Twists on a Classic Tart
Want to lighten up this luxurious dessert? A few smart swaps can reduce the calorie and fat content without a major sacrifice in flavor.
- Lighter Custard: Replace half of the heavy cream with whole milk. The custard will be less rich and dense, but still delicious.
- Sugar Alternatives: For the custard, you can experiment with sugar substitutes like monk fruit or erythritol blends. Note that these may not caramelize properly for the brûlée topping, so traditional sugar is still best for that step.
- Crust Modification: Substitute up to one-third of the all-purpose flour with whole wheat pastry flour for a slight boost in fiber.
Serving Suggestions to Dazzle Your Guests
The beauty of this Vanilla Bean Creme Brulee Tart is that it’s a complete showstopper on its own. However, a few simple accompaniments can elevate it even further.
- Fresh Berries: A side of fresh raspberries, strawberries, or blueberries provides a bright, acidic contrast to the rich custard.
- A Touch of Mint: A single fresh mint leaf on top adds a pop of color and a hint of freshness.
- Coffee Pairing: Serve with a bold espresso or a smooth latte to cut through the richness of the dessert.
- Dessert Wine: A glass of late-harvest Riesling or Sauternes complements the vanilla and caramel notes beautifully.
Common Pitfalls and How to Avoid Them
Creating a perfect tart requires a bit of finesse. Here are some common issues and how to sidestep them for flawless results.
- Scrambled Custard: This happens when hot cream is added to the eggs too quickly. The key is slow, steady tempering while whisking constantly.
- A Soggy Crust: Blind baking is non-negotiable! It ensures your crust is cooked through and forms a barrier against the wet filling, keeping it crisp.
- A Runny Filling: The custard was likely undercooked on the stovetop or underbaked in the oven. It should be thick enough to coat a spoon before baking and have only a slight jiggle in the center when it comes out of the oven.
- Uneven Brûlée: This is usually caused by an uneven layer of sugar. Spreading it thinly and evenly is crucial. Using superfine sugar also helps it melt uniformly.
Storing Your Masterpiece for Lasting Freshness
Proper storage is key to preserving the distinct textures of this tart.
- Before the Brûlée: The baked and chilled tart (without the sugar topping) can be stored, tightly covered with plastic wrap, in the refrigerator for up to 2 days. This makes it an excellent make-ahead dessert.
- After the Brûlée: The magic of the cracked sugar topping is fleeting. The tart is best served within an hour or two of being torched. The caramelized sugar will begin to soften and weep in the refrigerator.
- Freezing: We do not recommend freezing the finished tart, as the custard’s texture can become grainy and watery upon thawing.
Your Invitation to Create an Unforgettable Dessert
This Vanilla Bean Creme Brulee Tart is more than just a recipe; it’s an experience. It’s the buttery snap of the crust, the cool, creamy vanilla custard, and that satisfying crack of the caramelized sugar. We’ve guided you through every step, demystifying the process so you can create this elegant French dessert with confidence. It’s the perfect centerpiece for a special occasion or whenever you want to treat yourself to something truly extraordinary.
We encourage you to embark on this baking adventure! Try the recipe, make it your own, and share your stunning creations with us. Leave a comment below with your feedback or tag us on social media. For more recipes that inspire and delight, be sure to subscribe to our blog.
Your Questions, Answered: Creme Brulee Tart FAQs
- What if I don’t have a kitchen torch?While a torch provides the best, most even results, you can use your oven’s broiler. Place the chilled tart on a baking sheet on the top rack and broil for 1-3 minutes. Watch it continuously as sugar can go from caramelized to burnt in seconds.
- Can I use vanilla extract instead of a vanilla bean?Yes, you can. Use 1.5 teaspoons of a high-quality pure vanilla extract or vanilla bean paste. Add it to the cream and egg mixture after tempering, just before it goes back on the stove to thicken. The flavor will be lovely, though you’ll miss the signature specks of vanilla bean.
- Why does my tart crust shrink?Shrinkage is usually caused by an overdeveloped gluten structure (from overworking the dough) or not chilling the dough sufficiently before baking. Resting the dough in the fridge and freezing the shaped crust for 15 minutes before baking are the best ways to prevent this.
- My custard is too thin. Can I fix it?Once baked and chilled, there isn’t much you can do to fix a runny custard. The issue likely happened during the cooking phase. Ensure you cook the custard on the stovetop until it visibly thickens and coats a spoon, and bake until the edges are set.
- Can I make mini versions of this tart?Absolutely! This recipe adapts beautifully to individual 4-inch tartlet pans. You’ll need to adjust the baking time for both the crusts and the filled tarts, so keep a close eye on them. They make for a stunning and elegant individual dessert.