There are few culinary experiences as universally beloved as biting into a perfect piece of fried chicken. I’m talking about that shatteringly crisp, golden-brown crust that gives way to incredibly tender, juicy meat inside. It’s the stuff of legends, family picnics, and Sunday dinners. But for many home cooks, achieving that restaurant-quality crunch can feel like an impossible task. That’s why this recipe for the ultimate Crispy Fried Chicken is such a game-changer. Forget complicated marinades or secret ingredients. This straightforward, classic recipe uses a simple double-dredging technique to create an extra-crunchy coating that locks in moisture and flavor. This is the only recipe you’ll ever need to master the art of homemade fried chicken.
- Ingredients
- Timing
- Step-by-Step Instructions
- Step 1: Prepare Your Dredging Stations
- Step 2: Mix the Seasoned Flour Dredge
- Step 3: Create the Wet Batter
- Step 4: Heat the Frying Oil
- Step 5: Double-Coat the Chicken
- Step 6: Fry to Golden-Brown Perfection
- Step 7: Drain and Rest the Chicken
- Nutritional Information
- Healthier Alternatives
- Serving Suggestions
- Common Mistakes to Avoid
- Storing and Reheating Tips
- Conclusion
- FAQs
- Q1. Can I brine the chicken before frying?
- Q2. What is the best type of oil for frying chicken?
- Q3. How can I tell if the chicken is cooked through without a thermometer?
- Q4. Can I make this recipe gluten-free?
- The Ultimate Crispy Fried Chicken Recipe (Extra Crunchy!)
Ingredients
This recipe relies on a simple, perfectly balanced blend of pantry-staple seasonings to create its signature flavor.
| Ingredient | Amount/Quantity | Notes |
| All-Purpose Flour | 4 cups | Divided for the two dredging steps. |
| Garlic Salt | 2 tablespoons | |
| Paprika | 1 tablespoon | For color and a mild, sweet flavor. |
| Black Pepper | 3 teaspoons | Divided. |
| Poultry Seasoning | 2½ teaspoons | A classic blend of savory herbs. |
| Large Eggs | 2 | |
| Water | 1½ cups | |
| Salt | 1 teaspoon | |
| Broiler/Fryer Chickens | 2 (3½ to 4 lbs each) | Each chicken cut into 8 pieces. |
| Oil for Deep-Frying | About 4-6 cups, like vegetable or peanut oil. |

Timing
Creating legendary fried chicken takes a little time, but the process is simple and the payoff is huge.
- Preparation Time: 20 minutes
- Cook Time: Approximately 45-60 minutes (frying in batches)
- Total Time: Approximately 1 hour 20 minutes
Step-by-Step Instructions
Follow these steps closely to achieve that perfectly golden, extra-crispy fried chicken every single time.
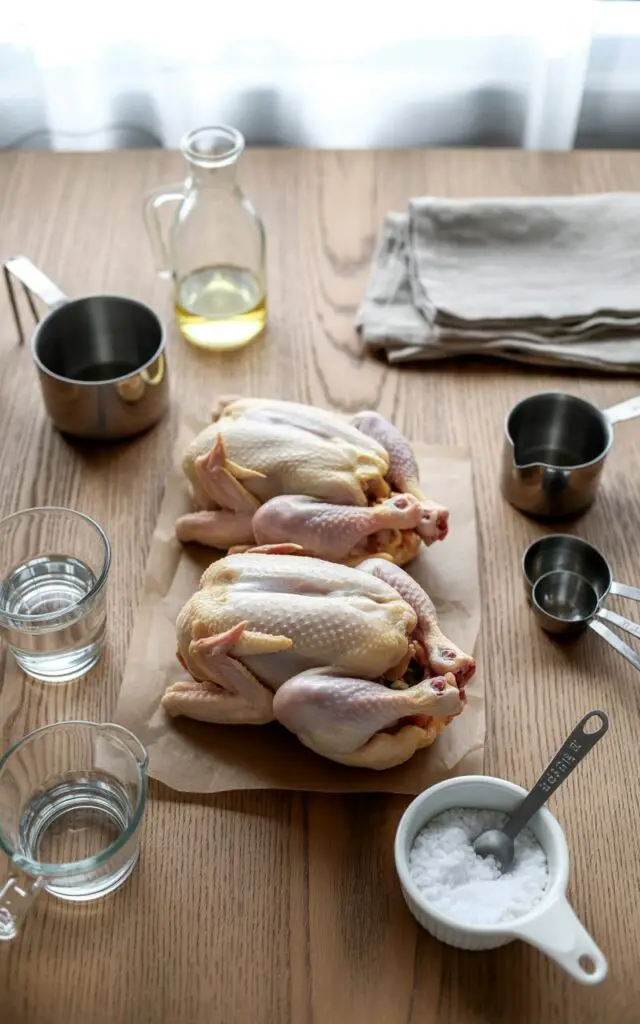
Step 1: Prepare Your Dredging Stations
To get organized, you’ll need two large, shallow dishes (like pie plates or baking dishes). One will be for your seasoned flour mixture, and the other will be for your wet egg batter. Having these stations ready makes the coating process smooth and mess-free.
Step 2: Mix the Seasoned Flour Dredge
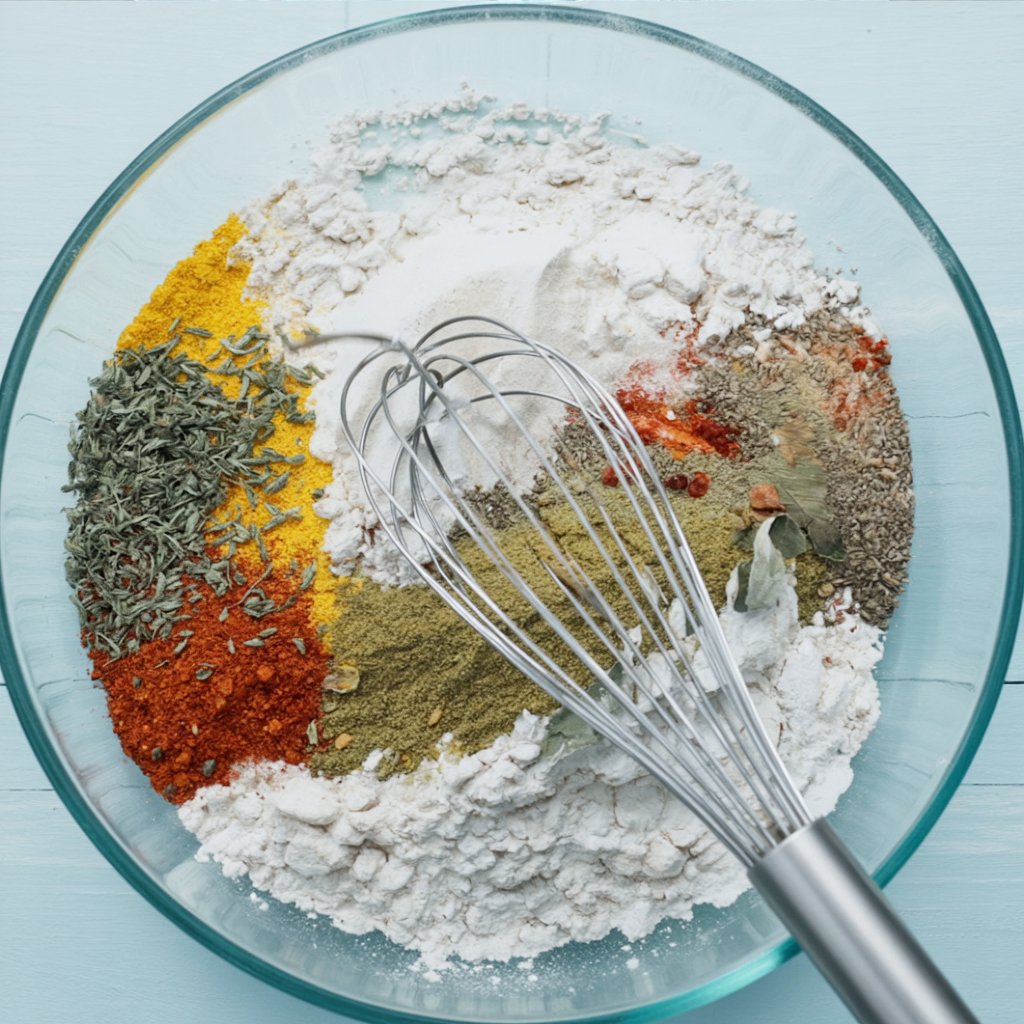
In the first shallow dish, combine 2⅔ cups of the all-purpose flour, the garlic salt, paprika, 2½ teaspoons of black pepper, and the poultry seasoning. Whisk everything together until the spices are evenly distributed throughout the flour. This is your primary coating and the source of that savory, crunchy crust.
Step 3: Create the Wet Batter
In the second shallow dish, whisk the 2 large eggs and 1½ cups of water until they are frothy and uniform. Add the 1 teaspoon of salt, the remaining 1⅓ cups of flour, and the remaining ½ teaspoon of black pepper. Continue to whisk until you have a smooth, pancake-like batter.
Step 4: Heat the Frying Oil
In a large Dutch oven, a heavy-bottomed pot, or an electric deep-fat fryer, pour in your oil to a depth of about 2-3 inches. Heat the oil over medium-high heat until it reaches 375°F (190°C). Tip: Using a thermometer is the best way to guarantee your oil is at the perfect temperature. Too hot, and the crust will burn before the inside is cooked; too cool, and the chicken will be greasy.
Step 5: Double-Coat the Chicken
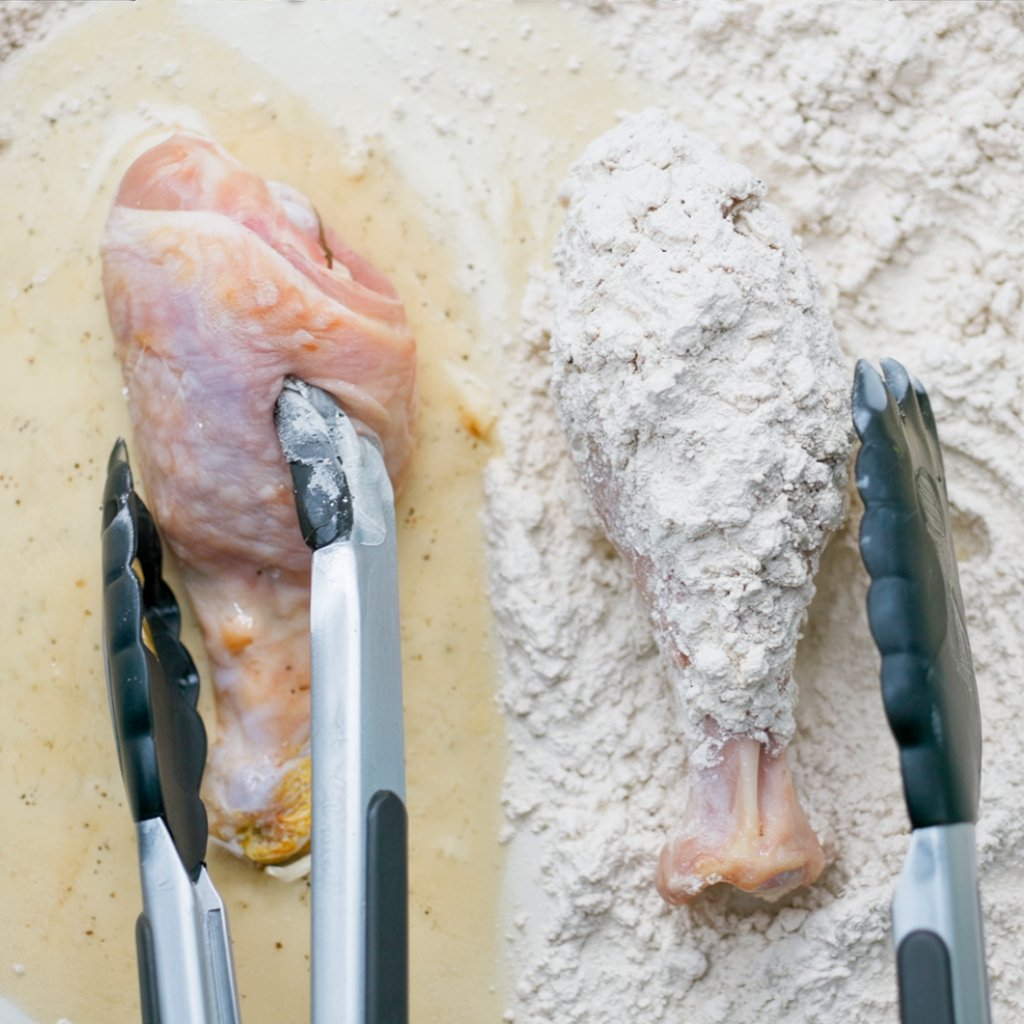
Working with one piece of chicken at a time, first dip it into the wet egg batter, allowing any excess to drip off. Next, immediately place it in the seasoned flour mixture. Turn the chicken several times, pressing gently to ensure a thick, even coating covers the entire surface. Place the coated chicken on a wire rack and repeat with the remaining pieces.
Step 6: Fry to Golden-Brown Perfection
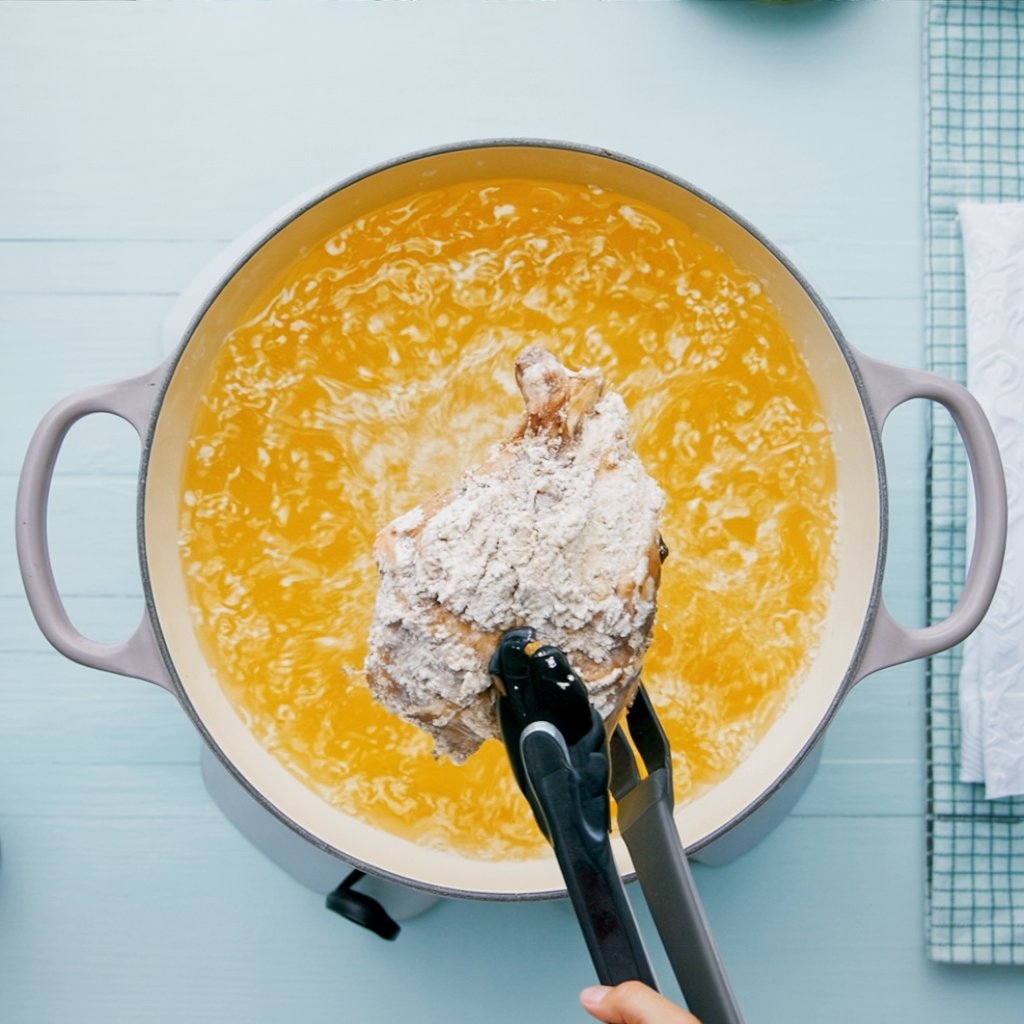
Carefully place several pieces of chicken into the hot oil, being sure not to overcrowd the pot. Fry the chicken for 7-8 minutes on each side. The chicken is done when it’s a deep golden brown, the crust is crispy, and the juices run clear. Use tongs to carefully flip the chicken only once during cooking to avoid disturbing the crust.
Step 7: Drain and Rest the Chicken
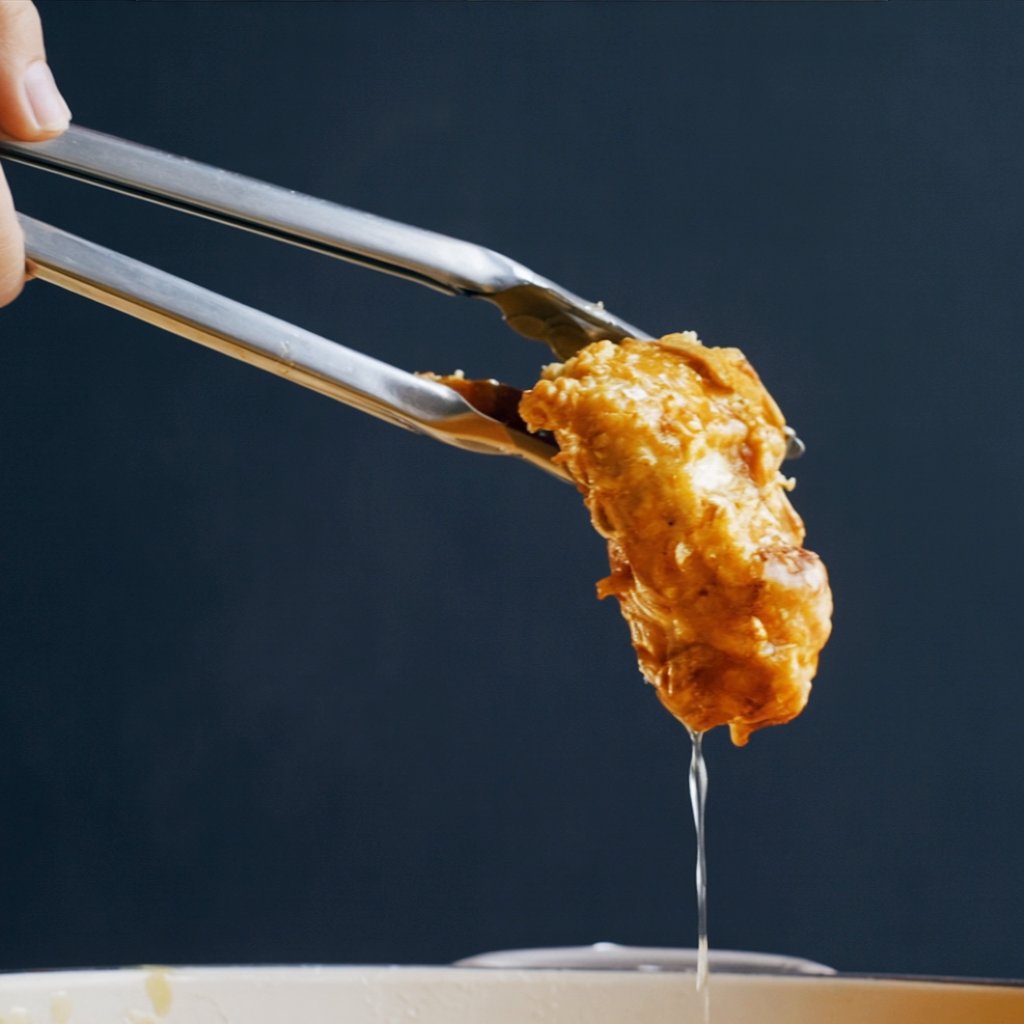
Once cooked, remove the chicken from the oil and let it drain on paper towels or, even better, a wire rack placed over a baking sheet. This allows air to circulate, keeping the bottom crust from getting soggy. Repeat the frying process with the remaining chicken, making sure the oil returns to 375°F between batches.
Nutritional Information
Here is the nutritional breakdown per serving, based on 5 ounces of cooked chicken.
- Calories: 543 kcal
- Protein: 41 g
- Fat: 33 g
- Saturated Fat: 7 g
- Carbohydrates: 17 g
- Fiber: 1 g
- Sugars: 0 g
- Cholesterol: 137 mg
- Sodium: 798 mg
Healthier Alternatives
While this is an indulgent classic, here are a few ways to lighten it up.
- Oven-Baked “Fried” Chicken: For a lower-fat version, coat the chicken as directed and place it on a wire rack set inside a baking sheet. Bake at 400°F (200°C) for 40-50 minutes, flipping halfway through, until golden and cooked through.
- Air Fryer Method: Place the coated chicken in a single layer in your air fryer basket. Spray generously with cooking oil. Air fry at 380°F (193°C) for 20-25 minutes, flipping halfway through, until the chicken is crispy and cooked.
- Use Whole Wheat Flour: You can substitute half of the all-purpose flour with whole wheat flour for a bit of added fiber. This will result in a slightly darker, nuttier-tasting crust.
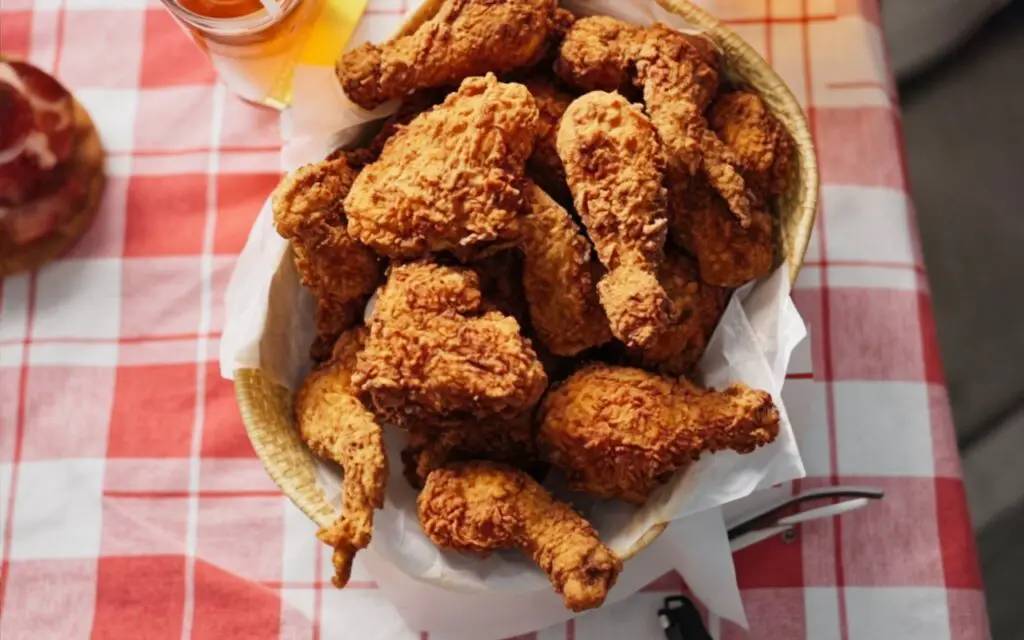
Serving Suggestions
This crispy fried chicken is the star of any classic comfort food meal.
- The Classic Plate: Serve it hot with creamy mashed potatoes, savory gravy, a side of coleslaw, and fluffy buttermilk biscuits.
- Picnic Perfect: This chicken is just as delicious served cold, making it the perfect centerpiece for a picnic or outdoor gathering.
- For a Crowd: It’s an undeniable crowd-pleaser for Sunday dinners, potlucks, and game day parties.
Common Mistakes to Avoid
Achieve fried chicken perfection by avoiding these common pitfalls.
- Incorrect Oil Temperature: This is the most critical factor. Solution: Invest in a deep-fry or candy thermometer. Constantly monitor the oil and adjust the heat to maintain a steady 375°F (190°C) throughout the frying process.
- Crowding the Pot: Adding too many pieces at once drastically lowers the oil temperature, resulting in soggy, greasy chicken. Solution: Fry in batches of 3-4 pieces at a time, making sure there is plenty of space for the oil to circulate around each piece.
- The Coating Falls Off: This can happen if the chicken isn’t dredged properly or is handled too aggressively in the oil. Solution: After coating, let the chicken rest on a wire rack for a few minutes to help the coating adhere. When frying, use tongs to gently turn the chicken only once.
Storing and Reheating Tips
Enjoying leftover fried chicken is one of life’s simple pleasures!
- Refrigerating: Store leftover chicken in the refrigerator for up to 4 days. To keep the crust from getting soggy, let it cool completely and then store it in a container with a loosely fitting lid or a paper bag.
- Reheating for Maximum Crispiness: The best way to reheat fried chicken is in the oven or an air fryer. Place the chicken on a wire rack and heat at 375°F (190°C) for 10-15 minutes, until it’s warmed through and the skin is crispy again. Avoid the microwave, which will make the crust soft.
Conclusion
Mastering the art of homemade Crispy Fried Chicken is a kitchen skill that will bring joy for years to come. This recipe proves that you don’t need a long list of complicated ingredients to achieve that iconic, extra-crunchy crust and perfectly juicy meat. With its simple seasonings and foolproof double-dredging technique, this is a timeless recipe destined to become a family favorite.
We hope you enjoy making—and devouring—this incredible fried chicken! Give it a try and let us know how it turned out in the comments below. We’d love to hear your feedback. Don’t forget to rate the recipe and subscribe for more classic comfort food ideas!
FAQs
Q1. Can I brine the chicken before frying?
Absolutely! Brining the chicken in a saltwater solution or buttermilk for 4-24 hours before you begin is a fantastic way to ensure the meat is extra juicy and flavorful. Just be sure to pat the chicken completely dry before starting the coating process.
Q2. What is the best type of oil for frying chicken?
The best oils for frying have a high smoke point. Neutral-flavored oils like vegetable, canola, or peanut oil are all excellent choices for frying chicken.
Q3. How can I tell if the chicken is cooked through without a thermometer?
The most reliable way is with a meat thermometer (it should read 165°F / 74°C). However, if you don’t have one, you can pierce the thickest part of the chicken with a knife. The juices should run clear, not pink. The chicken should also be a deep golden brown on the outside.
Q4. Can I make this recipe gluten-free?
Yes, you can adapt this recipe to be gluten-free. Substitute the all-purpose flour with a good-quality, measure-for-measure gluten-free flour blend. The texture of the crust may be slightly different, but it will still be delicious and crispy.
Print
The Ultimate Crispy Fried Chicken Recipe (Extra Crunchy!)
- Total Time: 1 hour 20 minutes
- Yield: 8 servings 1x
Description
Double-dredged and deep-fried for a shatteringly crisp crust with juicy, tender meat inside. Pantry spices keep the flavor classic and irresistible.
Ingredients
Seasoned Flour Dredge
- 2 2/3 cups all-purpose flour
- 2 tbsp garlic salt
- 1 tbsp paprika (for color and mild sweetness)
- 2 1/2 tsp black pepper
- 2 1/2 tsp poultry seasoning
Wet Batter
- 2 large eggs
- 1 1/2 cups water
- 1 tsp salt
- 1 1/3 cups all-purpose flour
- 1/2 tsp black pepper
Chicken & Frying
- 2 broiler/fryer chickens (3 1/2–4 lb each), cut into 8 pieces
- 4–6 cups oil for deep-frying (vegetable or peanut oil)
Instructions
- Prepare dredging stations: Set out two shallow dishes—one for the seasoned flour and one for the wet batter—to keep coating tidy and efficient.
- Mix seasoned flour: In the first dish, whisk together 2 2/3 cups flour, garlic salt, paprika, 2 1/2 tsp black pepper, and poultry seasoning.
- Make wet batter: In the second dish, whisk eggs and water until frothy. Add salt, 1 1/3 cups flour, and 1/2 tsp black pepper; whisk to a smooth, pancake-like batter.
- Heat oil: Pour oil into a Dutch oven or deep fryer to a depth of 2–3 inches. Heat to 375°F (190°C). Use a thermometer for accuracy.
- Double-coat chicken: Dip each piece in wet batter, let excess drip, then coat thoroughly in seasoned flour, pressing to adhere. Place on a wire rack.
- Fry: Working in batches without crowding, fry 7–8 minutes per side until deep golden and crisp, juices run clear, and the thickest part reaches 165°F (74°C). Turn only once.
- Drain & rest: Transfer to a wire rack set over a baking sheet (or paper towels). Let rest 5 minutes. Return oil to 375°F between batches.
Notes
For maximum crunch, keep coated pieces on a rack (not stacked) before frying. Maintain oil between 350–375°F; too cool yields greasy crust. To hold for serving, place fried pieces on a rack in a 200°F (95°C) oven for up to 20 minutes.
- Prep Time: 20 minutes
- Cook Time: 1 hour
- Category: Main Course
- Cuisine: American, Southern
Nutrition
- Calories: 543
- Sodium: 798
- Fat: 33
- Saturated Fat: 7
- Carbohydrates: 17
- Fiber: 1
- Protein: 41
- Cholesterol: 137