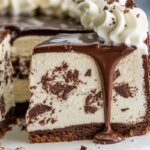
The Dreamy Dessert You’ve Been Missing Out On
Did you know that in a recent survey, over 60% of people said they prefer ice cream cake for their birthday over traditional cake? Yet, many believe that a truly decadent, creamy dessert is too complex to make at home. What if we told you that you could create a show-stopping, bakery-quality Dairy Cream Ice Cream Cake with minimal effort and maximum flavor? This recipe is designed to debunk that myth. We’re not just making any ice cream cake; we’re crafting an experience. A rich, layered masterpiece with a crunchy cookie crust, velvety smooth dairy cream ice cream, and a decadent fudge topping that will have everyone asking for a second slice. Forget the store-bought versions with their artificial flavors; this homemade creation is packed with wholesome, delicious ingredients and is fully customizable to your tastes. Get ready to impress your friends and family, and perhaps even yourself, with what is sure to become your new go-to celebration dessert.
- The Dreamy Dessert You’ve Been Missing Out On
- Your Shopping List for the Perfect Ice Cream Cake
- Timing Your Triumph: A Breakdown of the Process
- Step 1: Crafting the Perfect Cookie Crust
- Step 2: Whipping Up the Dreamiest Dairy Cream Ice Cream
- Step 3: Assembling the First Layer and the Fudge Center
- Step 4: The Final Layer and the Long Freeze
- A Slice of Heaven: The Nutritional Lowdown
- Healthier Twists on a Classic Treat
- Serving Suggestions to Wow Your Guests
- Common Mistakes to Sidestep for Cake Perfection
- Storing Your Masterpiece for Lasting Freshness
- Your New Favorite Celebration Dessert, Guaranteed
- Your Top Questions About Ice Cream Cake Answered
Your Shopping List for the Perfect Ice Cream Cake
To create this luscious dessert, we’ll be using a combination of simple, high-quality ingredients. The magic is in how they come together. Below is your guide to what you’ll need, along with some creative swaps to make this recipe your own.
| Ingredient Category | Ingredient | Quantity | Sensory Description & Smart Swaps |
| For the Chocolate Cookie Crust | Chocolate Sandwich Cookies | 25 cookies | The classic, crunchy, and intensely chocolatey base. Swap: For a different flavor profile, try shortbread cookies or Biscoff cookies. |
| Unsalted Butter, melted | 6 tbsp | The rich, golden binder that holds our delicious crust together. Swap: Melted coconut oil can be used for a subtle tropical note. | |
| For the Dairy Cream Ice Cream | Heavy Whipping Cream | 2 cups | The star of the show, providing a luxuriously smooth and rich texture. Swap: For a slightly lighter version, you can experiment with a mix of heavy cream and whole milk, but the texture will be less creamy. |
| Sweetened Condensed Milk | 1 (14-ounce) can | Provides the perfect amount of sweetness and a velvety mouthfeel without any churning. | |
| Pure Vanilla Extract | 2 tsp | Adds a warm, aromatic depth of flavor that complements the dairy cream. | |
| For the Fudge Layer & Topping | Semi-Sweet Chocolate Chips | 1 cup | For a rich, decadent fudge layer that provides a wonderful contrast in texture. Swap: Milk chocolate for a sweeter fudge, or dark chocolate for a more intense flavor. |
| Additional Heavy Cream | 1/2 cup | Creates a silky smooth and pourable fudge sauce. | |
| Optional: Crushed Cookies or Sprinkles | 1/2 cup | For a fun, festive, and crunchy topping. |
Timing Your Triumph: A Breakdown of the Process
Patience is a key ingredient in this recipe, as the freezing time is crucial for the perfect layers.
- Preparation Time: 25 minutes
- Freezing Time: At least 6 hours (overnight is best)
- Total Time: Approximately 6 hours and 25 minutes
While this may seem like a long time, the active prep time is significantly less than that of baking a traditional multi-layered cake, which often takes around 45-60 minutes of active work plus cooling time. This recipe is all about smart, simple steps followed by letting your freezer do the hard work.
Step 1: Crafting the Perfect Cookie Crust
Your journey to the ultimate Dairy Cream Ice Cream Cake begins with the foundation. Place your chocolate sandwich cookies in a food processor and pulse until they form fine crumbs. If you don’t have a food processor,1 you can place them in a zip-top bag and crush them with a rolling pin – a great way to get out some aggression! In a medium bowl, combine the cookie crumbs with the melted butter and mix until all the crumbs are moistened. Press this mixture firmly and evenly into the bottom of a 9-inch springform pan. A pro-tip for a perfectly even crust is to use the bottom of a flat-bottomed glass or measuring cup to press the crumbs down. Place the pan in the freezer for at least 15 minutes to firm up while you prepare the ice cream layer.
Step 2: Whipping Up the Dreamiest Dairy Cream Ice Cream
This no-churn ice cream is magically simple. In a large, chilled bowl, whip the 2 cups of heavy whipping cream with an electric mixer on medium-high speed until stiff peaks form. Be careful not to over-whip, or you’ll start to make butter! In a separate bowl, whisk together the sweetened condensed milk and vanilla extract. Gently fold the condensed milk mixture into the whipped cream with a spatula, being careful not to deflate the air you’ve just incorporated. The key here is to fold until just combined; a few streaks are okay.
Step 3: Assembling the First Layer and the Fudge Center
Retrieve your chilled crust from the freezer. Spread half of the ice cream mixture evenly over the cookie crust. Now for the decadent center. In a microwave-safe bowl, combine the semi-sweet chocolate chips and the 1/2 cup of additional heavy cream. Microwave in 30-second intervals, stirring in between, until the chocolate is melted and the mixture is smooth.2 Let this fudge sauce cool for a few minutes, then pour half of it over the first ice cream layer. Gently spread it out, leaving a small border around the edge. Freeze for 30 minutes to set the fudge layer slightly.
Step 4: The Final Layer and the Long Freeze

Once the fudge layer is semi-firm, gently spread the remaining ice cream mixture on top. Cover the springform pan with plastic wrap and place it in the freezer for at least 6 hours, or preferably overnight. This long freeze is essential for the cake to set properly and for the flavors to meld together.
A Slice of Heaven: The Nutritional Lowdown
While this is an indulgent treat, it’s interesting to see how it breaks down. Based on 12 servings, here’s an approximate nutritional profile per slice:
- Calories: 450 kcal
- Carbohydrates: 40g
- Protein: 5g
- Fat: 30g (predominantly from the dairy cream)
- Sugar: 35g
The use of real dairy cream provides a good source of calcium, and by making it at home, you avoid the artificial ingredients and preservatives found in many store-bought options.
Healthier Twists on a Classic Treat
Want to enjoy this delicious cake with a few healthy adjustments? Here are some creative ideas:
- Lower Sugar Option: Use a sugar-free or keto-friendly sweetened condensed milk alternative. You can also use dark chocolate with a higher cacao percentage (70% or more) for the fudge layer to reduce the sugar content.
- Gluten-Free Version: Simply swap the chocolate sandwich cookies for your favorite gluten-free chocolate cookies. The rest of the ingredients are naturally gluten-free.
- Fruit-Infused: Fold 1 cup of fresh or frozen berries (like raspberries or chopped strawberries) into the ice cream mixture for a burst of fruity flavor and added nutrients.
- Protein-Packed: Add a scoop of unflavored or vanilla collagen peptides or protein powder to the condensed milk mixture before folding it into the whipped cream.
Serving Suggestions to Wow Your Guests
The final presentation can take your Dairy Cream Ice Cream Cake from homemade to gourmet.
- The Final Drizzle: Just before serving, gently warm the remaining fudge sauce and drizzle it over the top of the cake.
- A Crown of Cream: Top the cake with freshly whipped cream swirls and a sprinkle of chocolate shavings.
- Crunch and Color: Sprinkle the top with crushed cookies, chopped nuts (like pecans or walnuts), or colorful sprinkles for a festive touch.
- À la Mode (in reverse!): Serve each slice with a side of fresh berries to cut through the richness of the cake.
Common Mistakes to Sidestep for Cake Perfection
Avoid these common pitfalls to ensure your ice cream cake is a roaring success:
- A Soupy Mess: Not freezing each layer for the recommended time is the number one mistake. Patience is your best friend here. Rushing the process will result in blurred layers and a soft texture.
- Over-whipping the Cream: Stop whipping as soon as you have stiff peaks. If you go too far, the cream will become grainy and start to separate.
- Hot Fudge Disaster: Pouring hot fudge sauce directly onto the ice cream layer will melt it, creating a messy blend rather than a distinct layer. Always let your fudge sauce cool to room temperature.
- The Dreaded Deflation: Be gentle when folding the condensed milk mixture into the whipped cream. An aggressive hand will knock out all the air you worked so hard to incorporate, resulting in a dense, icy cake.
Storing Your Masterpiece for Lasting Freshness
Proper storage is key to enjoying your ice cream cake for days to come.
- In the Freezer: The cake can be stored in the freezer for up to 2 weeks. For best results, store it in an airtight container or wrap the springform pan tightly in a double layer of plastic wrap and a layer of foil. This prevents freezer burn and keeps the cake tasting fresh.
- Pre-slicing for Convenience: For easy serving, you can pre-slice the cake after the initial overnight freeze. Place parchment paper between the slices and store them in an airtight container in the freezer.
Your New Favorite Celebration Dessert, Guaranteed
This homemade Dairy Cream Ice Cream Cake is more than just a recipe; it’s a celebration in a pan. From the crunchy cookie base to the velvety smooth ice cream and the rich fudge, every bite is a delightful experience. By following these simple steps, you can create a stunning and delicious dessert that will outshine any store-bought alternative. This recipe proves that with a little time and a lot of love, you can create truly magical culinary moments in your own kitchen.
We’d love to see your creations! Try the recipe, give it your own unique twist, and share your feedback in the comments below. For more decadent dessert recipes and pro baking tips, be sure to subscribe to our newsletter!
Your Top Questions About Ice Cream Cake Answered
- Can I make this recipe without an electric mixer?Yes, you can whip the cream by hand with a whisk. It will take a significant amount of arm power and time, but it is achievable. Make sure your bowl and whisk are well-chilled to speed up the process.
- Can I use a different type of pan?A springform pan is highly recommended as it allows you to easily remove the cake without damaging the layers. If you don’t have one, you can use a deep-dish pie plate or a loaf pan lined with plastic wrap with overhangs to help you lift the cake out.
- Why is my ice cream layer icy instead of creamy?This is usually due to one of two things: either the heavy cream was not whipped to stiff peaks, or the mixture was over-mixed when combining it with the sweetened condensed milk, which deflated the air.
- Can I add other mix-ins to the ice cream?Absolutely! This is a great base for your creativity. Chopped candy bars, caramel swirls, mini marshmallows, or chopped nuts can all be folded into the ice cream mixture at the end.
- How do I get clean slices?For perfect, clean slices, run a large, sharp knife under hot water and wipe it dry before each cut. This will warm the blade just enough to slice through the frozen cake smoothly.