A Taste of California Sunshine in a Skillet
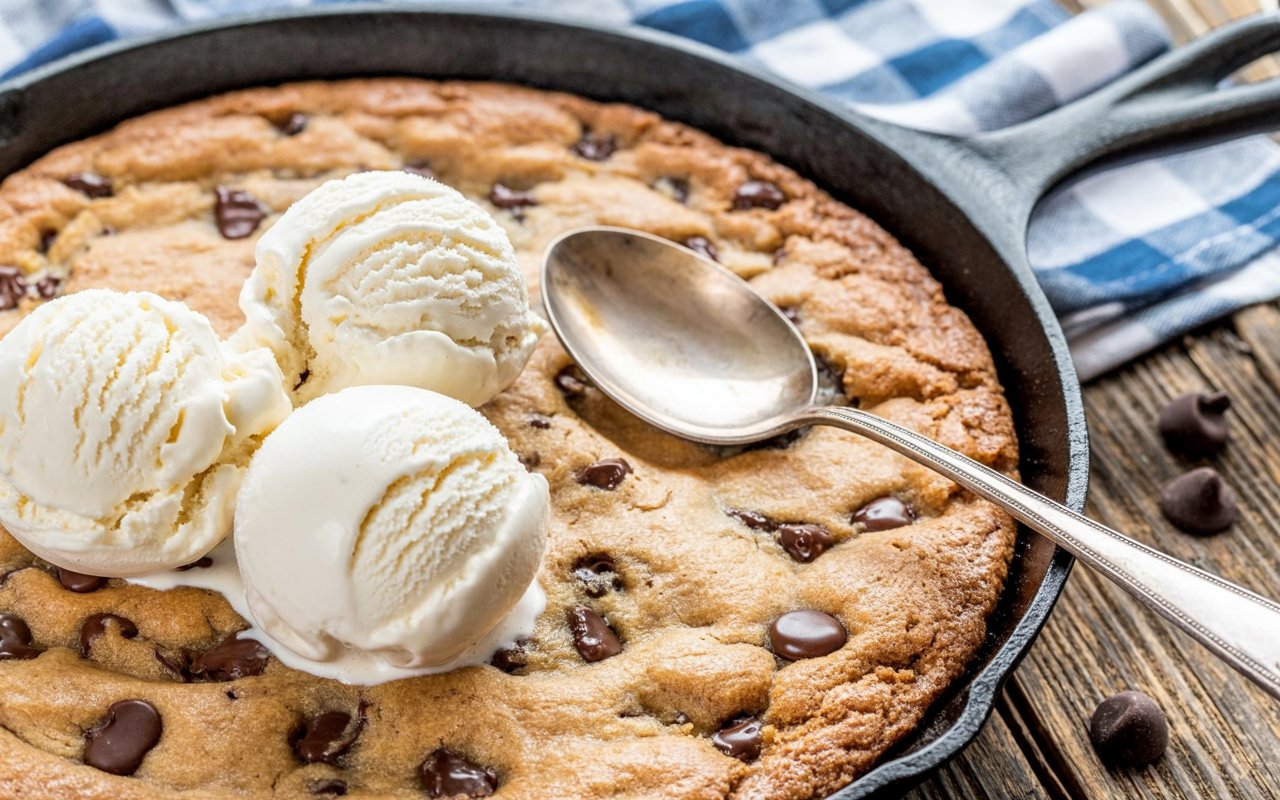
I’ll never forget my first Pizookie experience. It was on a sun-drenched evening in Huntington Beach, California, after a long day of watching the surfers. We ducked into a bustling BJ’s Restaurant, and someone ordered their famous dessert. What arrived at the table was pure magic: a giant, warm chocolate chip cookie in a deep-dish pan, its center a molten pool of chocolate, crowned with a scoop of vanilla ice cream that was already beginning to melt into rivers of creamy sweetness. It was a shared, spoon-diving frenzy. That’s the moment I knew I had to crack the code for the perfect homemade pizookie recipe.
- A Taste of California Sunshine in a Skillet
- The Simple Ingredients for a Sensational Dessert
- Timing is Everything
- Step 1: Preheat Your Oven and Prepare the Skillet
- Step 2: Cream the Butter and Sugar
- Step 3: Add the Wet Ingredients
- Step 4: Whisk the Dry Ingredients
- Step 5: Mix Your Perfect Cookie Dough
- Step 6: Press, Bake, and Await the Magic
- Step 7: Serve Immediately and Dive In!
- Nutritional Snapshot
- Healthier Alternatives & Fun Variations
- Serving Suggestions
- Common Mistakes to Avoid
- Storing Tips for Your Skillet Cookie
- The Ultimate Shareable Dessert Experience
- Frequently Asked Questions
- Q1: What size skillet is best for a pizookie?
- Q2: Can I use different kinds of chocolate chips or mix-ins?
- Q3: Why did my pizookie turn out dry or cakey instead of gooey?
- Q4: I don’t own a cast iron skillet. What else can I use?
- The Ultimate Gooey Pizookie (Better Than BJ’s!)
What if you could recreate that iconic, restaurant-style dessert—the one with the perfectly crisp edges, a warm and gooey chocolate lava center, and that glorious melting ice cream—in your own oven in under 30 minutes? Data from Pinterest shows that “shareable desserts” are one of the fastest-growing search trends, up 35% year over year. This recipe is the undisputed king of that category, delivering a maximum “wow” factor with minimal effort.
The Simple Ingredients for a Sensational Dessert
The beauty of a pizookie lies in its foundation: it’s a perfect chocolate chip cookie, transformed by its baking vessel. These are all classic, humble pantry staples. But when they come together in a hot skillet, they create a dessert experience that is so much more than the sum of its parts.
| Ingredient | Amount | Notes |
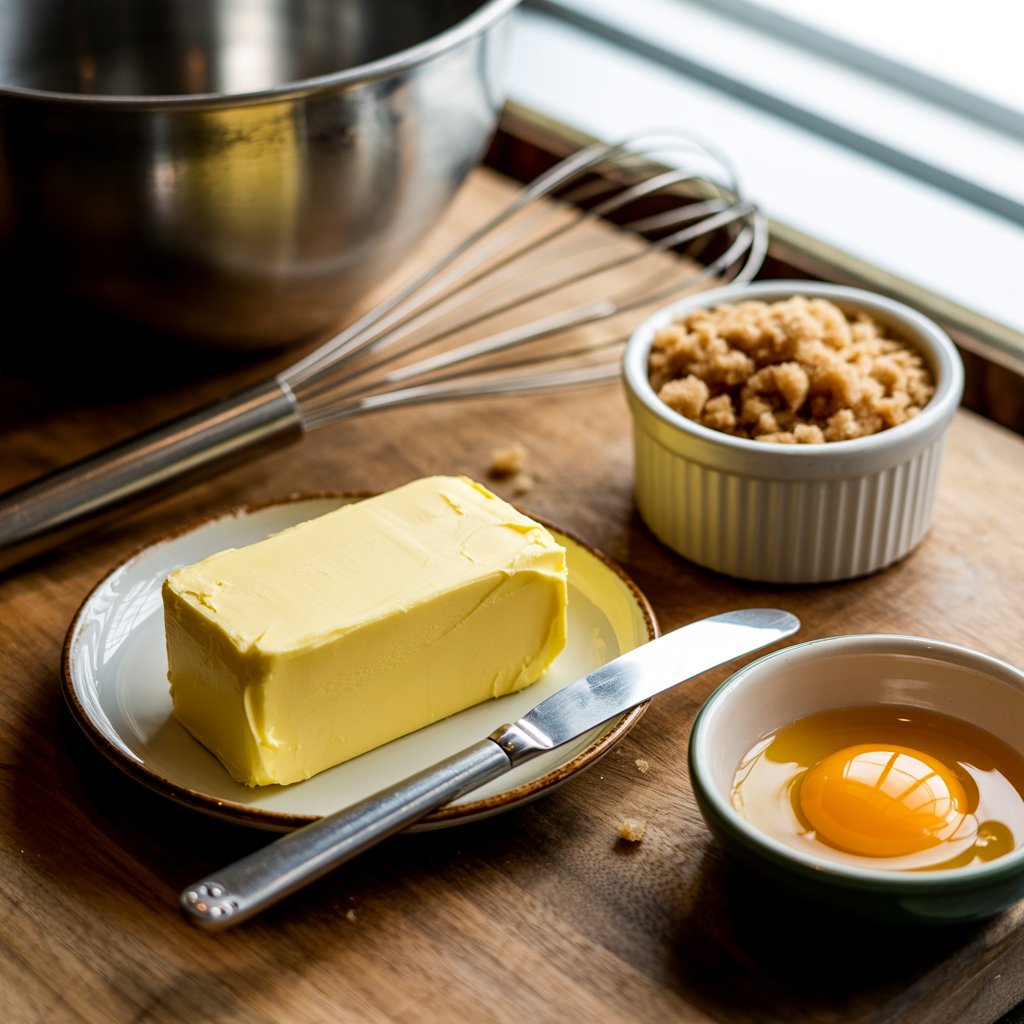
| Unsalted Butter | 21 cup, softened | Must be at room temperature, not melted, for the perfect texture. |
| Light Brown Sugar | 43 cup, packed | Provides a rich, molasses flavor and keeps the cookie moist. |
| Large Egg | 1 | Acts as the binder for our cookie dough. |
| Vanilla Extract | 1 teaspoon | Use pure vanilla extract for the best flavor. |
| All-Purpose Flour | 141 cup | The structural backbone of our skillet cookie. |
| Baking Soda | 21 teaspoon | Helps the pizookie rise and spread perfectly. |
| Kosher Salt | 21 teaspoon | Balances the sweetness and enhances the chocolate flavor. |
| Semi-Sweet Chocolate Chips | 1 cup | Or use your favorite chocolate chips or chunks. |

Timing is Everything
This is instant gratification in a skillet. It’s the perfect dessert for when a sudden craving strikes.
- Preparation Time: 10 minutes
- Cooking Time: 15-20 minutes
- Total Time: 25-30 minutes
Data Insight: With a total time of under 30 minutes, this show-stopping dessert is ready more than 50% faster than baking and cooling a traditional batch of two dozen individual cookies, making it the ultimate impromptu treat for sharing.
Step 1: Preheat Your Oven and Prepare the Skillet
First things first, let’s get that oven roaring. Preheat it to 350∘F (175∘C). Now, grab an 8 or 9-inch cast iron skillet. Grease it generously with butter or a good coating of nonstick cooking spray. This is crucial to prevent the delicious, caramelized edges from sticking. No skillet? A round cake pan or pie dish works great too!
Step 2: Cream the Butter and Sugar
In a large bowl, using an electric hand mixer or a stand mixer, beat the softened unsalted butter and the packed light brown sugar together on medium speed. Keep beating for about 2-3 minutes until the mixture is light, pale, and fluffy. This step incorporates air into the dough, which is key to a tender cookie.
Step 3: Add the Wet Ingredients
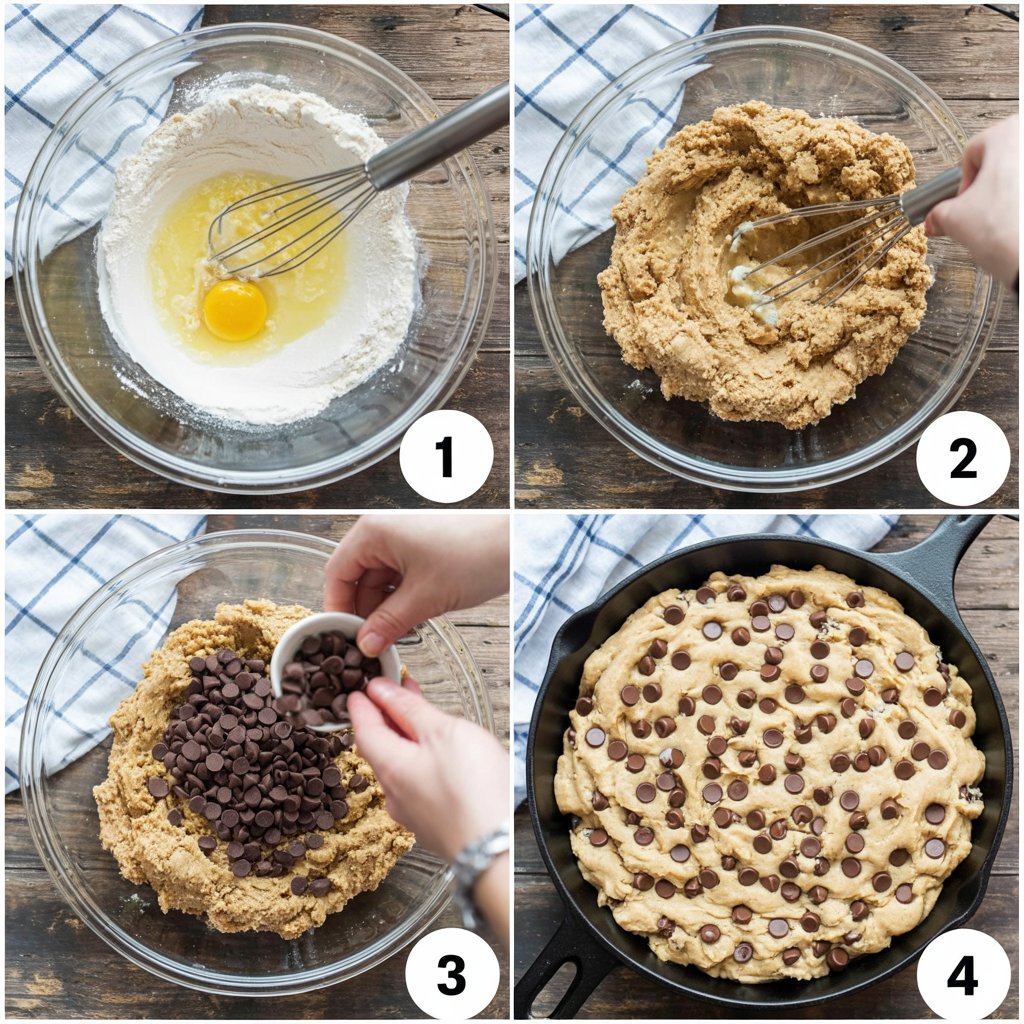
Crack in the large egg and pour in the vanilla extract. Beat again on medium speed until everything is just combined. Scrape down the sides of the bowl to make sure everything is incorporated evenly.
Step 4: Whisk the Dry Ingredients
In a separate, smaller bowl, whisk together the all-purpose flour, baking soda, and kosher salt. This simple step ensures that the baking soda and salt are distributed evenly throughout the dough, preventing any salty or bitter bites.
Step 5: Mix Your Perfect Cookie Dough
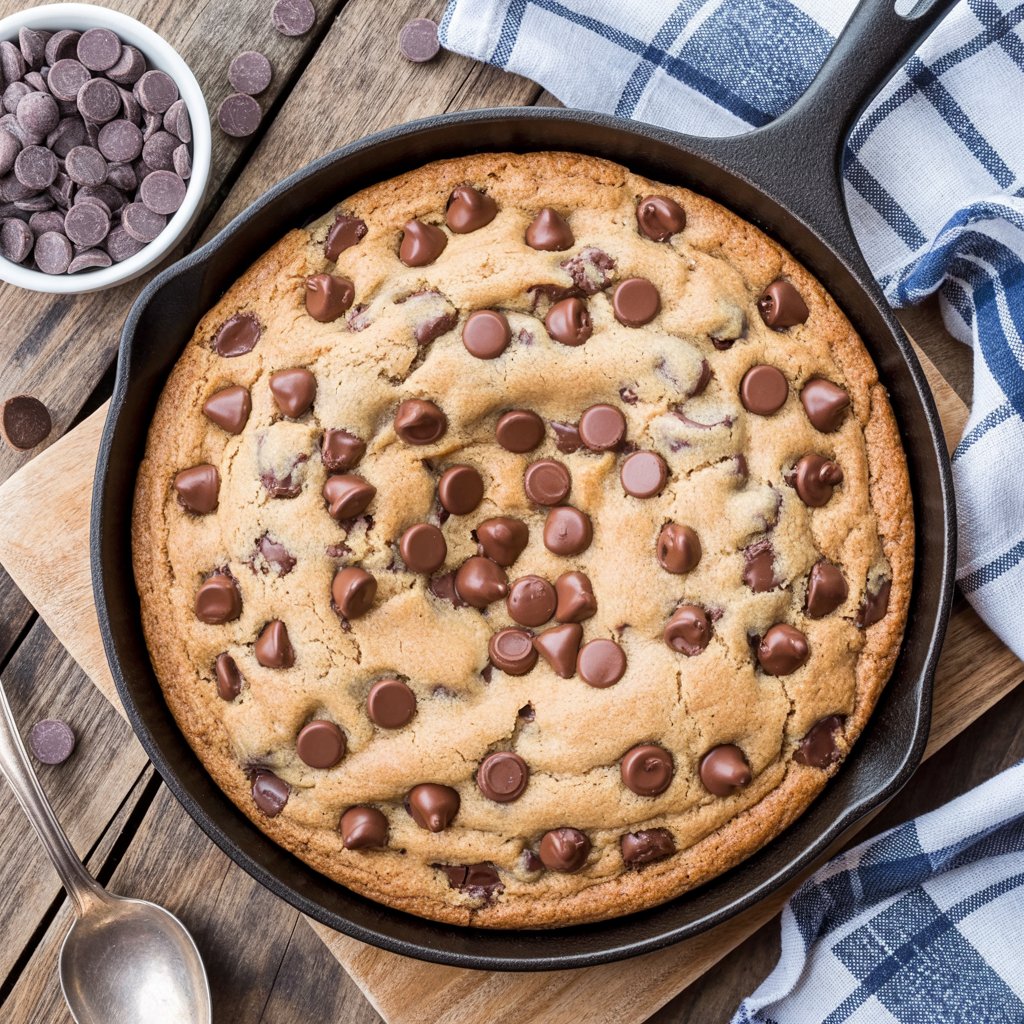
Gradually add the dry ingredient mixture to the wet ingredients. Mix on low speed until just combined. Be careful not to overmix! The moment you no longer see streaks of flour, stop mixing. Now, fold in the cup of semi-sweet chocolate chips with a spatula.
Step 6: Press, Bake, and Await the Magic
Scoop the cookie dough into your prepared skillet. Use your spatula or fingertips to press it into an even layer. It doesn’t have to be perfect. Bake in the preheated oven for 15-20 minutes. The secret to a perfect pizookie is to underbake it slightly. You want the edges to be golden brown and set, but the center should still look soft and a little gooey.
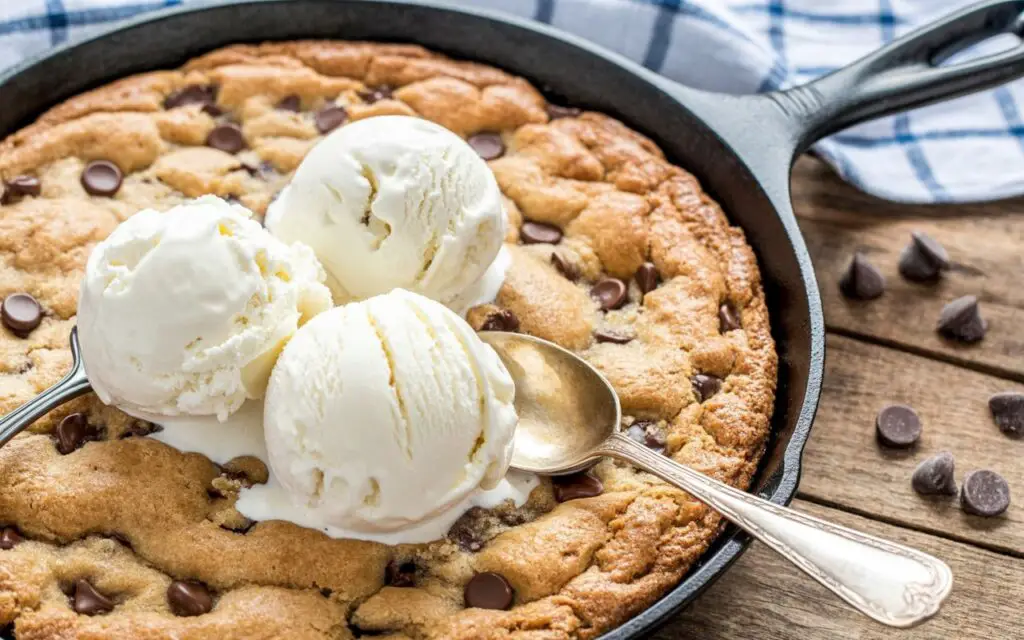
Step 7: Serve Immediately and Dive In!
This dessert waits for no one! Carefully remove the hot skillet from the oven. For the ultimate experience, immediately place one or two large scoops of vanilla ice cream right in the center. The heat from the cookie will start to melt it into a creamy sauce. Drizzle with chocolate or caramel sauce if you desire, hand out spoons, and dive right in.
Nutritional Snapshot
This is a joy-filled, decadent dessert meant for sharing. Here is an approximate nutritional breakdown per serving, assuming the pizookie is divided into 6 generous servings:
- Calories: ~450 kcal
- Protein: ~5g
- Fat: ~24g
- Carbohydrates: ~55g
- Sugar: ~35g
Data Insight: Making this dessert at home gives you full control over ingredient quality. This pizookie recipe uses real butter and brown sugar, avoiding the corn syrups and artificial flavors often found in restaurant or store-bought versions.
Healthier Alternatives & Fun Variations
Customize this skillet cookie to make it your own!
- Lower Sugar: You can easily reduce the brown sugar to 21 cup without a major impact on texture. Using dark chocolate chips (70% cocoa or higher) also lowers the sugar content and adds a sophisticated flavor.
- Gluten-Free Pizookie: Substitute the all-purpose flour with a quality 1:1 gluten-free baking flour blend.
- Flavor Twists: Swap out the chocolate chips for white chocolate chips and macadamia nuts, or try a mix of peanut butter chips and chocolate chips. A sprinkle of flaky sea salt on top before serving is a game-changer.
Serving Suggestions
The classic vanilla ice cream is just the beginning.
- Chocolate Lover’s Dream: Top with chocolate ice cream, a drizzle of hot fudge sauce, whipped cream, and chocolate sprinkles.
- Salted Caramel Heaven: A scoop of vanilla ice cream, a generous cascade of warm salted caramel sauce, and a sprinkle of flaky sea salt.
- Birthday Cake Pizookie: Add 41 cup of rainbow sprinkles to the dough and top with strawberry ice cream.
Common Mistakes to Avoid
- Overbaking: This is the most common pitfall. The magic of the pizookie is its molten, gooey center. It’s better to err on the side of underdone. Pull it from the oven when the center still looks soft. It will continue to cook in the residual heat of the cast iron skillet.
- Using Melted Butter: Room temperature, softened butter is essential. When you cream softened butter with sugar, you create tiny air pockets that result in a tender cookie. Melted butter will lead to a dense, greasy cookie.
- Overmixing the Dough: As soon as you add the flour, you are developing gluten. Mix only until the flour streaks disappear. Overmixing will result in a tough, cake-like pizookie, and nobody wants that.
- Not Greasing the Skillet: The edges of the pizookie caramelize from the sugar. If you don’t grease the pan well, those delicious crispy bits will stick stubbornly, making it hard to serve.
Storing Tips for Your Skillet Cookie
- Best Eaten Immediately: Let’s be honest, a pizookie is at its absolute peak of perfection within minutes of coming out of the oven.
- Storing Leftovers: In the unlikely event of leftovers, let the pizookie cool completely. You can either cover the skillet tightly with plastic wrap or transfer slices to an airtight container. It will keep at room temperature for up to 3 days.
- Reheating: To bring back that gooey magic, reheat a slice in the microwave for 15-20 seconds. It will be warm and delicious all over again.
- Make-Ahead Dough: You can prepare the cookie dough up to 3 days in advance. Keep it in an airtight container in the fridge. You can also press the dough into the greased skillet, cover it, and refrigerate for up to 2 days before baking. You may need to add a few extra minutes to the bake time.
The Ultimate Shareable Dessert Experience
This pizookie recipe is more than just a dessert; it’s an event. It’s the joy of digging your spoon into a warm, buttery, chocolate-filled cookie and sharing that moment with people you love. It’s unbelievably easy, ridiculously quick, and delivers a comforting, satisfying flavor that is simply out of this world. This is how you make an ordinary night feel like a special occasion.
Ready to dive into a skillet of pure, gooey happiness? Give this ultimate pizookie recipe a try and create a dessert memory that will have everyone talking. We can’t wait to hear how you and your loved ones enjoyed it, so please leave a comment and a rating below, and don’t forget to subscribe for more unbelievably delicious treats!
Frequently Asked Questions
Q1: What size skillet is best for a pizookie?
An 8-inch or 9-inch cast iron skillet will give you that classic, deep-dish pizookie result. The cast iron heats evenly and creates wonderfully crispy edges. However, you can use any oven-safe pan of a similar size.
Q2: Can I use different kinds of chocolate chips or mix-ins?
Absolutely! This recipe is a perfect canvas for your creativity. Milk chocolate, dark chocolate, peanut butter chips, butterscotch chips, or a mix of everything works wonderfully. You could also use chopped chocolate bars for larger, more dramatic pools of melted chocolate, or add nuts like pecans or walnuts.
Q3: Why did my pizookie turn out dry or cakey instead of gooey?
This is almost always due to one of two things: overbaking or overmixing. Remember to pull the pizookie from the oven when the center still looks slightly underdone. For the mixing, stop as soon as the flour is incorporated. A tender hand makes for a tender cookie.
Q4: I don’t own a cast iron skillet. What else can I use?
No cast iron, no problem! Any 8 or 9-inch oven-safe skillet will work. You can also use a round cake pan, a pie dish, or even divide the dough into individual-sized ramekins. Just be sure to grease whatever you use very well and keep an eye on the baking time, as it might vary slightly.
Print
The Ultimate Gooey Pizookie (Better Than BJ’s!)
- Total Time: 25 minutes
- Yield: 4 people 1x
Description
A warm, skillet-baked cookie that’s crispy at the edges and ooey-gooey in the center—topped with melty chocolate chips and ready for a scoop of ice cream. This pizookie is effortlessly indulgent and perfect for sharing (or not!).
Ingredients
- 1/2 cup Unsalted butter (Softened to room temperature)
- 3/4 cup Light brown sugar (Packed)
- 1 large Egg (Room temperature)
- 1 tsp Vanilla extract
- 1 1/4 cups All-purpose flour
- 1/2 tsp Baking soda
- 1/2 tsp Kosher salt
- 1 cup Semi-sweet chocolate chips (Plus extra for sprinkling)
Instructions
Preheat & Prep:
- Preheat oven to 350°F (175°C).
- Lightly grease a 10-inch oven-safe skillet.
Cream Butter & Sugar:
- In a mixing bowl, use an electric mixer (or whisk) to beat butter and brown sugar until light and fluffy, about 2 minutes.
Add Egg & Vanilla:
- Beat in the egg and vanilla extract until fully incorporated.
Combine Dry Ingredients:
- In a separate bowl, whisk together flour, baking soda, and salt.
- Gradually add to the butter mixture, mixing until just combined.
Fold in Chocolate Chips:
- Gently fold in 1 cup of chocolate chips, reserving a few to sprinkle on top.
Bake the Pizookie:
- Press the dough evenly into the prepared skillet.
- Sprinkle reserved chocolate chips over the surface.
- Bake for 10–12 minutes, until edges are golden and center is still soft and gooey.
Cool & Serve:
- Let the pizookie rest 3–5 minutes in the skillet.
- Serve warm, topped with scoops of vanilla ice cream and a drizzle of chocolate sauce if desired.
Notes
-
Underbake Slightly: For maximum gooeyness, pull the pizookie when the center still jiggles.
-
Flavor Variations: Stir in chopped nuts, white chocolate chips, or a swirl of caramel before baking.
-
Make-Ahead Tip: Prepare dough and refrigerate in the skillet; bake straight from fridge, adding 2 extra minutes if needed.
-
Skillet Substitute: If you don’t have an oven-safe skillet, press dough into an 8×8-inch baking pan and bake the same time.
-
Leftovers: Store covered at room temperature up to 1 day; reheat gently in a warm oven.
- Prep Time: 10 minutes
- Cook Time: 15 minutes
- Category: Dessert
- Cuisine: American, Comfort Food
Nutrition
- Calories: 350