A Summer Tradition, Minus the Oven
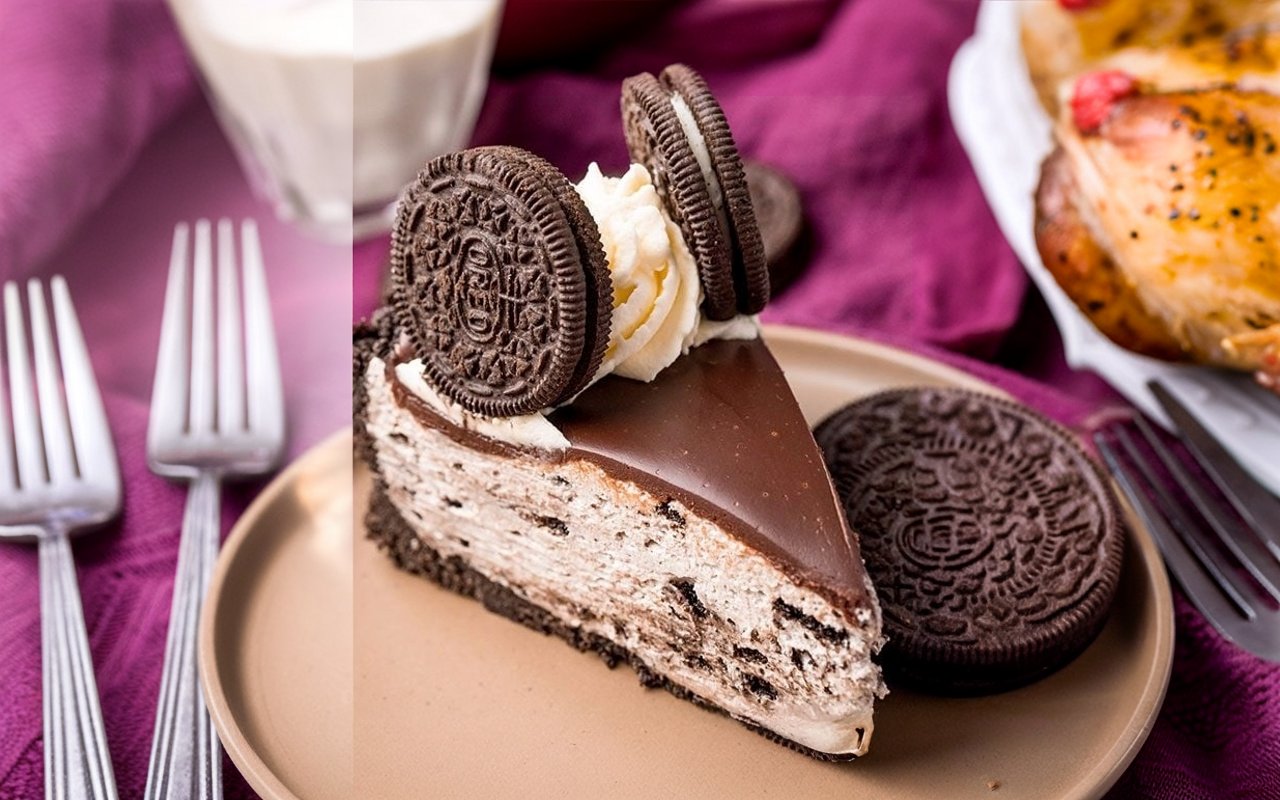
I remember the summers of my childhood being filled with the buzz of family gatherings in our backyard in Marrakesh. The air, thick with the scent of grilled meats and blooming jasmine, always held the promise of a sweet treat to cap off the day. My mother, a fantastic cook, would often lament the idea of turning on the oven in the sweltering Moroccan heat. This led to her quest for the perfect no-bake dessert – something decadent and crowd-pleasing without adding a single degree to our warm home. After much delicious experimentation, she perfected what our family now calls the ultimate No-Bake Oreo Cheesecake Recipe. It’s a dessert so rich, so creamy, and so unbelievably easy, it has become the star of every summer party and birthday celebration since. This is that legendary recipe, complete with a silky chocolate ganache that takes it to a whole new level of deliciousness.
- A Summer Tradition, Minus the Oven
- Everything You Need for Oreo Cheesecake Bliss
- Timing: Decadence Without the Wait
- Step 1: Craft the Perfect Oreo Crust
- Step 2: Whip Up the Creamy Cheesecake Filling
- Step 3: Assemble and Chill
- Step 4: Create the Silky Chocolate Ganache
- A Slice of Nutritional Insight
- Healthier Swaps for a Lighter Treat
- Serving Suggestions to Dazzle Your Guests
- Common Mistakes to Avoid for Cheesecake Perfection
- Storing Your Masterpiece
- Your New Favorite Dessert Awaits
- Your Questions, Answered: No-Bake Cheesecake FAQs
Everything You Need for Oreo Cheesecake Bliss
The magic of this dessert lies in its simplicity and the use of ingredients that scream indulgence. This is more than just a list; it’s your toolkit for creating a masterpiece. We’ve broken it down by component and included some pro-tips for substitutions.
| Component | Ingredient | Amount | Pro-Tips & Easy Swaps |
| Oreo Crust | Oreo Cookies | 36 cookies | The heart of our cheesecake! Use the whole cookie, filling and all, for maximum flavor. Easy Swap: Any chocolate sandwich cookie works. For a gluten-free version, use GF Oreos. |
| Unsalted Butter | 6 tbsp (85g) | Melted to bind our crunchy crust together. Easy Swap: You can use salted butter if that’s all you have, just omit any extra salt. | |
| Cream Cheese Filling | Full-Fat Cream Cheese | 16 oz (450g) | The key to a rich, creamy texture. It must be at room temperature to avoid lumps. Easy Swap: For a lighter version, use reduced-fat cream cheese (Neufchâtel), though the texture may be less firm. |
| Heavy Whipping Cream | 1 cup (240ml) | Creates the light, airy consistency of the filling. It must be very cold to whip properly. Easy Swap: There is no perfect substitute, but chilled full-fat coconut cream can work for a dairy-free alternative, though the flavor will change. | |
| Granulated Sugar | 1/2 cup (100g) | For sweetness. You can adjust this to your personal taste. Easy Swap: Powdered sugar can also be used for an even smoother filling. | |
| Vanilla Extract | 1 tsp | Enhances all the other flavors. | |
| Crushed Oreos | 8-10 cookies | Roughly chopped and folded into the filling for that classic cookies-and-cream texture. | |
| Chocolate Ganache | Semi-Sweet Chocolate | 4 oz (115g) | Use good quality chocolate chips or a chopped chocolate bar for the best results. Easy Swap: Milk chocolate will create a sweeter ganache, while dark chocolate will be more intense. |
| Heavy Whipping Cream | 1/2 cup (120ml) | The vehicle for melting the chocolate into a silky, pourable topping. |
Timing: Decadence Without the Wait
One of the most compelling reasons to make this no-bake dessert is the time you’ll save. A traditional baked cheesecake can take upwards of 90 minutes of prep and baking, plus hours of cooling. This recipe cuts down the active time significantly.
- Preparation Time: 25 minutes
- Chilling Time: At least 6 hours (overnight is best)
- Total Time: 6 hours and 25 minutes
With just 25 minutes of hands-on effort, you’re saving over 65% of the active time compared to a standard baked cheesecake recipe, all while keeping your kitchen cool.
Step 1: Craft the Perfect Oreo Crust
First, let’s create the crunchy foundation. Place the 36 Oreo cookies into a food processor and pulse until you have fine crumbs. If you don’t have a food processor, a sealed plastic bag and a rolling pin work wonders! Transfer the crumbs to a bowl and pour in the 6 tablespoons of melted butter. Mix with a fork until the crumbs are fully moistened and resemble damp sand. Tip this mixture into a 9-inch springform pan and press it firmly into the bottom and slightly up the sides. Using the flat bottom of a glass or measuring cup is a great trick to get a compact, even layer. Place the crust in the freezer to set while you prepare the filling.
Step 2: Whip Up the Creamy Cheesecake Filling
This step is where the magic happens. In a large bowl, beat the room-temperature cream cheese with an electric mixer on medium speed until it’s completely smooth and free of lumps – this is crucial for a silky texture. Add the granulated sugar and vanilla extract and beat again until everything is combined. In a separate, chilled bowl, whip the cold heavy cream on high speed until stiff peaks form. Be careful not to over-whip, or it will turn into butter. Gently fold about one-third of the whipped cream into the cream cheese mixture to lighten it up. Then, fold in the remaining whipped cream until just combined. Finally, fold in the 8-10 coarsely chopped Oreos.
Step 3: Assemble and Chill
Retrieve your chilled crust from the freezer. Spoon the glorious Oreo-flecked filling over the crust and spread it into an even layer with an offset spatula or the back of a spoon. Cover the pan with plastic wrap, making sure it doesn’t touch the surface of the filling, and place it in the refrigerator to chill for at least 6 hours. Overnight is highly recommended to ensure the cheesecake is fully set and firm enough to slice beautifully. Patience here is your greatest virtue!
Step 4: Create the Silky Chocolate Ganache
Once the cheesecake is fully chilled and set, it’s time for the crowning glory. Place your chopped semi-sweet chocolate into a heatproof bowl. Heat the 1/2 cup of heavy cream in a small saucepan over medium heat until it just begins to simmer around the edges (don’t let it boil). Immediately pour the hot cream over the chocolate and let it sit undisturbed for 5 minutes. This allows the heat from the cream to gently melt the chocolate. After 5 minutes, whisk the mixture slowly from the center outwards until a smooth, glossy ganache forms. Let the ganache cool for about 10-15 minutes, then pour it over your chilled cheesecake, spreading it gently to the edges.
A Slice of Nutritional Insight
While this is a decadent dessert meant for indulgence, it’s helpful to know what’s in a slice. Based on 12 servings, here’s an approximate nutritional profile:
- Calories: 550-600 kcal
- Fat: 40-45g
- Carbohydrates: 45-50g
- Sugar: 35-40g
- Protein: 7-9g
This homemade version often contains higher quality ingredients and avoids the preservatives found in many store-bought alternatives.
Healthier Swaps for a Lighter Treat
Want to lighten things up? This recipe is surprisingly adaptable.
- Reduce the Fat: Use Neufchâtel cheese (reduced-fat cream cheese) and a light whipped topping instead of heavy cream. Note that this will result in a softer set.
- Lower the Sugar: You can reduce the sugar in the filling to 1/3 cup or use a sugar substitute like erythritol. Use dark chocolate (70% or higher) for the ganache to reduce its sugar content.
- Gluten-Free Friendly: The only gluten-containing ingredient is the Oreos. Simply swap them for a gluten-free chocolate sandwich cookie to make the entire dessert gluten-free.
Serving Suggestions to Dazzle Your Guests
A slice of this cheesecake is stunning on its own, but a little extra flair never hurts.
- Whipped Cream Clouds: Garnish each slice with a dollop of fresh whipped cream and a mini Oreo.
- Berry Beautiful: The richness of the chocolate and cream cheese is perfectly cut by the tartness of fresh berries. Serve with a handful of fresh raspberries or sliced strawberries.
- A Drizzle of Contrast: Before the ganache sets, drizzle some melted white chocolate or salted caramel over the top for a beautiful visual and flavor contrast.
- Cheesecake in a Jar: For individual servings, layer the crust, filling, and ganache in small glass jars. They’re perfect for picnics and portion control.
Common Mistakes to Avoid for Cheesecake Perfection
- Lumpy Filling: This is almost always caused by using cream cheese that is too cold. Ensure it’s at true room temperature for an ultra-smooth consistency.
- Runny Filling: The cheesecake must chill for the full 6 hours, preferably overnight. Cutting into it too early will result in a soft, messy slice. Also, ensure you whip the cream to stiff peaks to provide structure.
- Broken Ganache: If you overheat the cream or over-mix the ganache, it can split or become grainy. If this happens, try whisking in a tablespoon of warm milk or cream to bring it back together.
- A Soggy Crust: Be sure to pack the crust down firmly. This creates a tight seal that prevents the creamy filling from seeping in and making it soggy.
Storing Your Masterpiece
Proper storage is key to making your cheesecake last.
- In the Refrigerator: The cheesecake can be stored, tightly covered, in the refrigerator for up to 5 days. The flavors actually meld and deepen by the second day!
- In the Freezer: This cheesecake freezes beautifully. You can freeze the whole cake or individual slices. Wrap them well in plastic wrap and then in foil. It will last for up to 2 months. Thaw in the refrigerator for a few hours before serving.
Your New Favorite Dessert Awaits
This No-Bake Oreo Cheesecake Recipe is more than just a dessert; it’s a celebration in a pan. It’s the perfect harmony of crunchy chocolate crust, creamy and tangy filling, and a rich, decadent ganache topping. It’s a guaranteed showstopper that requires no baking and minimal effort, making you look like a pastry hero every single time.
We truly hope you’ll give this family-favorite recipe a try. When you do, we would be thrilled if you shared your experience in the review section or left a comment below. Did you try a fun variation? Let us know! For more foolproof and delicious recipes, don’t forget to subscribe to our blog.
Your Questions, Answered: No-Bake Cheesecake FAQs
- Do I have to use a springform pan?A springform pan is ideal because it allows for easy removal. However, you can make this in a 9-inch deep-dish pie plate. Just know that you’ll be scooping out the first slice instead of presenting the whole cake.
- Can I make this recipe without an electric mixer?You can, but it will require significant arm power! You’ll need a whisk and a lot of determination to get the cream cheese smooth and to whip the cream to stiff peaks.
- Why is my cheesecake not setting up firmly?The most common reasons are not chilling it long enough or not whipping the heavy cream to stiff peaks. The whipped cream provides essential stability to the filling.
- Can I use a different cookie for the crust?Absolutely! Biscoff cookies would create a delicious spiced crust, or you could use shortbread cookies for a buttery alternative. Adjust the amount of butter as needed depending on the cookie’s texture.


