Some desserts are good. Some are great. And then there’s chocolate peanut butter lasagna — the kind of dessert that makes a grown adult close their eyes mid-bite and whisper “oh my god.” Four layers of peanut butter cookie crust, silky chocolate pudding, whipped peanut butter cream cheese, and a cloud of Cool Whip scattered with chips and cookie crumbs. They call them dream bars for a reason. Once you make these, every other no-bake dessert in your life will feel like it’s trying too hard.
I once made a pan of these for a neighborhood thing where everyone was bringing store-bought stuff. The pan came back licked clean and I got four texts asking for the recipe before I even got home.
Four Layers, One Pan, Zero Oven Stress
Well — almost zero. The crust gets ten minutes in the oven and that’s it. After that, everything is mixing bowls and refrigerator time. Here’s the breakdown:
Prep: 20 minutes | Bake: 10 minutes | Chill: 2 hours | Total: about 2.5 hours
The active work is fast. The hardest part is waiting while it chills — and resisting the urge to “check on it” with a spoon.
Every Single Layer, Laid Out
The Crust
| Ingredient | Amount | What It Brings |
|---|---|---|
| Peanut butter sandwich cookies, crushed | 16 oz package (reserve 8–9 for topping) | Salty-sweet crunch that becomes a buttery, golden base |
| Unsalted butter, melted | 8 tbsp (½ cup) | Binds those crumbs into a firm, press-in crust |
The Chocolate Pudding Layer
| Ingredient | Amount | What It Brings |
|---|---|---|
| Milk | 1½ cups | Cold — keeps the pudding thick and smooth |
| Instant chocolate pudding mix | 3.9 oz box | Rich, dark, velvety chocolate that sets up beautifully |
The Peanut Butter Cream Cheese Layer
| Ingredient | Amount | What It Brings |
|---|---|---|
| Cream cheese, softened | 4 oz | Tangy, creamy, and smooth when beaten properly |
| Creamy peanut butter | ½ cup | That warm, nutty richness you can taste before you even bite |
| Powdered sugar | ½ cup | Sweetens without any grit — dissolves right in |
The Whipped Topping Layer
| Ingredient | Amount | What It Brings |
|---|---|---|
| Cool Whip whipped topping | 8 oz tub | Light, fluffy, dreamy — the final white cloud on top |
| Milk chocolate chips | ½ cup | Little bursts of melty chocolate in every bite |
| Peanut butter chips | ½ cup | Sweet, nutty gems scattered across the top |
| Reserved PB sandwich cookies, crushed | 6 cookies | That gorgeous crumbly finish — the crown |

Building It: Layer by Beautiful Layer
Step 1: Bake the Cookie Crust
Preheat your oven to 350°F and give an 8×8-inch baking pan a light spray of nonstick cooking spray.
Crush your peanut butter sandwich cookies — food processor is fastest, but a rolling pin and zip-top bag work beautifully if you want a little workout. Remember to set aside 8–9 cookies before you crush. You’ll need them later for the topping.
Combine the crumbs with the melted butter in a bowl and stir until every crumb is coated and glistening. Press the mixture firmly into the bottom of the pan — use the flat bottom of a glass to really compact it. Bake for 10 minutes, then pull it out and let it cool completely. This is not a step to rush.
Step 2: Spread the Chocolate Pudding
In a small bowl, whisk together the instant chocolate pudding mix and cold milk. Use a hand mixer on medium or a whisk with some muscle — beat until the pudding thickens into a gorgeous, velvety chocolate layer.
Spread it evenly over the cooled crust using an offset spatula or the back of a spoon. Pop the pan in the fridge while you make the next layer. Every minute it chills helps it set firmer.
Step 3: Whip Up the Peanut Butter Cream Cheese Layer
This is where things get dreamy. In a medium bowl, beat the softened cream cheese with a hand mixer on medium-high for about a minute until it’s completely smooth. No lumps allowed.
Add the creamy peanut butter and beat for another 30 seconds to a minute. Then reduce the speed to low and slowly sift in the powdered sugar. Mix until it’s fully incorporated — you should have a thick, fluffy, peanut-buttery mousse that smells absolutely incredible.
Pull the pan from the fridge and spread this layer evenly over the chocolate pudding. Be gentle — you don’t want to disturb the pudding underneath. Light, sweeping strokes with a spatula.
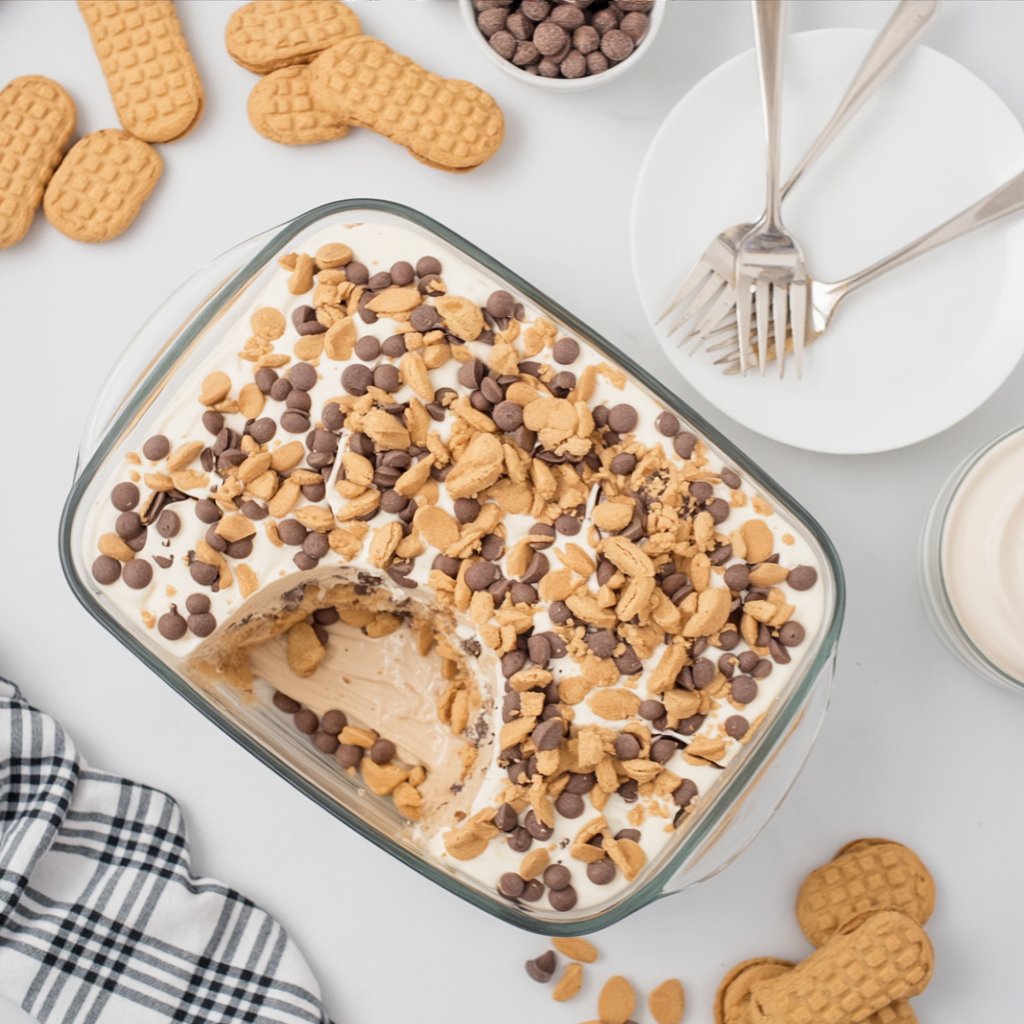
Step 4: Top It Off With Everything Good
Spread the entire tub of Cool Whip over the peanut butter layer in one smooth, generous cloud.
Now the fun part: scatter the milk chocolate chips and peanut butter chips evenly across the top. Then take those reserved crushed peanut butter cookies and sprinkle them over everything like confetti. Stand back and admire your work for a second. You earned it.
Step 5: Chill, Slice, and Try Not to Eat the Whole Pan
Cover the pan and refrigerate for at least 2 hours. Overnight is even better — the layers firm up, the flavors meld, and the crust gets that perfect balance between crunchy and slightly softened from the pudding above it.
Cut into 2-inch squares and serve cold.
Quick Detours That’ll Cost You (And How to Avoid Them)
Using warm milk for the pudding. Cold milk is the secret to thick, set pudding. Room temperature or warm milk gives you a thin, sloppy layer that never firms up properly.
Not letting the crust cool completely. Warm crust + cold pudding = condensation + soggy mess. Be patient. Set a timer. Walk away.
Cold cream cheese. If it’s not softened, you’ll fight lumps the entire time and the layer won’t be smooth. Leave it on the counter for at least 30 minutes before you start.
Cutting before it’s fully chilled. Two hours minimum. If the layers slide when you cut, it needs more time. Clean cuts come from cold, set layers and a sharp knife run under hot water between slices.
Going overboard pressing the crust. You want it firm, not concrete. A packed-too-tight crust gets hard and crumbly instead of pleasantly crunchy. Press evenly, not aggressively.
What Each Square Looks Like Nutritionally
Per serving (makes 16 squares):
- Calories: ~310
- Total Fat: 18g
- Saturated Fat: 9g
- Carbohydrates: 33g
- Sugar: 24g
- Protein: 5g
- Sodium: 260mg
The peanut butter brings decent protein for a dessert, and the portion size is built right into the squares. These are rich — a 2-inch square is genuinely satisfying.
Scenes Where These Dream Bars Belong
- On a holiday dessert table next to pies — they’ll disappear first. Guaranteed.
- Cut into tiny squares as party bites on a platter with toothpicks.
- Brought to a bake sale in individual cupcake liners — they look professional and taste unreal.
- Served after a casual dinner with a drizzle of chocolate sauce on the plate.
- Stacked in a glass container as a gift with a ribbon — better than anything from a bakery box.
The Kind of Dessert That Makes People Ask for the Recipe
Chocolate peanut butter lasagna is one of those rare recipes that looks like it came from a pastry chef’s kitchen but takes barely any skill to pull off. Four layers, one small pan, and a couple of hours in the fridge — that’s the whole commitment. And what you get back is a dessert so rich, so layered, so perfectly balanced between chocolate and peanut butter that people will not believe you made it at home.
So make a pan. Bring it somewhere. Or keep the whole thing for yourself — I won’t judge. Just come back and tell me how it went. Rate the recipe, drop a comment, share your tips. These dream bars have a way of becoming everyone’s new favorite, and I want to hear your story.
Print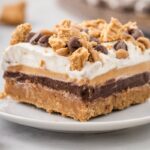
Chocolate Peanut Butter Lasagna (Dream Bars)
A stunning four-layer no-bake dessert with a peanut butter cookie crust, silky chocolate pudding, whipped peanut butter cream cheese filling, and a fluffy Cool Whip topping loaded with chocolate chips, peanut butter chips, and crushed cookies. Rich, indulgent, and impossibly easy to make.
- Total Time2 hours 30 minutes
- Yield16 servings 1x
Ingredients
Crust
- 16 oz package peanut butter sandwich cookies, crushed (reserve 8–9 cookies for topping)
- 8 tablespoons (1/2 cup) unsalted butter, melted
Chocolate Pudding Layer
- 1 1/2 cups milk (cold)
- 3.9 oz box instant chocolate pudding mix
Peanut Butter Cream Cheese Layer
- 4 ounces cream cheese, softened
- 1/2 cup creamy peanut butter
- 1/2 cup powdered sugar
Whipped Topping Layer
- 8 oz tub Cool Whip whipped topping
- 1/2 cup milk chocolate chips
- 1/2 cup peanut butter chips
- 6 cookies reserved peanut butter sandwich cookies, crushed
Instructions
- Bake the Cookie Crust: Preheat oven to 350°F. Lightly spray an 8×8-inch pan with nonstick cooking spray. Crush peanut butter sandwich cookies (reserving 8–9 for topping), combine with melted butter, and press firmly into the pan. Bake for 10 minutes and cool completely.
- Make the Chocolate Pudding Layer: Whisk together cold milk and instant chocolate pudding mix until thickened. Spread evenly over the cooled crust and refrigerate while preparing the next layer.
- Make the Peanut Butter Cream Cheese Layer: Beat softened cream cheese until smooth, about 1 minute. Add creamy peanut butter and mix until combined. Reduce speed, add powdered sugar, and mix until fully incorporated. Spread evenly over the chocolate pudding layer.
- Add the Whipped Topping: Spread the entire tub of Cool Whip over the peanut butter layer. Scatter milk chocolate chips and peanut butter chips evenly over the top, then sprinkle with the reserved crushed peanut butter cookies.
- Chill and Serve: Refrigerate for at least 2 hours until fully set. Cut into 2-inch squares and serve cold.
Notes
Use cold milk for the pudding layer — warm milk results in a thin, runny layer that won’t set properly. Let the crust cool completely before adding the pudding to avoid condensation and sogginess. Softened cream cheese is essential for a smooth peanut butter layer — leave it out at room temperature for at least 30 minutes. For cleanest cuts, run your knife under hot water between slices. Overnight chilling produces the best texture and firmest layers.
- Prep Time: 20 minutes
- Cook Time: 10 minutes
- Category: Dessert
- Cuisine: American
Nutrition
- Calories: 310
- Sugar: 24
- Sodium: 260
- Saturated Fat: 9
- Protein: 5