Imagine a silky, tangy cloud of lemony goodness that melts on your tongue without requiring you to turn on the oven. No-bake lemon cheesecake delivers precisely that experience, making it one of the most enticing easy and quick desserts you can prepare, especially on hot days or whenever you want a fuss-free treat. This recipe provides that perfect balance of sweet and tart while saving you from complicated baking steps. If you’re new to no-bake cheesecakes, prepare to be amazed by how simple and foolproof they can be.
- Embracing No-Bake Desserts
- Gathering Your Ingredients
- Step 1: Creating the Crust
- Step 2: Preparing the Lemon Cheesecake Filling
- Step 3: Assembling and Chilling
- Step 4: Serving and Decorating
- Why This Cheesecake Shines Among Easy and Quick Desserts
- Delicious Variations to Try
- Troubleshooting Common Issues
- Tips for Storage and Make-Ahead
- Frequently Asked Questions
- Celebration-Worthy Serving Ideas
- Conclusion: A Refreshing Slice of Bliss
- Creamy Lemon Cheesecake (No-Bake): The Ultimate Easy and Quick Desserts Treat
Embracing No-Bake Desserts

No-bake desserts are rapidly gaining popularity for a variety of reasons. First, they’re typically straightforward: you combine ingredients, assemble, chill, and voilà—you have a fantastic dessert. Second, they’re practical for those who lack an oven or prefer not to heat up the kitchen. Third, they’re surprisingly versatile. You can adapt flavors, add toppings, and experiment with garnishes just as you would with a baked dessert.
But perhaps the most appealing aspect is the texture you achieve. By using a combination of cream cheese, whipped cream, and fresh lemon juice, you end up with a dessert that’s luscious yet light, creamy yet stable. When you slice into a well-chilled no-bake cheesecake, each piece holds its shape but practically melts in your mouth.
Gathering Your Ingredients
Before you begin, ensure you have everything ready. As with many easy and quick desserts, organization is key to a smooth experience.
| Ingredient | Quantity | Notes |
|---|---|---|
| Graham Crackers (or Digestive Biscuits) | ~ 2 cups (crumbled) | Forms about 1½ cups of crumbs |
| Unsalted Butter | 1/2 cup (115g) | Melted |
| Cream Cheese | 16 oz (450g) | Full-fat recommended for richer flavor, softened |
| Granulated Sugar | 3/4 cup (150g) | Adjust to taste (more if you prefer a sweeter cheesecake) |
| Lemon Juice | 1/4 cup (60ml) | Freshly squeezed for best flavor |
| Lemon Zest | From 1-2 lemons | Adds a bright citrus aroma |
| Whipped Cream (or Heavy Cream) | 1 cup (240ml) whipped | Soft peaks to fold into cream cheese mixture |
| Vanilla Extract | 1 teaspoon | Elevates the flavor |
| Optional: Gelatin | 1 teaspoon | If you want extra firmness (bloom in 2 Tbsp water) |
Equipment wise, you’ll need:
- A springform pan (8 or 9 inch) for easy removal.
- A mixing bowl for crust and a separate bowl for the filling (plus a small bowl for blooming gelatin if using).
- An electric mixer (hand mixer or stand mixer).
- A spatula and whisk.
- A zester or microplane to collect lemon zest.
Step 1: Creating the Crust
- Crush the Biscuits
Start by crushing graham crackers or digestive biscuits into fine crumbs. You can use a food processor, or place them in a zip-top bag and crush them with a rolling pin. - Combine with Butter
Mix the crumbs with the melted butter until they resemble wet sand. If you prefer a sweeter base, add a tablespoon of sugar. If you’d like a hint of saltiness, use salted butter or a pinch of salt. - Press Into Pan
Pour the crumb mixture into the springform pan. Use a flat-bottomed glass or measuring cup to press down firmly, creating an even layer. This step ensures your crust won’t crumble when you slice the cheesecake. Place the pan in the refrigerator for at least 15 minutes (or in the freezer for 5-10 minutes) to help it set.
Step 2: Preparing the Lemon Cheesecake Filling
- Soften the Cream Cheese
Make sure your cream cheese is at room temperature. This helps it whip up smoothly without lumps. Place it in a large mixing bowl. - Add Sugar and Flavorings
Blend the cream cheese with the sugar until you achieve a fluffy, smooth mixture. Stir in the vanilla extract, fresh lemon juice, and lemon zest. Taste the batter at this point. If you want a sweeter flavor, add a bit more sugar. If you crave more tang, a bit of extra lemon juice or zest does the trick. - Optional Gelatin Step
If you want a slightly firmer set, bloom 1 teaspoon of powdered gelatin in 2 tablespoons of cold water. Let it sit for a few minutes, then microwave in short 10-second bursts until it’s dissolved. Allow it to cool slightly before whisking into the lemon cheesecake filling. - Fold in Whipped Cream
In a separate bowl, whip your cream until it forms soft peaks. Gently fold this whipped cream into the cream cheese mixture using a spatula. Take care not to knock out too much air, which helps keep the texture light.
Step 3: Assembling and Chilling
- Fill the Crust
Remove the pan with the chilled crust from the refrigerator. Pour or spoon the lemon cheesecake filling on top, spreading it evenly with your spatula. Smooth the surface to create a pristine top. - Chilling Time
Cover the springform pan with plastic wrap or aluminum foil. Place it in the refrigerator for at least four hours. Overnight chilling yields the best texture. This gives the cheesecake time to set fully and allows the flavors to meld into a bright, citrusy delight.
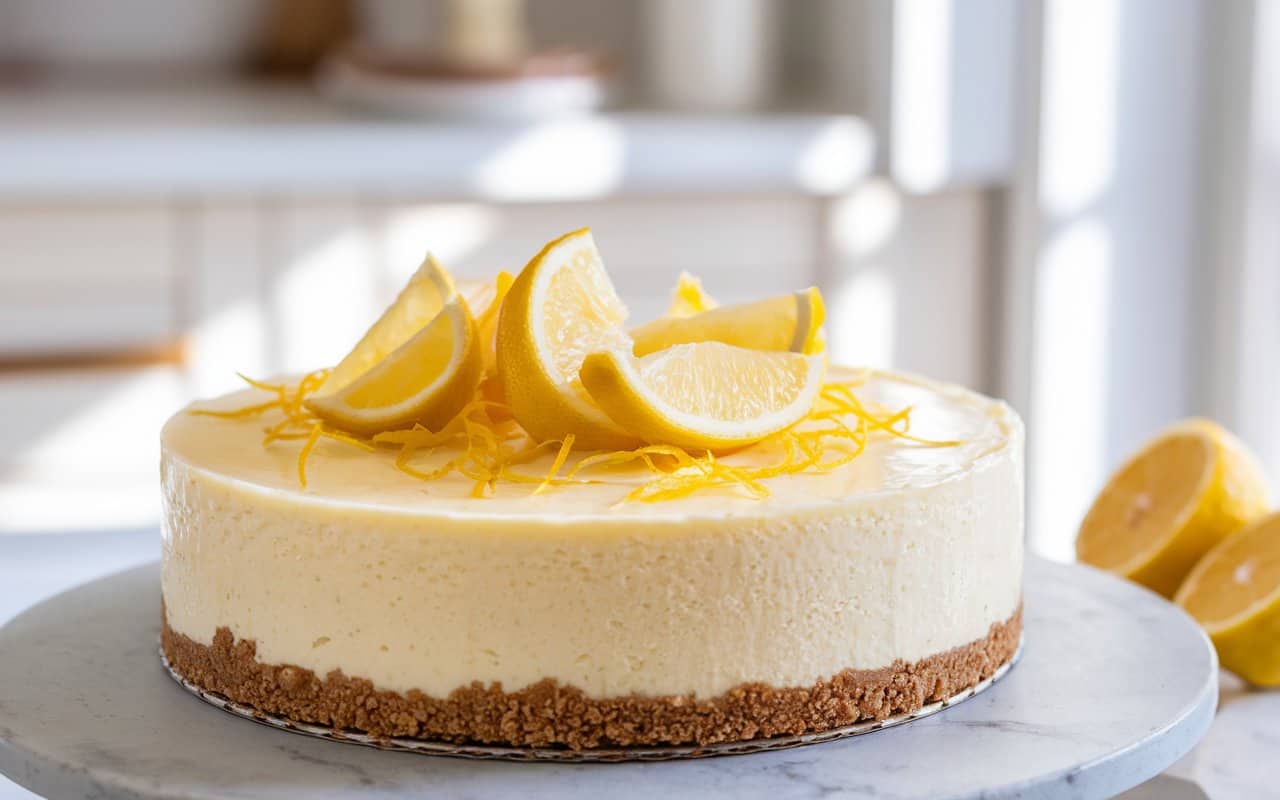
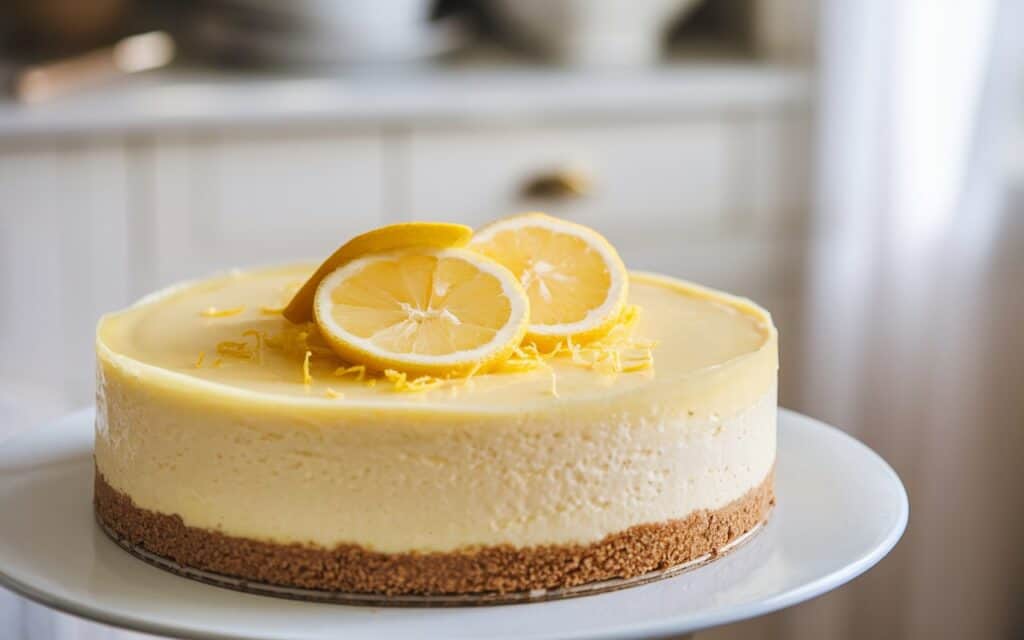
Step 4: Serving and Decorating
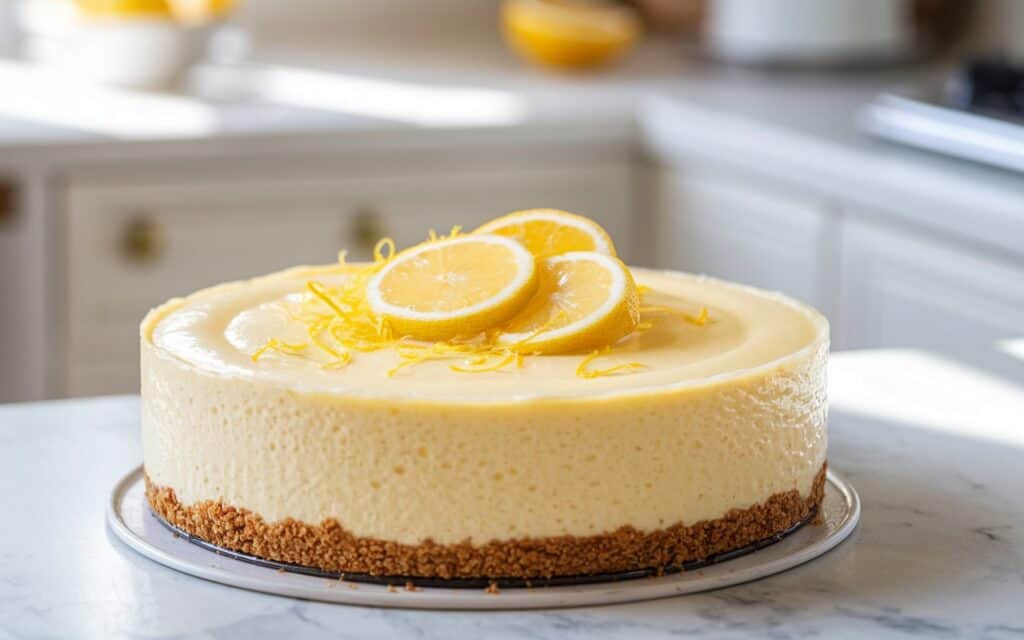
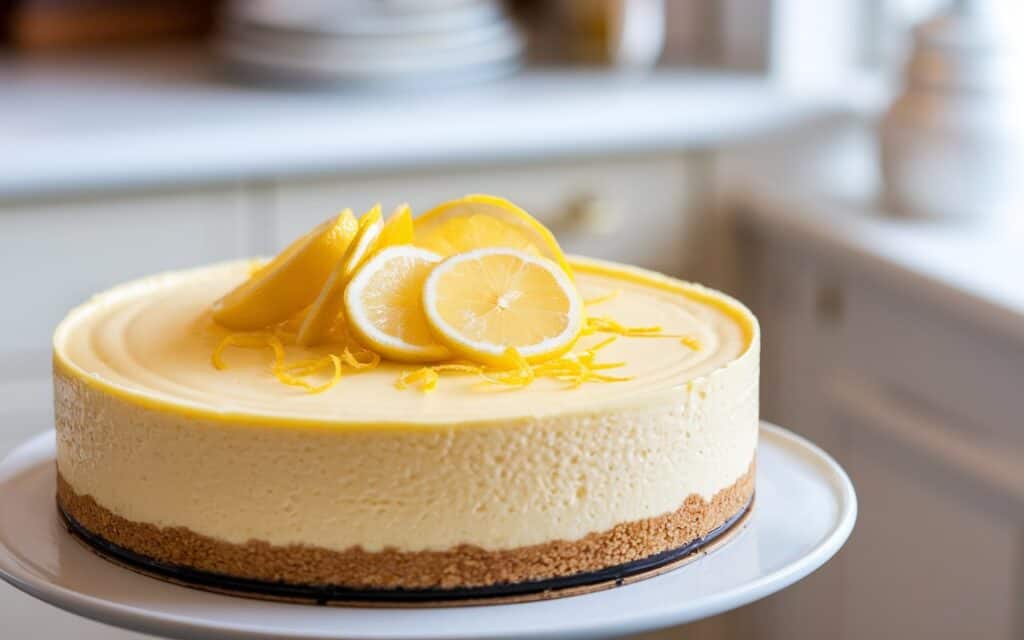
Once your cheesecake is properly set, unclasp the springform pan and lift off the ring. If you want pristine edges, run a knife dipped in warm water around the edges before releasing the ring. Transfer the cheesecake to a serving plate if desired, or leave it on the springform base for convenience.
Garnish
- Decorate the top with a dusting of powdered sugar, lemon slices, or a sprinkling of lemon zest.
- Pipe whipped cream rosettes around the edges if you’re feeling fancy.
- For a pop of color, top with fresh berries such as blueberries, raspberries, or sliced strawberries.
Why This Cheesecake Shines Among Easy and Quick Desserts
- No Hot Oven Needed
Especially helpful during warm weather or in small kitchens without reliable ovens, this no-bake method ensures you can still indulge in a luxurious cheesecake. - Tangy Yet Sweet Balance
Lemon brings a refreshing tang that pairs beautifully with the richness of cream cheese. The result is a balanced flavor profile that’s neither too sweet nor too tart. - Easily Customizable
You can swap lemon with lime for a tropical twist or combine orange zest and lemon for a more complex citrus flavor. Additionally, you can top it with fruit sauces, chocolate shavings, or crumbled cookies. - Make-Ahead Friendly
Since this dessert sets in the fridge, you can prepare it the day before a special occasion. On the day of, you can focus on other tasks or simply relax, knowing dessert is already ready to impress.
Delicious Variations to Try
- Lime and Coconut
Replace the lemon juice and zest with lime, and fold shredded coconut into the crust or the filling for a tropical spin. - Berries Galore
Whip up a quick berry coulis by blending fresh or frozen berries with a bit of sugar and lemon juice. Drizzle this over each slice for a burst of color and flavor. - Chocolate Swirl
For a lemon-chocolate combo, melt a small amount of chocolate and swirl it through the cheesecake filling before chilling. It creates a marbled effect and a delightful flavor twist.
Troubleshooting Common Issues
- Runny Texture
- Often happens if the cream cheese wasn’t fully softened or if the cheesecake didn’t get enough chill time.
- Using gelatin can mitigate the risk.
- Ensure you whipped the cream to soft or medium peaks.
- Lumpy Cheesecake
- This occurs if you don’t soften the cream cheese properly or if you rush the blending process.
- Always bring cream cheese to room temperature before mixing.
- Crust That Falls Apart
- The crust likely needed more butter or a firmer tamping down.
- Chill it longer before adding the filling.
- Overly Tart or Sweet
- Always taste test your filling before pouring it into the pan. Adjust sugar, lemon juice, or zest to match your preference.
Tips for Storage and Make-Ahead
- Store any leftover cheesecake covered in the refrigerator for up to five days. The crust may soften over time, but the taste remains delightful.
- If you want to freeze slices, wrap them individually in plastic wrap and place them in a freezer-safe bag or container. Thaw in the refrigerator before serving.
Frequently Asked Questions
- Do I really need gelatin?
- Not necessarily. This recipe is designed to hold its shape with whipped cream and the cream cheese’s natural firmness. Gelatin is an extra step if you crave a firmer texture, especially in warmer climates.
- Could I use low-fat or reduced-fat cream cheese?
- Yes, though the cheesecake might not be as rich or hold its shape as well. Full-fat cream cheese provides the best results.
- How can I maximize the lemon flavor?
- Use more zest, as it contains the aromatic oils. Also, freshly squeezed lemon juice is key for a bright taste.
- Is it okay to use bottled lemon juice?
- You can, but you won’t get the same vibrant, fresh flavor. Fresh-squeezed is best for a dessert that highlights citrus.
- Can I add whipped topping instead of real whipped cream?
- That’s possible, but your cheesecake might be sweeter. Adjust sugar accordingly, and remember that whipped topping usually has stabilizers that could affect texture.
Celebration-Worthy Serving Ideas
If you’re making this for a party, place the cheesecake on a decorative pedestal or cake stand. Surround it with slices of lemon or small bowls of berry sauce. If you’re going all out, a dessert buffet with multiple easy and quick desserts—like brownies, cookies, or mini tarts—creates a variety that pleases any crowd.
Another presentation trick is to make individual no-bake cheesecakes in small ramekins or dessert cups. Press a bit of crumb mixture into the bottom of each cup and top with the lemon cheesecake filling. This approach is perfect for portion control and a stylish look at dinner parties.
Conclusion: A Refreshing Slice of Bliss

When you have minimal time but still want a stunning dessert, a no-bake lemon cheesecake steps in to save the day. It’s one of those easy and quick desserts that defies the assumption that convenience means cutting corners on flavor. Every bite bursts with creamy, lemony indulgence. Whether you’re a seasoned home baker or a dessert newbie, you’ll appreciate its simplicity, versatility, and captivating taste.
So, gather your ingredients, set aside a little time for mixing and chilling, and watch this citrus delight come together. The hardest part might be waiting for it to set, but the reward is a dessert that garners “oohs” and “ahhs” with each slice. Make it once, and you’ll keep it in your repertoire for birthdays, holidays, or any special moments in need of a sweet finish—no baking required.
Print
Creamy Lemon Cheesecake (No-Bake): The Ultimate Easy and Quick Desserts Treat
- Total Time: 4 hours 20 minutes
- Yield: 8 Slices 1x
Description
Enjoy a refreshingly zesty twist on the classic cheesecake with this no-bake version. Featuring a tangy lemon-infused, creamy filling atop a crisp graham cracker crust, this dessert is both elegant and effortless—perfect for brightening any occasion.
Ingredients
For the Crust:
- 1 1/2 cups Graham cracker crumbs (About 10-12 crackers finely crushed)
- 1/4 cup Granulated sugar
- 1/2 cup Unsalted butter (Melted)
For the Filling:
- 16 oz Cream cheese (Softened to room temperature 2 packages)
- 1 can Sweetened condensed milk (14 oz)
- 1/2 cup Fresh lemon juice (Preferably freshly squeezed)
- Zest of 1 lemon (Fresh lemon zest for enhanced citrus flavor)
- 1 tsp Vanilla extract
- Pinch Salt (Enhances overall flavor)
For Garnish (Optional):
- To taste Fresh berries or whipped cream (For an extra decorative and flavorful touch)
- To taste Additional lemon zest (For garnish)
Instructions
Prepare the Crust:
- In a bowl, combine the graham cracker crumbs, granulated sugar, and melted butter until the mixture is uniform.
- Press the mixture firmly into the bottom (and slightly up the sides, if desired) of an 8-inch springform pan.
- Place the pan in the refrigerator while you prepare the filling.
Make the Filling:
- In a large mixing bowl, beat the softened cream cheese with an electric mixer or whisk until smooth and creamy.
- Gradually blend in the sweetened condensed milk until fully incorporated.
- Stir in the fresh lemon juice, lemon zest, vanilla extract, and a pinch of salt until the mixture is well combined and silky.
Assemble and Chill:
- Pour the lemon cheesecake filling over the chilled crust, smoothing the top evenly with a spatula.
- Cover and refrigerate for at least 4 hours (or overnight) until the cheesecake is firmly set.
Garnish and Serve:
- Before serving, garnish with fresh berries, a dollop of whipped cream, or an extra sprinkle of lemon zest, if desired.
- Slice into 8 elegant pieces and enjoy your refreshing, no-bake lemon cheesecake treat!
Notes
- For the best texture and flavor, allow the cheesecake to chill thoroughly—overnight chilling is ideal.
- Use freshly squeezed lemon juice and zest for a bright, natural lemon flavor.
- Feel free to experiment with your garnish—whipped cream, mint leaves, or fresh berries add an extra touch of elegance.
- This no-bake cheesecake is perfect for warm days when you want a cool, tangy dessert without turning on the oven.
Enjoy your Creamy Lemon Cheesecake—a luxuriously tangy and effortlessly delicious dessert treat!
- Prep Time: 20 minutes
- Category: Dessert
- Cuisine: American
Nutrition
- Calories: 350