What if the best birthday cake you’ve ever made never once touched an oven? This no bake birthday cake is layered vanilla sandwich cookies, a cloud-soft, cream cheese pudding filling packed with rainbow sprinkles, and a billowy whipped topping finish that looks like it came from a bakery case. It is joyful, creamy, completely over-the-top festive, and it sets in the fridge while you do absolutely nothing.
I made this the first time for a last-minute celebration with zero stress. It was the most requested dessert I’d made in years. Sometimes simple wins everything.
What Makes Every Layer Taste Like a Celebration
Eight ingredients. Not a single one complicated. All of them working together to create something that tastes so much more impressive than the list suggests.
| Ingredient | Amount | What It Does |
|---|---|---|
| Vanilla sandwich cookies | 1 box (14.3 oz / 405g) | The crisp, sweet layers that soften overnight into something almost cake-like |
| Cream cheese, softened | 8 oz (225g) | Tangy, dense, velvety — the anchor that gives the filling real body |
| Granulated sugar | ¼ cup (50g) | Sweetens the cream cheese base and dissolves into it completely smoothly |
| Instant vanilla pudding mix | 1 box (3.4 oz / 96g) | Thickens the filling and adds a classic, nostalgic vanilla flavour |
| Cold milk | 1½ cups (350ml) | Whisked with the pudding until thick and just barely pourable |
| Vanilla extract | 1 teaspoon | Deepens and rounds out the vanilla throughout every layer |
| Frozen whipped topping, thawed | 8 oz (225g) | Half goes into the filling for lift; half crowns the top in snowy, cloudlike perfection |
| Rainbow sprinkles | ⅓ cup (55g) | Folded throughout and scattered on top — pure, unfiltered birthday energy |

The cream cheese must be fully softened. Pull it from the fridge at least an hour ahead. Softened cream cheese beats into something completely smooth and lump-free; cold cream cheese fights you the whole way and leaves grainy bits in the filling no matter how long you mix.
The Tiny Mistakes That Flatten This Cake’s Big Energy
1. Using warm milk for the pudding. The pudding needs cold milk to thicken properly. Room temperature or warm milk gives you a thin, runny mixture that never quite sets into the right consistency. Keep it cold, whisk it immediately, and it thickens beautifully in under two minutes.
2. Stirring the whipped topping instead of folding. Whipped topping is full of air — that’s what makes the filling light and mousse-like instead of dense and heavy. Stir it aggressively and you lose all of that. Fold slowly with a spatula, stop when the streaks disappear, and walk away.
3. Skipping the plastic wrap lining. It takes thirty seconds and it means you can lift the entire finished cake out of the dish cleanly for slicing. Skip it and you’re cutting in the dish, which means uneven slices and scraping the bottom. Line the dish. Always.
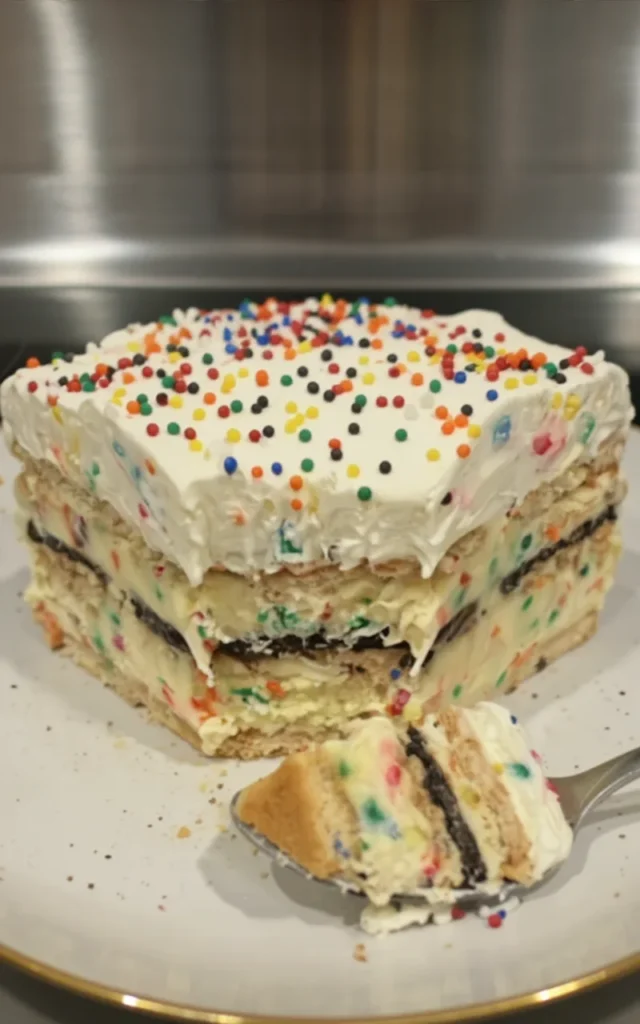
4. Not chilling long enough. Four hours is the minimum and overnight is genuinely better. The magic of this cake is what happens during the chill — the cookies absorb the cream filling and soften from crisp to tender, cake-like layers that slice cleanly and taste like they were baked from scratch. Rush it and you get crunchy cookies in cold cream. Give it time and you get something transformative.
5. Adding too many sprinkles on top before chilling. Sprinkles bleed colour when they sit in moisture for hours. Fold the ones going into the filling right before layering, and save the final topping sprinkles for right before you serve — they’ll stay vivid, distinct, and perfectly festive.
Fifteen Minutes of Work, Four Hours of Anticipation
Step 1: Line the Dish
Take your 8×8-inch square dish and line it completely with plastic wrap, letting the excess hang over all four sides. This overhang is your handle — it’s what lets you lift the whole cake out in one clean, beautiful move when it’s time to serve. Press the wrap into the corners as neatly as you can.
Step 2: Beat the Cream Cheese and Sugar
In a large mixing bowl, beat the softened cream cheese and granulated sugar together until the mixture is completely smooth, slightly fluffy, and no lumps remain — about 1 to 2 minutes with a handheld mixer on medium speed. Scrape the sides of the bowl once to make sure everything is incorporated.
Step 3: Whisk the Pudding
In a separate bowl, whisk the instant vanilla pudding mix and cold milk together vigorously for about 2 minutes until the mixture is noticeably thickened and glossy. It should coat the back of a spoon — not pourable like water, but soft and just barely set.
Step 4: Combine the Two Mixtures
Fold the thickened pudding and vanilla extract into the cream cheese mixture. Use a spatula and work in slow, deliberate strokes until the two are completely unified, smooth, and deeply fragrant with vanilla. No streaks, no lumps — just one gorgeous, silky base.
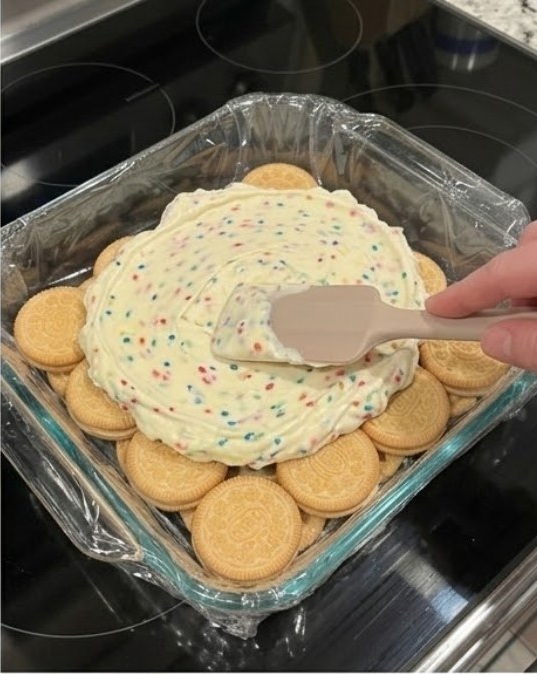
Step 5: Fold in the Whipped Topping and Sprinkles
Add half the container of whipped topping to the pudding mixture and fold it in gently until fully incorporated and the filling looks light, airy, and almost mousse-like. Then scatter in the rainbow sprinkles and fold just enough to distribute them evenly throughout — a few strokes and done.
Step 6: Build the First Layer
Arrange vanilla sandwich cookies in a single, tight, even layer across the entire bottom of the prepared dish — no gaps, no overlapping. Get them edge to edge. This is the foundation, and a solid, even layer here means clean, even slices later.
Step 7: Spread the First Half of the Filling
Spoon half of the sprinkle cream mixture over the cookie layer and spread it smoothly and evenly all the way to the edges with an offset spatula or the back of a spoon. Every cookie underneath should be fully covered.
Step 8: Repeat the Layers
Add a second complete layer of vanilla sandwich cookies on top of the filling — again, tight and even, edge to edge. Spread the remaining filling over this second cookie layer with the same care, smooth, level, reaching every corner.
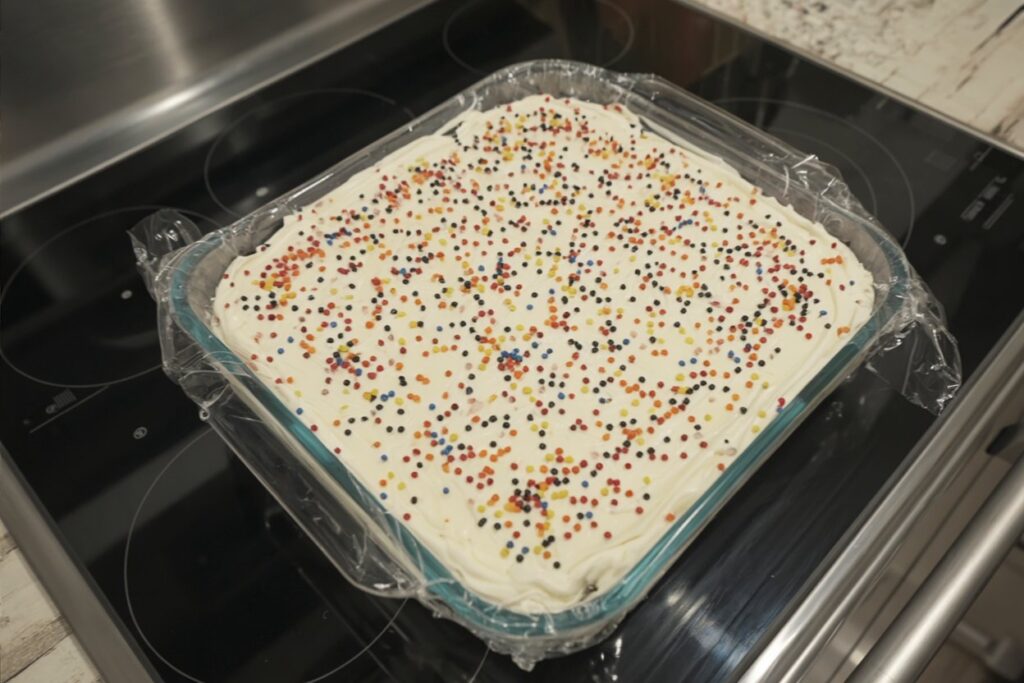
Step 9: Top With Whipped Topping
Spoon the remaining whipped topping over the top of the cake and spread it into a billowy, even blanket that covers the entire surface. This is the moment it starts looking like a real celebration dessert — and it absolutely is.
Step 10: Chill Until Set — Then Garnish and Serve
Cover the dish and refrigerate for a minimum of 4 hours, though overnight is where this cake truly becomes something special. Right before serving, scatter the extra rainbow sprinkles over the top — do this last so the colours stay bright and vivid. Lift the whole cake out using the plastic wrap overhang, transfer to a board or platter, and slice into clean squares.
What’s in Every Celebratory Square
| Nutrient | Per Serving |
|---|---|
| Calories | ~310 kcal |
| Total Fat | 14g |
| Saturated Fat | 7g |
| Carbohydrates | 42g |
| Sugar | 27g |
| Protein | 3g |
| Sodium | ~260mg |
A serving comes in at around 310 calories — reasonable for a fully celebratory dessert that genuinely satisfies. The cream cheese and pudding filling gives it more staying power than a standard frosted cake slice, which means people actually stop at one piece instead of going back three times.
Bring the Birthday Energy — Then Come Back and Tell Me Everything
Serve this at a kids’ birthday party with a single candle pressed into the top square. Cut it into neat rectangles and place each piece in a bright cupcake liner for a party platter that looks completely intentional and effortlessly cheerful. Pull it out at a summer cookout as the surprise dessert nobody saw coming. Make it as a treat-yourself Tuesday night project and eat a cold square over the sink at midnight with zero apologies.
This no bake birthday cake is the recipe that proves celebration food doesn’t have to be complicated to be completely, memorably wonderful. It’s the dessert that makes people close their eyes on the first bite, and that kind of reaction never gets old.
Leave a comment and tell me when you made it and who it was for. Did the kids lose their minds over the sprinkles? Did it set up perfectly overnight? Rate the recipe, share it with someone who has a birthday coming up, and subscribe so you never miss a no-bake recipe this good again. You have completely got this — and it is going to be absolutely perfect.
Print
No Bake Birthday Cake
A no-bake birthday cake layered with vanilla sandwich cookies, a silky cream cheese vanilla pudding filling loaded with rainbow sprinkles, and a billowy whipped topping finish. Festive, creamy, completely oven-free, and even better after a full overnight chill.
- Total Time4 hours 15 minutes
- Yield9 servings 1x
Ingredients
The Cake
- 1 box (14.3 oz / 405g) vanilla sandwich cookies
- 8 oz (225g) cream cheese, fully softened
- 1/4 cup (50g) granulated sugar
- 1 box (3.4 oz / 96g) instant vanilla pudding mix
- 1 1/2 cups (350ml) cold milk
- 1 teaspoon (5ml) vanilla extract
- 8 oz (225g) frozen whipped topping, thawed and divided in half
- 1/3 cup (55g) rainbow sprinkles, plus extra for garnish
Instructions
- Line the Dish: Line an 8×8-inch square dish completely with plastic wrap, letting the excess hang over all four sides for easy removal later.
- Beat Cream Cheese and Sugar: In a large mixing bowl, beat the softened cream cheese and granulated sugar together with a handheld mixer until perfectly smooth, fluffy, and lump-free, about 1–2 minutes.
- Make the Pudding: In a separate bowl, whisk the instant vanilla pudding mix and cold milk together for 2 minutes until thickened and glossy.
- Combine the Mixtures: Fold the thickened pudding and vanilla extract into the cream cheese mixture until completely smooth and unified with no streaks.
- Fold in Whipped Topping and Sprinkles: Gently fold half (4 oz) of the whipped topping into the pudding mixture until light and airy. Fold in the rainbow sprinkles until evenly distributed.
- Layer One — Cookies: Arrange a single, tight, even layer of vanilla sandwich cookies across the entire bottom of the prepared dish with no gaps.
- Layer One — Filling: Spread half of the sprinkle cream mixture evenly over the cookie layer all the way to the edges.
- Layer Two — Repeat: Add a second layer of vanilla sandwich cookies, then spread the remaining filling evenly over the top.
- Top With Whipped Topping: Spread the remaining whipped topping in an even, billowy layer across the entire surface of the cake.
- Chill, Garnish, and Serve: Cover and refrigerate for a minimum of 4 hours, or overnight. Just before serving, scatter extra rainbow sprinkles over the top. Lift out using the plastic wrap overhang, transfer to a platter, and slice into squares.
Notes
Cream cheese must be fully softened — pull it from the fridge at least 1 hour ahead. Use cold milk for the pudding; warm milk prevents proper thickening. Fold, do not stir, the whipped topping. Line the dish with plastic wrap for clean removal and even slicing. Overnight chilling is strongly preferred over the 4-hour minimum — the cookies soften into tender, cake-like layers. Add the final garnish sprinkles just before serving to prevent colour bleeding. Keeps refrigerated for up to 3 days.
- Prep Time: 15 minutes
- Category: Dessert
- Cuisine: American
Nutrition
- Calories: 310
- Sodium: 260
- Saturated Fat: 7
- Protein: 3
- Cholesterol: 25