Let’s Talk About This Dreamy Slice of Heaven
Ever poke holes in a perfectly good cake on purpose? I know, sounds a little wild, but trust me on this one. Pineapple Dream Cake is one of those recipes that looks fancy enough for company but simple enough for a Tuesday night craving. This tropical-inspired dessert has been making the rounds at potlucks and family gatherings for good reason—it’s impossibly moist, ridiculously fluffy, and tastes like sunshine on a plate.
The secret? Those little holes you poke let all that sweet pineapple juice soak right into every single bite. No dry cake disasters here, friends.
What You’ll Need From Your Pantry
| Ingredient | Amount |
|---|---|
| Yellow cake mix | 1 box (plus eggs, oil, water or milk as directed) |
| Crushed pineapple, undrained | 1 (20 oz) can |
| Pineapple chunks, drained | 1 (8 oz) can |
| Whipped topping, thawed | 1 (8 oz) container |
| Maraschino cherries, drained | 1/2 cup |

That’s it! Five ingredients plus your basic cake mix add-ins. Your grocery run just got a whole lot easier.
How Long Will This Take?
- Prep Time: 15 minutes
- Bake Time: 28-33 minutes
- Cooling & Chilling: About 2 hours
- Total Time: Roughly 3 hours (mostly hands-off!)
Most of that time is just waiting for cooling and chilling. Perfect for making ahead while you tackle other things.
Let’s Make Some Magic Happen
Step 1: Get That Oven Going
Preheat your oven to whatever temperature your cake mix box recommends (usually around 350°F). Grab your 9×13 inch baking pan and give it a good greasing—don’t skip this part unless you want your cake stuck to the bottom!
Tip: A little flour dusted over the greased pan creates extra insurance against sticking.
Step 2: Mix Up Your Batter
Whip together your yellow cake mix with eggs, oil, and water or milk according to the package directions. Don’t overthink this—just follow the box and you’re golden.
Tip: Room temperature eggs blend more smoothly and create a fluffier texture.
Step 3: Into the Pan It Goes
Pour that beautiful batter into your prepared pan and spread it evenly. Give the pan a gentle tap on the counter to release any air bubbles hiding in there.
Step 4: Bake Until Perfect
Slide your pan into the oven and bake for 28-33 minutes. You’ll know it’s done when a wooden skewer poked into the center comes out clean. Keep an eye on it around the 25-minute mark—every oven runs a little different.
Step 5: The Poke Method (This Is Where the Magic Lives)
Here’s where things get fun! As soon as that warm cake comes out, grab a wooden spoon handle or fork and poke holes all over the top. Don’t be shy—make sure those holes go about halfway down into the cake.
Tip: Space your pokes about an inch apart for maximum juice absorption.
Step 6: Soak It All In
Pour the entire can of crushed pineapple—juice and all—right over the warm cake. Spread it around so every section gets some love. Watch it seep down into those holes. This step is what makes your pineapple dream cake impossibly moist.
Step 7: Cool Down Completely
Let your soaked cake cool at room temperature first, then pop it in the fridge for about 30 minutes. Patience pays off here—the cake needs time to absorb all that fruity goodness.
Step 8: Top It Off
Spread your thawed whipped topping evenly across the cooled cake. Go edge to edge for full coverage.
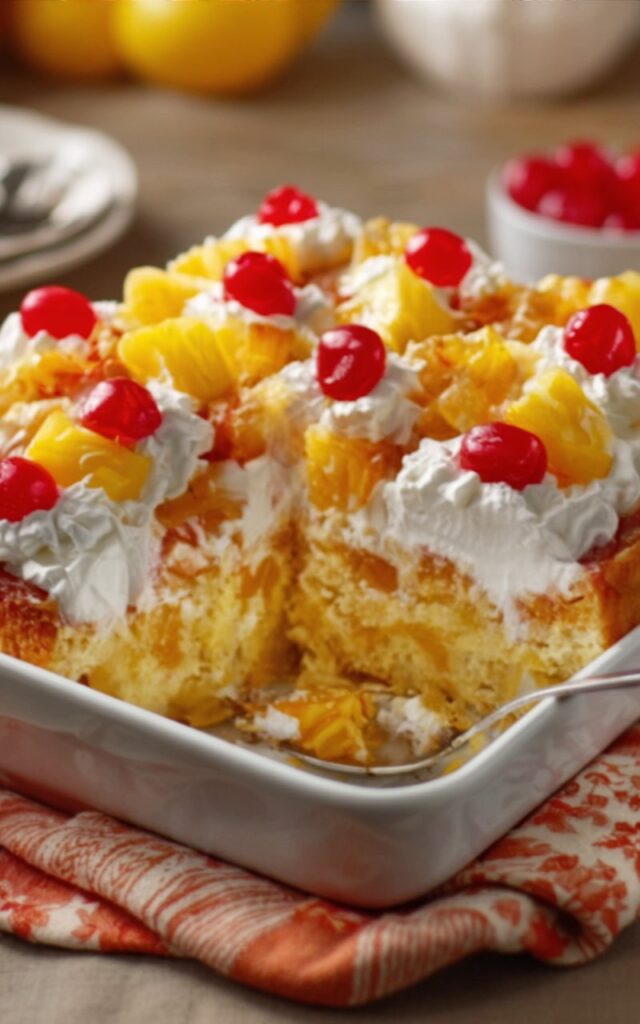
Step 9: Make It Pretty
Arrange those pineapple chunks and bright red maraschino cherries on top however makes your heart happy. Rows, scattered, a pattern—totally up to you!
Step 10: Final Chill
Pop the finished cake back in the fridge for at least one hour before serving. This firms everything up and lets the flavors really come together.
Nutrition Facts (Per Serving)
Based on 12 servings:
- Calories: 320 kcal
- Carbohydrates: 52 g
- Sugar: 35 g
- Fat: 12 g
- Saturated Fat: 5 g
- Protein: 3 g
- Sodium: 310 mg
This is definitely a treat-yourself dessert, not an everyday snack!
Making It a Bit Lighter
Want to cut some calories without losing that dreamy texture? Swap the regular cake mix for a sugar-free version.
Use light whipped topping instead of regular—you’ll save fat and calories while keeping that fluffy cloud factor. For less added sugar, drain the crushed pineapple and use only half the juice.
How to Serve This Beauty
This pineapple dream cake shines at summer barbecues, potlucks, and birthday parties. Cut it into squares and serve chilled straight from the pan.
Pair it with iced tea or lemonade for the ultimate refreshing combo. It’s also gorgeous topped with toasted coconut flakes for extra tropical vibes.
Oops, Don’t Do This!
Skipping the holes: Those pokes are everything. Without them, your juice just sits on top instead of soaking in.
Pouring juice on a cool cake: The warm cake absorbs liquid way better. Don’t wait too long after it comes out of the oven.
Using frozen whipped topping: Make sure it’s fully thawed or you’ll get lumpy, uneven coverage.
Serving it warm: This cake needs to chill. Warm cake plus whipped topping equals melty mess.
Keeping Your Cake Fresh
Store your pineapple dream cake covered in the refrigerator for up to 4 days. The longer it sits, the more the flavors meld together—day two is honestly even better than day one.
This cake doesn’t freeze particularly well because of the whipped topping, so plan to enjoy it fresh. Making it the night before an event is perfectly fine.
Time to Get Baking!
There you have it—the easiest, dreamiest, most foolproof tropical dessert you’ll ever make. This pineapple dream cake delivers on moisture, flavor, and that wow factor every single time. Whether you’re feeding a crowd or just treating your family, this one’s a winner.
Give it a try and drop a comment below! I’d love to hear how yours turned out. Don’t forget to rate the recipe and subscribe for more simple, delicious ideas!
Got Questions? I’ve Got Answers!
Q1. Can I use fresh pineapple instead of canned?
Canned works best here because you need that sweet juice for soaking. Fresh pineapple doesn’t release enough liquid. If you really want fresh, blend some with a bit of pineapple juice to create a similar consistency.
Q2. Can I make this cake ahead of time?
Absolutely! This cake actually tastes better after chilling overnight. Make it the day before your event for best results and easiest prep.
Q3. What can I use instead of whipped topping?
Homemade whipped cream works beautifully—just whip cold heavy cream with a little powdered sugar until stiff peaks form. Keep in mind it won’t hold up quite as long as store-bought topping.
Q4. Can I use a different cake mix flavor?
White or vanilla cake mix both work wonderfully. Some folks even use butter cake mix for extra richness. Chocolate would be pretty adventurous!
Q5. Why is my cake still dry?
You might not have poked enough holes, or you waited too long before adding the pineapple. Make sure to poke immediately while warm and really distribute that juice everywhere.
Print
Pineapple Dream Cake: The Fluffiest No-Fail Dessert
This impossibly moist pineapple dream cake is soaked with sweet pineapple juice and topped with fluffy whipped topping, pineapple chunks, and cherries. Perfect for potlucks, parties, and whenever you need a taste of tropical sunshine!
- Total Time3 hours
- Yield12 servings 1x
Ingredients
Cake
- 1 box yellow cake mix (plus eggs, oil, water or milk as directed on box)
- 20 oz crushed pineapple (undrained)
Topping
- 8 oz whipped topping (thawed)
- 8 oz pineapple chunks (drained)
- 0.5 cup maraschino cherries (drained, for garnish)
Instructions
- Preheat and Prepare: Preheat oven to temperature specified on cake mix box. Grease and flour a 9×13 inch baking pan.
- Mix the Batter: Prepare yellow cake mix according to package directions, combining with eggs, oil, and water or milk as instructed.
- Bake the Cake: Pour batter into prepared pan and bake for 28-33 minutes, or until a wooden skewer inserted in center comes out clean.
- Poke the Holes: Immediately after removing from oven, use a wooden spoon handle or fork to poke holes evenly across entire top surface, going about halfway down.
- Add the Pineapple: Pour entire can of undrained crushed pineapple evenly over warm cake, allowing juice and fruit to seep into holes.
- Cool Completely: Let cake cool at room temperature, then refrigerate for 30 minutes to fully absorb pineapple liquid.
- Top and Garnish: Spread thipped topping evenly over cooled cake. Arrange pineapple chunks and maraschino cherries decoratively on top.
- Chill and Serve: Refrigerate for at least 1 hour before serving to allow flavors to meld and topping to firm up.
Notes
Poking holes in the warm cake immediately after baking is crucial for maximum moisture absorption. The cake tastes even better the next day after the flavors have had time to meld together.
- Prep Time: 15 minutes
- Cook Time: 33 minutes
- Category: Dessert
- Cuisine: American
Nutrition
- Calories: 320
- Sugar: 35
- Sodium: 310
- Fat: 12
- Saturated Fat: 5
- Carbohydrates: 52
- Protein: 3