First Bite of Heaven
Picture this: you’re celebrating a special occasion, and you want to wow your guests with something truly spectacular. What if I told you that Red Velvet Strawberry Cheesecake combines three beloved desserts into one show-stopping masterpiece? Most people think you need to choose between red velvet cake, creamy cheesecake, or fresh strawberry dessert—but why settle when you can have all three?
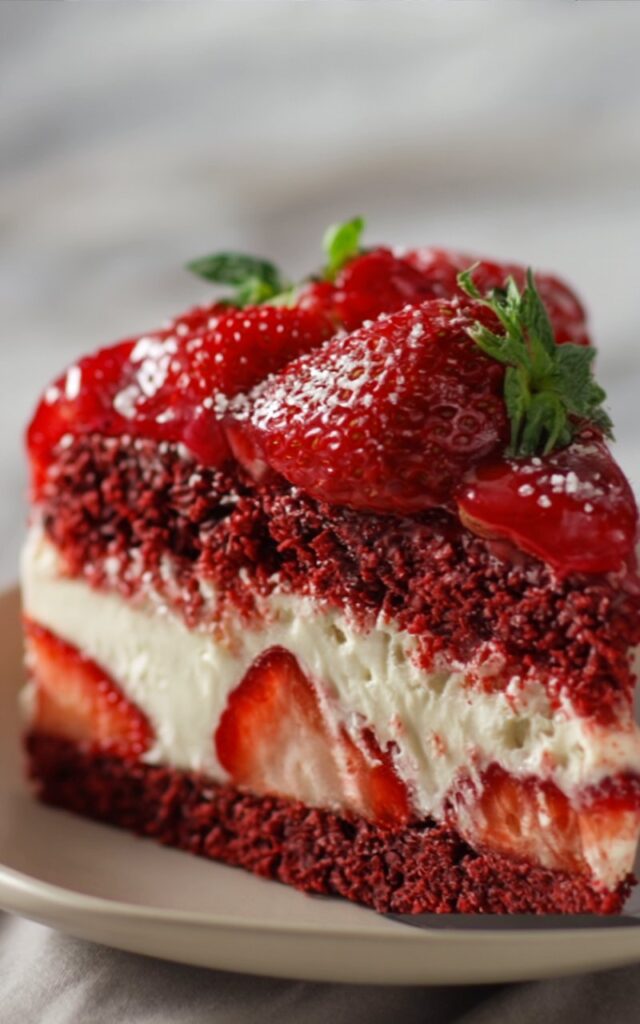
This red velvet strawberry cheesecake is the dessert equivalent of wearing your fanciest outfit to brunch—it’s a little extra, totally indulgent, and absolutely worth it. With its vibrant red layers, silky cheesecake center, and glossy strawberry topping, this recipe delivers on both flavor and visual impact. Whether you’re planning a romantic Valentine’s dinner, a birthday bash, or just treating yourself because Tuesday deserves celebration too, this dessert will make you look like a baking rockstar (even if you’re secretly still figuring out what “cream until fluffy” really means).
Everything You’ll Need
Red Velvet Cake Layers
| Ingredient | Amount |
|---|---|
| All-purpose flour | 1½ cups |
| Unsweetened cocoa powder | 1 tablespoon |
| Baking soda | ½ teaspoon |
| Salt | ½ teaspoon |
| Buttermilk (room temperature) | ¾ cup |
| Distilled white vinegar | 1 teaspoon |
| Vanilla extract | 1 teaspoon |
| Red gel food coloring | ½ teaspoon |
| Unsalted butter (softened) | ½ cup |
| Granulated sugar | ¾ cup |
| Large eggs (room temperature) | 2 |
Cheesecake Layer
| Ingredient | Amount |
|---|---|
| Cream cheese (softened) | 16 oz |
| Granulated sugar | ¾ cup |
| Vanilla extract | 1 teaspoon |
| Large eggs (room temperature) | 2 |
| Sour cream | ½ cup |
| Heavy cream | 2 tablespoons |
Strawberry Topping
| Ingredient | Amount |
|---|---|
| Fresh strawberries (hulled and sliced) | 2 cups |
| Granulated sugar | ¼ cup |
| Cornstarch | 1 tablespoon |
| Lemon juice | 1 tablespoon |
| Water | ½ cup |
Optional Cream Cheese Frosting
| Ingredient | Amount |
|---|---|
| Cream cheese (softened) | 4 oz |
| Unsalted butter (softened) | 2 tablespoons |
| Vanilla extract | 1 teaspoon |
| Powdered sugar | 1 cup |
| Fresh strawberries for garnish | As needed |

Time Investment (Totally Worth It!)
- Prep Time: 30 minutes
- Cook Time: 90 minutes
- Chilling Time: 4 hours (or overnight)
- Total Time: Approximately 5 hours
Yes, this dessert requires some patience, but most of that is hands-off chilling time. Think of it as about the same time commitment as binge-watching half a season of your favorite show—except the payoff is way more delicious!
Let’s Make Magic Happen
Step 1: Get Your Red Velvet Layers Started
Preheat your oven to 350°F (175°C) and line two 8-inch round cake pans with parchment paper. Give them a light spray or butter coating too—nobody wants their gorgeous cake stuck to the pan! In a medium bowl, whisk together the flour, cocoa powder, baking soda, and salt until there are no lumps lurking.
Pro tip: Sifting your dry ingredients might feel old-fashioned, but it really does create a lighter, more tender crumb. If you skip it, just make sure you whisk thoroughly to break up any clumps.
Step 2: Mix Your Wet Team
In a small bowl or measuring cup, combine the buttermilk, vinegar, vanilla extract, and that gorgeous red gel food coloring. Stir until the color is evenly distributed—this mixture should look like liquid velvet! The vinegar and buttermilk combo is crucial here; they react with the baking soda to give red velvet its signature tender texture.
Kitchen hack: No buttermilk? Add 1 tablespoon of white vinegar or lemon juice to ¾ cup regular milk, stir, and let it sit for 5 minutes. Boom—homemade buttermilk!
Step 3: Cream That Butter and Sugar
In your stand mixer or using a hand mixer with a large bowl, beat the softened butter and sugar together on medium-high speed for about 3-4 minutes. You’re looking for a light, fluffy mixture that’s almost pale in color. Add the eggs one at a time, beating well after each addition until they’re fully incorporated.
Why this matters: Proper creaming incorporates air into your batter, which means a lighter, more tender cake. Don’t rush this step—your arms might get tired, but your taste buds will thank you!
Step 4: Bring It All Together
Now for the fun part! Add about one-third of your flour mixture to the butter mixture, mix on low just until combined, then add half of your buttermilk mixture. Repeat this pattern, ending with the flour mixture. Mix each addition just until you don’t see streaks anymore—overmixing is the enemy of tender cake!
Divide the batter evenly between your two prepared pans. A kitchen scale makes this super easy, but eyeballing it works too.
Step 5: Bake Those Beauties
Slide your pans into the preheated oven and bake for 22-25 minutes. You’ll know they’re done when a toothpick inserted into the center comes out clean or with just a few moist crumbs. The tops should spring back when gently pressed.
Let the cakes cool in their pans for 10 minutes, then turn them out onto wire racks to cool completely. Patience, friends—putting warm cake into your final assembly will spell disaster!
Step 6: Cheesecake Time!
Lower your oven temperature to 325°F (160°C). In a squeaky-clean mixing bowl, beat the cream cheese and sugar until completely smooth and lump-free—about 3 minutes. Scrape down the sides of the bowl, then beat in the vanilla extract. Add the eggs one at a time, mixing on low speed just until incorporated. Finally, fold in the sour cream and heavy cream.
Critical tip: Don’t overbeat once you add the eggs! Too much air creates cracks in your cheesecake, and we’re going for smooth perfection here.
Step 7: Water Bath Magic
Pour your cheesecake batter into an 8-inch springform pan (make sure it’s wrapped in aluminum foil to prevent leaks!). Place the springform pan into a larger roasting pan, then carefully pour hot water into the roasting pan until it comes about halfway up the sides of the springform.
Bake for 55-65 minutes. The cheesecake is done when the edges are set but the center still has a slight jiggle—like, um, how do I say this delicately—like a certain body part doing a certain dance. Yeah, you know what I mean!
Turn off the oven, crack the door open, and let the cheesecake cool in the oven for an hour. Then refrigerate for at least 4 hours, but overnight is even better.
Step 8: Strawberry Sauce Heaven
While everything’s chilling, let’s make that gorgeous topping! Combine the sliced strawberries, sugar, cornstarch, lemon juice, and water in a medium saucepan over medium heat. Stir frequently as the mixture comes to a gentle boil. Cook until it thickens beautifully—about 5-7 minutes. The sauce should coat the back of a spoon.
Remove from heat and let it cool completely. It’ll thicken even more as it cools, creating that perfect glossy, spoonable consistency.
Step 9: The Grand Assembly
This is where your masterpiece comes together! Place your first red velvet layer on your serving plate. Carefully remove the cheesecake from its springform pan and place it on top of the cake layer. Top with your second red velvet layer.
If you’re making the optional cream cheese frosting, beat together the cream cheese, butter, and vanilla until smooth, then gradually add the powdered sugar. Pipe or spread decorative dollops around the edges.
Finally, spoon that stunning strawberry sauce over the top, letting some drip down the sides for that “I’m a professional baker” look. Garnish with fresh strawberries.
The Nutrition Breakdown
Per generous slice (assuming 12 servings):
- Calories: 485 kcal
- Protein: 8 g
- Total Fat: 26 g
- Saturated Fat: 15 g
- Trans Fat: 0 g
- Carbohydrates: 56 g
- Dietary Fiber: 1 g
- Sugars: 42 g
- Cholesterol: 135 mg
- Sodium: 320 mg
- Calcium: 110 mg
- Iron: 1.2 mg
Real talk: This is a celebration dessert, not an everyday breakfast (though I won’t judge). The cream cheese does provide some protein and calcium, and the strawberries add vitamin C and antioxidants—so there’s that!
Lighten It Up (Without Losing the Love)
Look, I’m all about indulgence, but sometimes you want to enjoy this beauty without unbuttoning your pants afterward. Here are some swaps that actually work:
- Reduce the sugar: You can cut the sugar in both the cake and cheesecake layers by about 25% without dramatically affecting texture. The strawberry topping provides plenty of sweetness too.
- Greek yogurt swap: Replace half the sour cream in the cheesecake layer with full-fat Greek yogurt. You’ll add protein and tang while cutting some calories.
- Lighter cake layers: Substitute ⅓ cup of the all-purpose flour with whole wheat pastry flour for added fiber and nutrients. Regular whole wheat is too heavy for this delicate cake.
- Natural food coloring: If you’re avoiding artificial dyes, use beet juice or powder for the red color. The shade will be more burgundy than bright red, but it’s beautiful and natural.
- Portion control: Cut smaller slices! This dessert is so rich that a thinner slice is often just as satisfying. You can easily get 16 servings instead of 12.
How to Serve This Showstopper
This red velvet strawberry cheesecake deserves to be the star of the show, but here’s how to make the moment even more special:
- Presentation matters: Serve slices on white plates to make those red layers pop. A small mint leaf beside each slice adds a touch of elegance.
- Perfect pairings: This pairs beautifully with champagne, prosecco, or a sweet dessert wine. For non-alcoholic options, try sparkling raspberry lemonade or a rich, dark-roast coffee.
- Temperature tips: For the best flavor and texture, remove the cake from the refrigerator about 20-30 minutes before serving. The cheesecake layer tastes creamier at cool room temperature rather than ice-cold.
- Make it extra: A small scoop of vanilla ice cream or a dollop of whipped cream alongside each slice takes it over the top. Because if you’re already going big, why not go bigger?
- Occasion ideas: This dessert screams Valentine’s Day, anniversaries, and bridal showers, but it’s also perfect for Mother’s Day, Christmas dessert tables, or any time you want to impress the heck out of someone.
Oops-Proof: Mistakes You’ll Want to Skip
Even experienced bakers can stumble with a recipe this ambitious. Here’s what to watch out for:
- Cold ingredients in the cake batter: When butter, eggs, and buttermilk are at different temperatures, they don’t emulsify properly, leading to a dense, heavy cake. Solution: Set everything out an hour before baking. If you forget, place eggs in warm water for 5 minutes and microwave butter for 5-10 seconds.
- Overmixing after adding flour: This develops too much gluten, making your tender red velvet tough and chewy. Solution: Mix just until the flour streaks disappear. A few small lumps are totally fine!
- Cracked cheesecake: Usually caused by overbaking or temperature shock. Solution: Use a water bath, don’t overbake (remember the jiggle!), and let it cool gradually in the turned-off oven.
- Runny strawberry sauce: If you skip the cornstarch or don’t cook it long enough, your topping will be soupy. Solution: Make sure the mixture comes to a full boil and thickens. Remember, it firms up even more as it cools.
- Cake layers stuck to pan: Nothing ruins your day like a broken cake layer. Solution: Line pans with parchment paper AND grease them. Let cakes cool for 10 minutes before attempting to remove them.
- Lopsided layers: If your cakes bake unevenly, your final dessert will lean like the Tower of Pisa. Solution: Use an oven thermometer to ensure accurate temperature, rotate pans halfway through baking, and level any domed cakes with a serrated knife.
Keeping It Fresh
You’ve put all this work in—let’s make sure it stays delicious!
Refrigerator storage: This dessert MUST be refrigerated due to the cream cheese components. Store it in an airtight cake dome or loosely covered with plastic wrap for up to 5 days. The strawberry topping stays fresh for about 3 days, so if you’re making this ahead, add the topping within a day of serving.
Freezing options: You can freeze the red velvet cake layers (unfrosted) for up to 3 months. Wrap each layer tightly in plastic wrap, then aluminum foil. Thaw in the refrigerator overnight before assembling. The assembled cheesecake can also be frozen (without the strawberry topping) for up to 1 month. Add the strawberry sauce after thawing.
Make-ahead strategy: This is actually a GREAT make-ahead dessert! Bake the cake layers and cheesecake the day before. Make the strawberry sauce up to 3 days ahead. Assemble everything 2-4 hours before serving for maximum freshness and easiest slicing.
Slicing tips: Use a long, thin knife dipped in hot water and wiped clean between each cut. This gives you those perfect, Instagram-worthy slices with distinct layers.
Wrapping Up This Sweet Adventure
There you have it—a red velvet strawberry cheesecake that’s guaranteed to earn you serious bragging rights in the kitchen! This stunning three-layer dessert brings together the subtle cocoa notes of red velvet, the rich creaminess of New York-style cheesecake, and the bright, fresh pop of strawberry sauce. It’s indulgent, yes, but it’s also a labor of love that shows people you really care.
The beauty of this recipe is that while it looks intimidating, each component is actually pretty straightforward. Break it down into steps, give yourself plenty of time, and trust the process. Your friends and family will think you spent days in culinary school to pull this off!
Ready to dive in? Try making this show-stopping dessert this weekend and let me know how it turns out in the comments below! Did you make any creative substitutions? How did your layers turn out? I’d absolutely love to see your photos and hear about your experience. And if you loved this recipe, don’t forget to rate it with five stars and share it with your dessert-loving friends. Subscribe to get more decadent recipes delivered straight to your inbox—because life’s too short for boring desserts!
Your Questions Answered
Q1. Can I use a different size pan for this recipe?
Absolutely! If you want to use 9-inch pans instead of 8-inch, you’ll have slightly thinner cake layers, so reduce the baking time by about 3-5 minutes and watch them carefully. For the cheesecake layer, stick with an 8-inch springform to maintain the proper height ratio between all the layers. If you only have a 9-inch springform, your cheesecake layer will be thinner, which actually makes assembly easier—just reduce the baking time by about 10 minutes.
Q2. What if I don’t have gel food coloring?
Gel food coloring gives the most vibrant red color without adding extra liquid, but you can use liquid food coloring in a pinch. You’ll need about 1-2 tablespoons to achieve that classic red velvet hue. Just know that adding more liquid might slightly affect the batter consistency—you may need to add an extra tablespoon or two of flour to compensate. For a natural option, beet powder or beet juice works, though the color will be more burgundy than bright red.
Q3. Help! My cheesecake cracked. Can I still use it?
Yes! Cracks happen to the best of us, and the beauty of this layered dessert is that the strawberry topping covers the top of your cheesecake completely. Plus, it’s sandwiched between cake layers, so any side cracks won’t even show. If you’re a perfectionist, you can also use the optional cream cheese frosting to fill and smooth any cracks before adding the strawberry sauce. Your secret is safe with me!
Q4. Can I skip the water bath for the cheesecake?
I really don’t recommend it. The water bath serves two important purposes: it keeps the oven environment humid (preventing cracks) and ensures gentle, even baking (preventing that rubbery texture). If you absolutely must skip it, place a pan of water on the rack below your cheesecake and reduce the oven temperature by 25°F. Bake slowly and don’t open the oven door. Just know that your results may vary!
Q5. How far in advance can I make this dessert?
The assembled cake tastes best within 24-48 hours of assembly, but you can definitely prep components ahead! Bake the cake layers up to 2 days in advance and store them wrapped at room temperature. Make the cheesecake up to 3 days ahead and keep it refrigerated. The strawberry sauce keeps for about 3 days refrigerated. Assemble everything the day before your event for optimal freshness and easiest slicing. The flavors actually meld beautifully overnight!
Print
Red Velvet Strawberry Cheesecake Recipe
This stunning Red Velvet Strawberry Cheesecake combines three beloved desserts into one show-stopping masterpiece. With vibrant red velvet cake layers, a silky smooth cheesecake center, and fresh strawberry topping, this recipe delivers on both flavor and visual impact. Perfect for celebrations, romantic dinners, or any time you want to impress with a truly spectacular dessert.
- Total Time5 hours
- Yield12 servings 1x
Ingredients
Red Velvet Cake Layers
- 1.5 cups all-purpose flour
- 1 tablespoon unsweetened cocoa powder
- 0.5 teaspoon baking soda
- 0.5 teaspoon salt
- 0.75 cup buttermilk (room temperature)
- 1 teaspoon distilled white vinegar
- 1 teaspoon vanilla extract
- 0.5 teaspoon red gel food coloring
- 0.5 cup unsalted butter (softened)
- 0.75 cup granulated sugar
- 2 large eggs (room temperature)
Cheesecake Layer
- 16 oz cream cheese (softened)
- 0.75 cup granulated sugar
- 1 teaspoon vanilla extract
- 2 large eggs (room temperature)
- 0.5 cup sour cream
- 2 tablespoons heavy cream
Strawberry Topping
- 2 cups fresh strawberries (hulled and sliced)
- 0.25 cup granulated sugar
- 1 tablespoon cornstarch
- 1 tablespoon lemon juice
- 0.5 cup water
Optional Cream Cheese Frosting
- 4 oz cream cheese (softened)
- 2 tablespoons unsalted butter (softened)
- 1 teaspoon vanilla extract
- 1 cup powdered sugar
- fresh strawberries (for garnish)
Instructions
- Prepare the cake pans and dry ingredients: Preheat your oven to 350°F (175°C) and line two 8-inch round cake pans with parchment paper. Give them a light spray or butter coating. In a medium bowl, whisk together the flour, cocoa powder, baking soda, and salt until there are no lumps lurking.
- Mix the wet ingredients: In a small bowl or measuring cup, combine the buttermilk, vinegar, vanilla extract, and red gel food coloring. Stir until the color is evenly distributed.
- Cream butter and sugar: In your stand mixer or using a hand mixer with a large bowl, beat the softened butter and sugar together on medium-high speed for about 3-4 minutes until light and fluffy. Add the eggs one at a time, beating well after each addition.
- Combine all ingredients: Add about one-third of your flour mixture to the butter mixture, mix on low just until combined, then add half of your buttermilk mixture. Repeat this pattern, ending with the flour mixture. Mix just until streaks disappear. Divide the batter evenly between your two prepared pans.
- Bake the red velvet cakes: Bake for 22-25 minutes until a toothpick inserted into the center comes out clean or with just a few moist crumbs. Let the cakes cool in their pans for 10 minutes, then turn them out onto wire racks to cool completely.
- Prepare the cheesecake batter: Lower your oven temperature to 325°F (160°C). Beat the cream cheese and sugar until completely smooth, about 3 minutes. Beat in the vanilla extract. Add the eggs one at a time, mixing on low speed just until incorporated. Fold in the sour cream and heavy cream.
- Bake the cheesecake: Pour cheesecake batter into an 8-inch springform pan wrapped in aluminum foil. Place the springform pan into a larger roasting pan, then carefully pour hot water into the roasting pan until it comes about halfway up the sides of the springform. Bake for 55-65 minutes until edges are set but center still has a slight jiggle. Turn off the oven, crack the door open, and let the cheesecake cool in the oven for an hour. Then refrigerate for at least 4 hours or overnight.
- Make the strawberry topping: Combine the sliced strawberries, sugar, cornstarch, lemon juice, and water in a medium saucepan over medium heat. Stir frequently as the mixture comes to a gentle boil. Cook until thickened, about 5-7 minutes. Remove from heat and let cool completely.
- Assemble the layers: Place your first red velvet layer on your serving plate. Carefully remove the cheesecake from its springform pan and place it on top of the cake layer. Top with your second red velvet layer. If making the optional frosting, beat together cream cheese, butter, and vanilla until smooth, then gradually add powdered sugar. Pipe or spread decorative dollops around the edges. Spoon the strawberry sauce over the top, letting some drip down the sides. Garnish with fresh strawberries.
Notes
All ingredients should be at room temperature for best results. The cake tastes best when assembled 2-4 hours before serving to allow flavors to meld. Store covered in the refrigerator for up to 5 days. Cake layers can be made ahead and frozen for up to 3 months. For cleaner slices, dip your knife in hot water and wipe clean between cuts.
- Prep Time: 30 minutes
- Cook Time: 1 hour 30 minutes
- Category: Dessert
- Cuisine: American
Nutrition
- Calories: 485
- Sugar: 42
- Sodium: 320
- Fat: 26
- Saturated Fat: 15
- Carbohydrates: 56
- Fiber: 1
- Protein: 8
- Cholesterol: 135