The 25-Minute Meal That Will Change Your Weeknights
Did you know that the average person spends nearly an hour preparing dinner each night? A recent study shows that for many busy families, finding a meal that’s both quick and universally loved is a major daily challenge. What if you could slash that prep time and serve up a hot, cheesy, and satisfying meal that has everyone at the table asking for seconds? Enter the solution you’ve been searching for: these incredibly Easy Tuna Melt Sliders. This recipe isn’t just another sandwich; it’s a game-changing approach to a classic comfort food, perfect for hectic weeknights, game day gatherings, or a simple, delicious lunch. Get ready to transform a humble can of tuna into a gooey, golden-brown masterpiece.
Your Shopping List for Perfect Tuna Melt Sliders
The magic of this recipe lies in its use of simple, accessible ingredients that come together to create something truly special. The combination of savory tuna salad, melted cheese, and soft, sweet rolls topped with a buttery glaze is simply irresistible.
| Component | Ingredient | Quantity | Sensory Description & Smart Swaps |
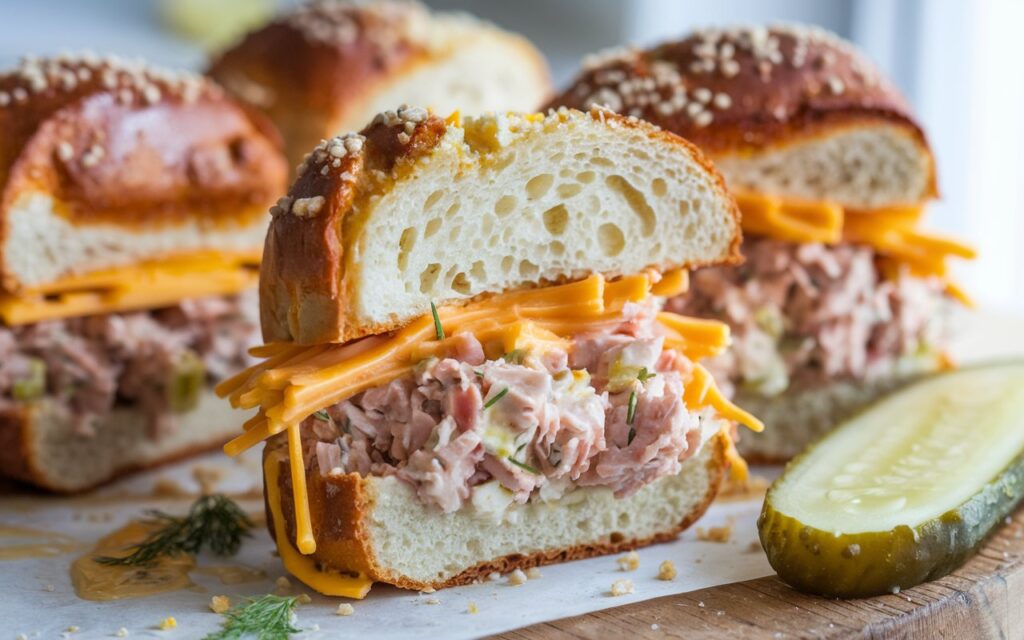
| For the Sliders | Canned Tuna | 2 (5 oz) cans | Use tuna packed in water for a lighter base, or oil-packed for a richer flavor. Drain it well for the best texture. Easy Swap: Canned salmon or even shredded chicken would also be delicious. |
| Mayonnaise | 1/2 cup | The creamy binder for our tuna salad. Use a high-quality mayo for the best taste. Easy Swap: Greek yogurt (full-fat) for a tangier, higher-protein option. | |
| Celery | 1 stalk, finely chopped | Provides that essential, fresh, and satisfying crunch. Easy Swap: Finely chopped red onion or bell pepper can add a different kind of crunch and flavor. | |
| Dill Relish | 2 tbsp | Adds a sweet and tangy kick that cuts through the richness. Easy Swap: Finely chopped dill pickles or a squeeze of fresh lemon juice work well. | |
| Dijon Mustard | 1 tsp | For a subtle, zesty depth of flavor that elevates the tuna salad. | |
| Hawaiian Sweet Rolls | 1 (12-count) package | Their signature softness and sweetness are the perfect vehicles for the savory filling. Easy Swap: Any soft dinner rolls or slider buns will work. | |
| Provolone or Cheddar Cheese | 6 slices | The melty, cheesy heart of the sliders. Provolone is mild and creamy; cheddar is sharper. Easy Swap: Swiss, Muenster, or Monterey Jack cheese all melt beautifully. | |
| For the Topping | Butter | 3 tbsp, melted | Creates a rich, golden-brown top and helps the seasonings adhere. |
| Poppy Seeds | 1 tsp | Adds a slight nutty flavor and a classic visual appeal. | |
| Garlic Powder | 1/2 tsp | Infuses the buttery topping with a savory, aromatic kick. | |
| Worcestershire Sauce | 1/2 tsp | A secret weapon for a deep, umami flavor in the glaze. |
Timing: A Gourmet Experience in Under 30 Minutes
In our fast-paced world, time is a precious commodity. This recipe respects that, delivering maximum flavor in minimum time.
- Preparation Time: 15 minutes
- Cooking Time: 10-12 minutes
- Total Time: Approximately 25-27 minutes
Considering that data from market research firms shows many “quick” recipes still take over 40 minutes from start to finish, these Easy Tuna Melt Sliders are over 30% faster, making them a true weeknight hero.
Step 1: Crafting the Perfect Tuna Salad Filling
Preheat your oven to 350°F (175°C). In a medium bowl, combine the two cans of well-drained tuna, mayonnaise, finely chopped celery, dill relish, and Dijon mustard. Mix everything together until it’s well combined, but be gentle – you don’t want to turn the tuna into a complete paste. A pro-tip here is to flake the tuna with a fork before adding the other ingredients to ensure an even mixture. Season with a pinch of salt and pepper to your taste. This is your chance to personalize! Feel free to add a dash of hot sauce or some fresh herbs like dill or parsley.
Step 2: Assembling the Sliders
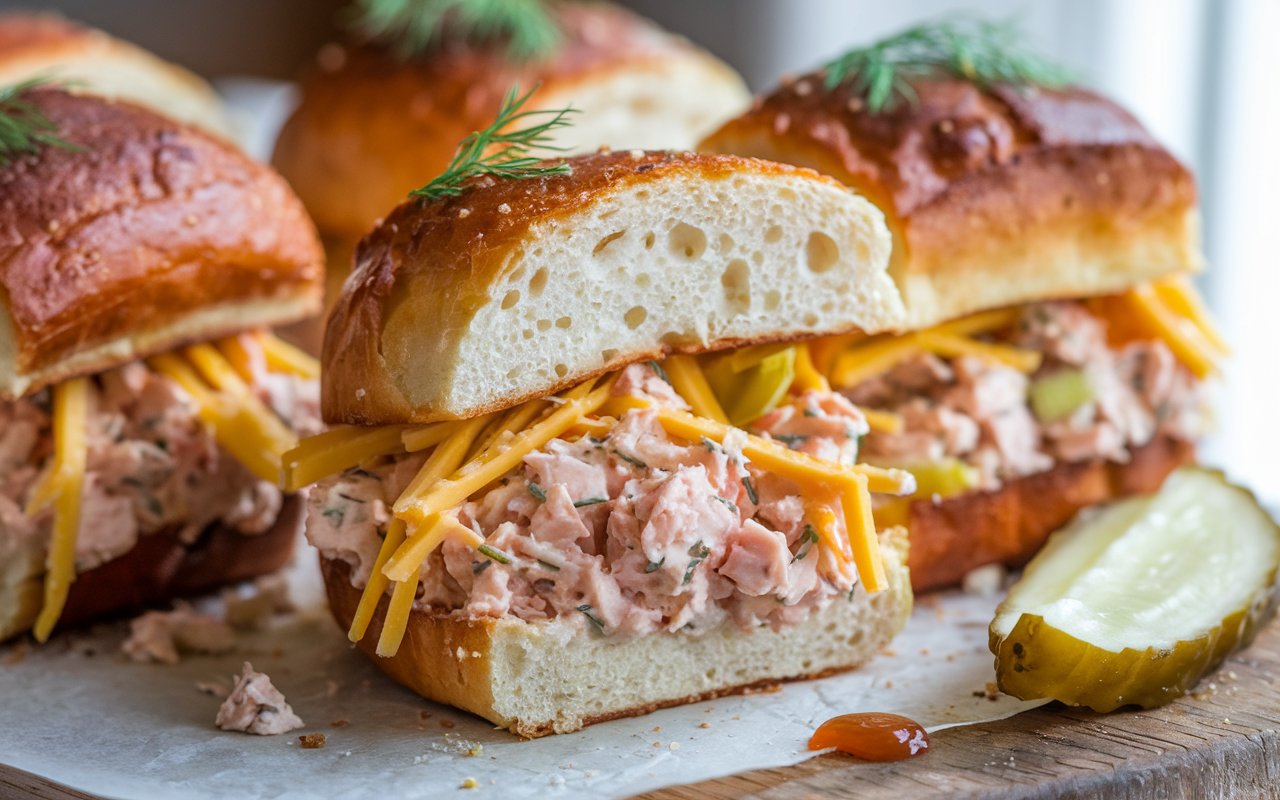
Take your package of Hawaiian sweet rolls and, without separating them, use a large serrated knife to slice the entire slab of rolls in half horizontally. It’s like opening a giant book. Place the bottom half of the rolls into a lightly greased 9×13 inch baking dish. Spread your prepared tuna salad mixture evenly over the bottom rolls, reaching all the way to the edges. Next, lay the slices of your chosen cheese over the tuna salad, creating a complete blanket of cheesy goodness. Place the top half of the rolls back on, completing your giant sandwich.
Step 3: Creating the Savory Butter Topping
Now for the magic touch that makes these sliders truly unforgettable. In a small bowl, whisk together the melted butter, poppy seeds, garlic powder, and Worcestershire sauce. This combination creates a savory, aromatic glaze that will bake into the tops of the rolls. Using a pastry brush or the back of a spoon, spread this buttery mixture evenly over the entire surface of the top rolls. Don’t be shy – make sure every nook and cranny gets some of that delicious glaze.
Step 4: Baking to Golden, Melty Perfection

Cover the baking dish with aluminum foil and bake in your preheated oven for 10 minutes. The foil helps to steam the rolls and melt the cheese completely without burning the tops. After 10 minutes, remove the foil and bake for an additional 2-5 minutes, or until the tops are beautifully golden brown and the cheese is bubbly and oozing out the sides. This final, uncovered bake is what gives the sliders that irresistible finish. Let them rest for a minute or two before using a knife to cut them apart and serve immediately.
A Look at the Nutritional Profile
While these sliders are a definitive comfort food, understanding their nutritional content can help you fit them into a balanced diet. The following is an approximation per slider, assuming a batch of 12.
- Calories: Approximately 280-330 kcal
- Fat: 18-22g
- Protein: 12-15g
- Carbohydrates: 15-20g
- Sodium: 500-600mg
Data Insight: By using tuna packed in water and Greek yogurt instead of mayonnaise, you can reduce the fat content by up to 40% per slider while simultaneously increasing the protein.
Healthier Alternatives for a Lighter Bite
Love the idea but want to lighten it up? This recipe is incredibly adaptable.
- Go Low-Carb: Ditch the rolls and serve the hot tuna and cheese mixture in hollowed-out bell peppers or on top of zucchini boats. Bake until the filling is hot and bubbly.
- Boost the Veggies: Add more finely chopped vegetables to your tuna salad. Shredded carrots, finely diced red onion, or even corn can add nutrients, texture, and flavor.
- Smart Swaps: Use light mayonnaise or Greek yogurt, and opt for a reduced-fat cheese to significantly cut down on calories and fat without a huge flavor sacrifice. Whole wheat slider buns can also add extra fiber.
Creative Serving Suggestions
These Easy Tuna Melt Sliders are fantastic on their own, but they also play well with others.
- Classic Comfort Combo: Serve them alongside a warm bowl of tomato soup for the ultimate comfort food pairing.
- With a Crisp Salad: Balance the richness of the sliders with a simple, crisp green salad tossed in a light vinaigrette.
- The Perfect Platter: For a party or game day, serve them on a platter surrounded by classic snacks like potato chips, pickles, and a fresh vegetable tray with dip.
- A Touch of Green: Garnish the sliders with a sprinkle of fresh chopped parsley or chives right after they come out of the oven for a pop of color and fresh flavor.
Common Mistakes to Avoid for Flawless Sliders
This recipe is simple, but a few key details make all the difference.
- Soggy Bottoms: The most common mistake is not draining the tuna properly. Excess water will make your tuna salad runny and can lead to soggy bottom buns. Squeeze it dry!
- Uneven Spreading: Make sure to spread both the tuna salad and the butter topping evenly to the edges. You want every single slider to have the perfect ratio of filling, cheese, and glaze.
- Skipping the Foil: Baking uncovered for the entire time can lead to burnt tops and cheese that isn’t fully melted. The initial covered baking time is crucial for steaming the inside to gooey perfection.
- Slicing Too Soon: While tempting, let the sliders rest for a minute or two after taking them out of the oven. This allows the cheese to set slightly, making for cleaner cuts and less filling squishing out.
Storing and Reheating Your Sliders
Got leftovers? No problem. These sliders are almost as good the next day.
- Storing: Store any leftover sliders in an airtight container in the refrigerator for up to 2 days.
- Reheating: The best way to reheat them is in the oven or an air fryer. Place them on a baking sheet and heat at 350°F (175°C) for 5-7 minutes, or until warmed through and the tops have re-crisped. Microwaving will work in a pinch, but you’ll lose the crispy top.
- Prep Ahead: You can prepare the tuna salad mixture up to a day in advance and store it in an airtight container in the refrigerator. This makes assembly even faster when you’re ready to bake.
Your New Go-To for Quick & Delicious Meals
In conclusion, these Easy Tuna Melt Sliders are the perfect answer to the “What’s for dinner?” dilemma. They are incredibly fast, require only a handful of simple ingredients, and deliver a knockout punch of savory, cheesy, and comforting flavor. This recipe is a guaranteed crowd-pleaser that will earn a permanent spot in your meal rotation. It’s proof that you don’t need to spend hours in the kitchen to create a meal that feels special and satisfying.
We wholeheartedly encourage you to give this recipe a try! Let us know how it goes by leaving a comment or a review below. Did you add your own unique twist? We’d love to hear about it! For more simple, family-friendly recipes, don’t forget to subscribe to our blog.
Your Questions, Answered: Tuna Melt Slider FAQs
- Can I make these ahead for a party?Yes! You can fully assemble the sliders (without the topping) a few hours ahead of time. Cover them and keep them in the refrigerator. When you’re ready, just add the butter topping and bake as directed.
- Can these sliders be frozen?It’s not recommended to freeze the fully assembled sliders, as the mayonnaise and texture of the rolls can change upon thawing. However, you can prepare and freeze the tuna salad mixture for up to a month.
- I don’t like mayonnaise. What can I use instead?Full-fat Greek yogurt is the best substitute, providing a similar creaminess with a pleasant tang. You could also use mashed avocado for a completely different, delicious twist.
- My family doesn’t like tuna. Any other ideas?Certainly! This slider concept works wonderfully with other fillings. Try using canned salmon, shredded rotisserie chicken mixed with BBQ sauce, or even sloppy joe meat for a different but equally delicious experience.
- How can I prevent the tops from getting too brown?Every oven is different. If you notice the tops are browning too quickly after you remove the foil, simply place the foil loosely back on top for the remainder of the baking time.