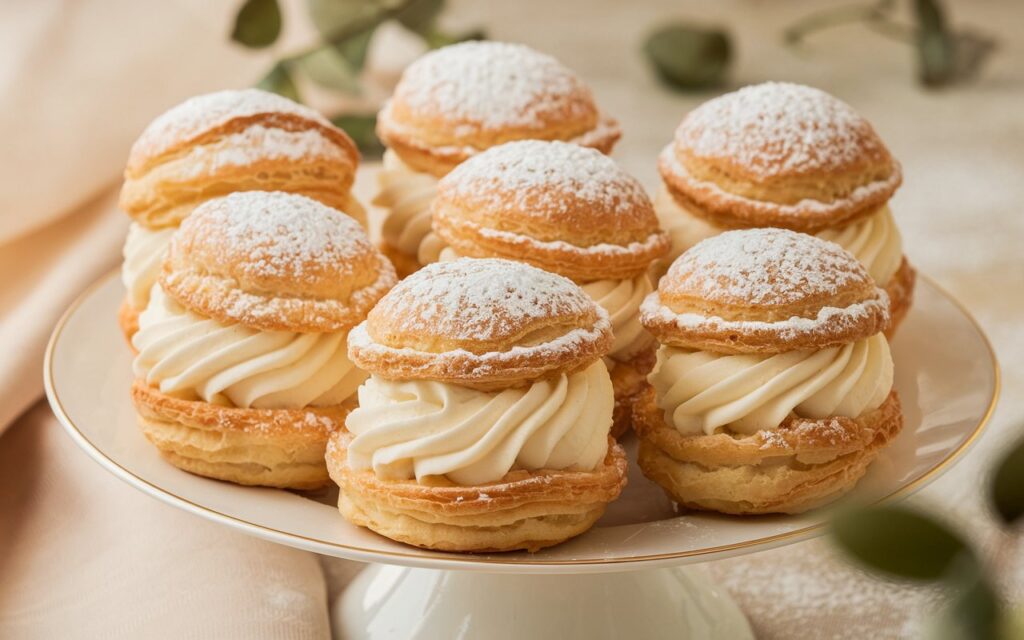
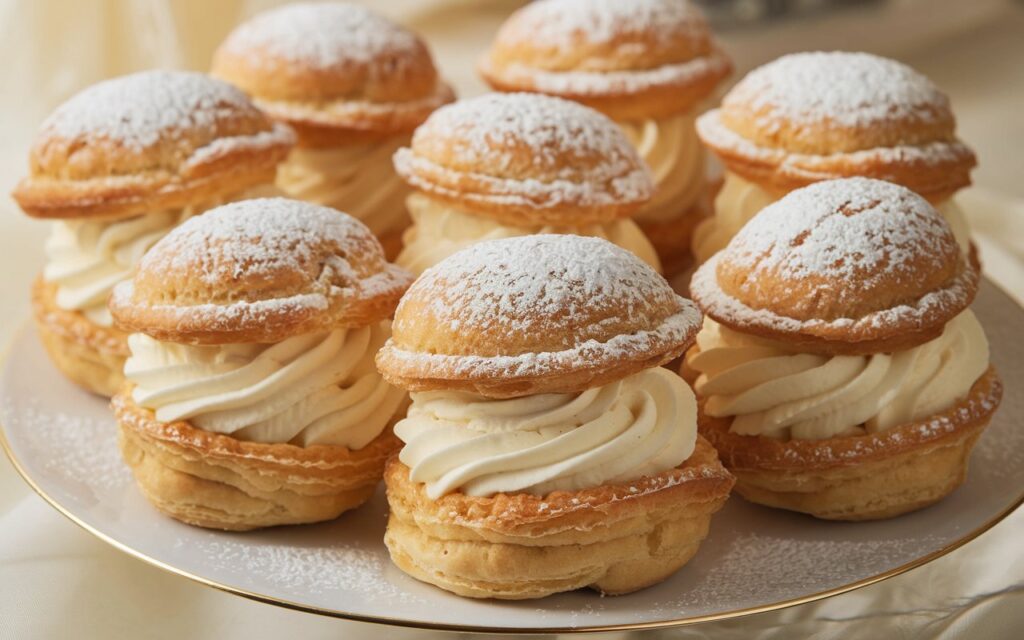
Envision biting into a hollow, airy shell that collapses delicately under your teeth, bursting with vanilla pastry cream—that’s the ethereal charm of Cream Puffs. Constructed from pâte à choux—a French pastry dough known for its steam-based rise—these puffs deliver a crisp exterior and a custardy interior that begs for sweet fillings. Topped with a dusting of powdered sugar or a drizzle of chocolate, each puff feels both light and indulgent, reminiscent of old-world patisseries or elegant dessert buffets.
I stumbled upon cream puffs when I was young, watching bakers pipe the choux dough in perfect rounds, amazed at how they puffed in the oven. Over time, I discovered that the real star is the pastry cream that nestles within—soft, richly vanilla, and sweet without being cloying. Achieving the signature airy pocket demanded mastering a few key steps: cooking the dough on the stovetop, beating in eggs to the perfect consistency, and baking in a way that sets the shell’s structure. Now, Classic Cream Puffs with Vanilla Pastry Cream stand as a go-to showstopper dessert for brunches or special dinners, impressing guests with their delicate look and luscious taste while quietly relying on the simplest of ingredients like butter, flour, eggs, and milk.
In this piece, we’ll explore how to form pâte à choux, ensuring your shells puff and crisp, then prepare a smooth vanilla pastry cream for filling them. Whether you’re a budding baker seeking to conquer choux pastry or a dessert enthusiast craving a timeless treat, prepare for a journey that proves even “fancy French pastry” can be welcoming—and undeniably rewarding.

Why Classic Cream Puffs with Vanilla Pastry Cream Impress
- Light as Air
Choux pastry uses steam to rise, creating a hollow shell perfect for piping or spooning in creamy fillings. The result is a pastry that feels lighter than typical dough-based sweets. - Contrasting Textures
Crisp exteriors meet soft, custardy vanilla pastry cream, forging a textural delight. Biting into a cream puff yields that satisfying contrast reminiscent of biting a crisp shell filled with airy cream. - Versatile & Elegant
Cream puffs are suitable for high teas, banquets, or everyday indulgences. They also adapt to savory applications with cheese or salmon mousse, though sweet remains classic. - Accessible Technique
While it sounds fancy, choux pastry is relatively simple once you follow the correct method—boil water, butter, flour on the stovetop, incorporate eggs, bake, fill. The logic is straightforward if each step is done carefully.
Ingredient Overview
Makes ~20–24 medium cream puffs:
| Ingredient | Quantity | Notes |
|---|---|---|
| For the Choux Pastry | ||
| Water | ~1 cup (240 ml) | Some prefer half water, half milk for richer pastry |
| Unsalted Butter (cubed) | ~8 tbsp (1 stick, 113 g) | For richness; salted can be used if you adjust salt content |
| Sugar | 1–2 tsp | Light sweetness in the dough, optional but typical |
| Salt | ¼ tsp | Enhances flavor |
| All-Purpose Flour | ~1 cup (125–130 g) | Measure accurately, can sift if lumps are present |
| Eggs (large) | 4 (room temperature) | Possibly 1 extra if dough is still too thick |
| For the Vanilla Pastry Cream | ||
| Whole Milk | 2 cups (480 ml) | Richness is key; 2% can substitute but yield slightly thinner cream |
| Sugar | ~½ cup (100 g) | Adjust sweetness to taste |
| Egg Yolks | 4 (large) | Adds structure & richness |
| Cornstarch | ~3 tbsp | Thickening agent, ensures stable pastry cream |
| Unsalted Butter (optional) | ~2 tbsp (28 g) | Adds silkiness at the end |
| Vanilla Extract or Vanilla Bean | 1–2 tsp extract, or seeds from 1 bean | Use real vanilla for best flavor |
| Optional Topping | Powdered sugar, chocolate drizzle | For garnish after filling |
*(Note: The ratio of eggs in choux pastry is critical. If dough is too stiff after 4 eggs, consider an extra half egg or water to achieve that glossy, pipeable consistency. Pastry cream can incorporate half a vanilla bean or 2 tsp extract for robust flavor.)
Step-by-Step Recipe (Approx. 2–3 Hours Including Cooling)
Part A: Choux Pastry
- Boil Water, Butter, Sugar, Salt
- In a medium saucepan, combine 1 cup water, 8 tbsp butter, 1–2 tsp sugar, and ¼ tsp salt. Bring to a rolling boil over medium-high heat. This step dissolves butter, sugar, and salt thoroughly.
- Stir in Flour
- Once boiling, reduce heat to low. Immediately add 1 cup flour all at once, stirring vigorously with a wooden spoon. The dough forms a ball, pulling away from pan sides. Keep cooking ~1–2 minutes, allowing excess moisture to evaporate. The dough should become slightly glossy, forming a cohesive mass.
- Cool Dough & Incorporate Eggs
- Transfer dough ball to a mixing bowl. Let cool ~5 minutes so it’s warm but not scorching. Then beat in eggs one at a time, either by hand or using a mixer on medium speed. After each egg, the dough may look separated but will eventually come together. The final consistency is thick yet pipeable, leaving a V-shaped ribbon when you lift the spatula. If too stiff, add half an egg or a spoonful of water.
- Pipe or Spoon Mounds
- Preheat oven to 400°F (205°C). Line a baking sheet with parchment or a silicone mat. Transfer dough to a piping bag fitted with a round tip (or spoon by tablespoonful). Pipe mounds ~2 inches in diameter, 2 inches apart. For smooth tops, dampen your fingertip to press down any peaks. Optional: Lightly egg wash the tops for extra shine.
- Bake & Cool
- Bake at 400°F ~20 minutes, then reduce to 350°F (175°C) and continue ~10–15 minutes more, or until golden brown and puffed. They should feel hollow and lightweight. Turn off oven, crack door slightly, and let pastries cool inside ~5–10 minutes to prevent collapse. Transfer to a wire rack to cool fully.
*(Note: Crispness emerges from baking out interior moisture. If underbaked, puffs flatten. The color shift from pale to golden indicates dryness. Using the oven door crack step helps them set.)
Part B: Vanilla Pastry Cream
- Heat Milk
- In a medium saucepan, warm 2 cups whole milk over medium heat. If using a vanilla bean, split it and scrape seeds into milk, adding the pod as well. Heat until steaming, not boiling. Remove pod if using a bean.
- Whisk Yolks, Sugar, Cornstarch
- In a separate bowl, whisk 4 egg yolks with ~½ cup sugar. Once lightened in color, whisk in ~3 tbsp cornstarch, ensuring no lumps. The mixture will be thick and pale.
- Temper Egg Mixture
- Slowly pour about ~½ cup of the hot milk into the yolk mixture, whisking constantly to avoid curdling. Continue adding small amounts of hot milk until combined. This step prevents scrambling the eggs.
- Cook Pastry Cream
- Return the tempered yolk mixture to the saucepan. Cook over medium heat, whisking constantly. The mixture thickens quickly, typically within ~2–3 minutes. Let it bubble gently for 30 seconds to cook out raw starch flavor. If lumps form, reduce heat and keep whisking. The final texture should be thick enough to coat a spoon.
- Add Butter & Vanilla
- Remove from heat. Stir in ~2 tbsp butter (optional for richness) and 1–2 tsp vanilla extract if not using the bean. Transfer pastry cream to a bowl, press plastic wrap onto surface to prevent skin formation, and let cool to room temp. Then refrigerate until cold, at least 1 hour.
*(Note: The ratio of cornstarch is key. Too little yields runny cream, too much can be gummy. The “boil” for 30 seconds ensures stable thickening. Overcooking or too-high heat can risk lumps or scorching.)
Part C: Filling & Assembling
- Prepare Pastry Cream
- Once chilled, whisk pastry cream briefly to smooth out lumps. If extremely thick, stir in a spoonful of whipped cream or milk to lighten.
- Fill Cream Puffs
- Slice tops off puffs or poke a hole at the bottom. Pipe pastry cream using a bag with a round tip. For the slice method, spoon cream into the bottom half, then replace the “lid.” If using the hole method, gently pipe cream inside, feeling the puff expand.
- Decorate
- Optionally dust with powdered sugar or drizzle melted chocolate on top. For an extra flourish, swirl sweetened whipped cream on top. Present them on a platter, the airy interior brimming with luscious filling.
*(Note: Filled cream puffs can soften if left too long. For maximum crispness, fill close to serving time. If you prefer them super-chilled, store them in the fridge but expect a softer shell.)
Flavor Variations
- Chocolate Pastry Cream
- Add ~2 tbsp cocoa powder or ~2 oz melted chocolate to the pastry cream near the end. This results in a double-chocolate treat if you drizzle chocolate on top as well.
- Fruit Twist
- Fold lemon curd or berry compote into the pastry cream for a fruity dimension. Alternatively, skip pastry cream for whipped cream and fresh berries, forming a light fruit-filled puff.
- Tiramisu Cream
- Stir a bit of mascarpone and espresso powder into the pastry cream for a coffee-laced filling reminiscent of tiramisu.
- Savory Puffs
- Omit sugar from the choux dough and fill with cheese mousse, smoked salmon, or herb cream cheese for an appetizer version. The technique remains the same, though obviously no pastry cream.
Serving & Storage
- Immediate Enjoyment
- For best texture (crisp shell, creamy interior), serve soon after filling. The shells can stand at room temperature a few hours unfilled, staying fairly crisp.
- Refrigeration
- If leftover, store in the fridge up to 1 day. The shell softens but remains tasty. For next-day crispness, some reheat shells in a 300°F oven to dry out briefly, then refill if pastry cream is separate.
- Freezing
- Unfilled shells freeze decently. Thaw and re-crisp in the oven. Pastry cream doesn’t freeze well (it can separate), so consider making fresh cream if you plan to freeze the shells.
- Presentation
- Pile them in a pyramid or line them on a tiered tray. A dusting of powdered sugar and a few fresh berries around the plate can evoke a patisserie vibe.
Perfecting Pâte à Choux & Cream
- Choux Consistency
- The dough after adding eggs should form a thick ribbon that slowly falls from the spoon. If it’s too stiff, puffs might not inflate fully. If too loose, they can spread too much.
- Oven Heat
- The initial higher temp (400°F) helps the puffs rise from steam. Lowering it (to 350°F) ensures the inside cooks thoroughly, preventing collapse.
- Avoiding Pastry Cream Lumps
- Constant whisking and thorough tempering matter. If lumps appear, you can pass the cream through a fine sieve while warm.
- Egg Quality & Temperature
- Using room-temp eggs in choux dough helps them incorporate more easily, leading to a smoother result. Cold eggs slow the emulsion process.
FAQ – Classic Cream Puffs with Vanilla Pastry Cream
Q1: My puffs collapsed after removal from the oven—why?
A1: Possibly underbaked or oven temp was inconsistent. The shell must be fully set and dried inside. Next time, confirm the golden-brown color, let them rest in the oven for a few minutes with the door cracked.
Q2: Can I use half water, half milk in the choux?
A2: Yes, it can yield a richer flavor, but pure water is classic. Some prefer half milk for a slightly more tender crumb. Keep the overall liquid ratio the same.
Q3: Is pastry cream mandatory?
A3: You can fill with whipped cream, custard variations, or even sweetened mascarpone. Pastry cream is standard, but the method welcomes many fillings.
Q4: Should I keep them in the fridge if not serving immediately?
A4: Unfilled puffs can remain at room temp in an airtight container. Once filled with pastry cream, store in the fridge to prevent spoilage. The shells do soften, so it’s best to fill near serving time.
Q5: Can I skip the slicing and just inject the cream?
A5: Absolutely, that’s a classic approach. Use a piping tip to poke a hole at the bottom or side, fill until the puff feels heavier. The slicing method can be simpler for novices.
Conclusion

Unifying the airy crispness of pâte à choux with the sweet, vanilla-laden indulgence of pastry cream, these Classic Cream Puffs delight dessert enthusiasts globally. Each bite merges subtle complexities: the ephemeral crackle of the choux shell, followed by a rush of cool, rich filling. Perfect for refined events or casual sweet cravings, they prove that so-called “fancy” pastry can be approachable, provided you follow a few key steps.
Now that you’ve unlocked the secrets—correct choux dough consistency, thorough baking for a hollow interior, and a silky pastry cream that provides sweet satisfaction—why not try them for your next celebratory brunch or after-dinner treat? Once you taste that final puff—maybe dusted with sugar or crowned by a chocolate drizzle—come back to share any personal variations. Did you swirl in coffee flavors, add fresh fruit, or adopt a savory spin? Your creativity might inspire other bakers to discover how joyous the synergy of crisp shells and creamy fillings can be.