This Dessert Has No Business Being This Easy
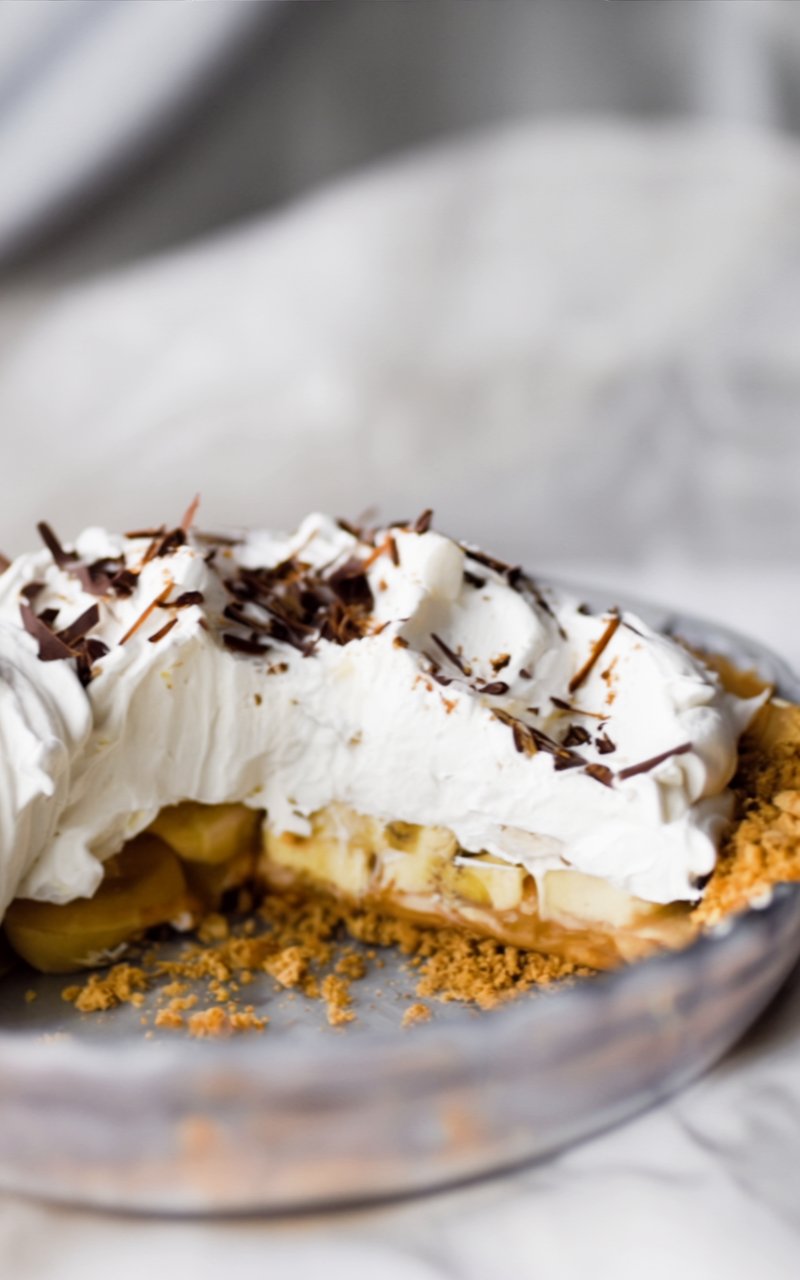
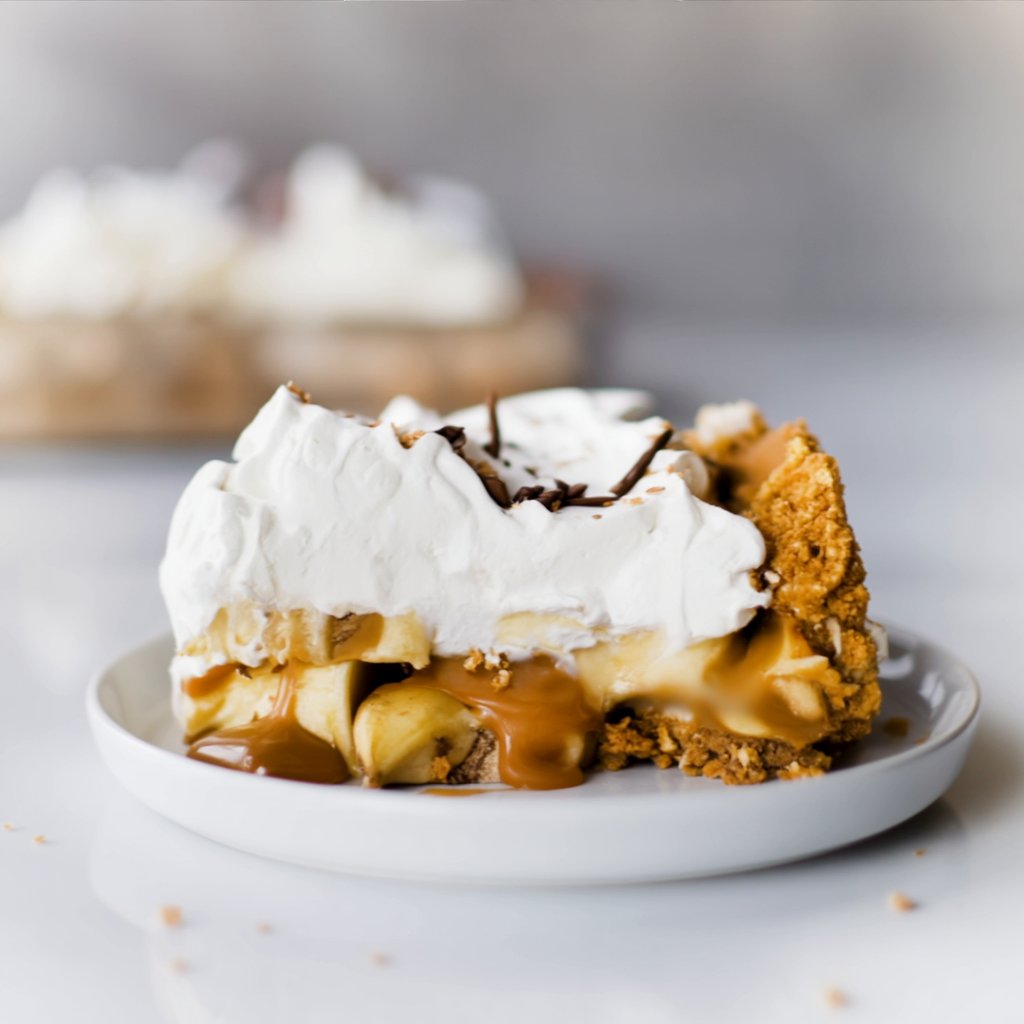
Let me tell you something — the first time I made banoffee pie, I genuinely couldn’t believe I’d just assembled a dessert that gorgeous with almost zero effort. No complicated techniques, no fancy equipment, no stressing over oven temperatures. Just a buttery graham cracker crust, a thick layer of caramel dulce de leche, fresh banana slices, and billowy whipped cream piled on top.
This classic no-bake banoffee pie is one of those desserts that looks like you spent hours in the kitchen, but really? It comes together in about 20 minutes of hands-on work. The rest is just waiting (impatiently) while it chills in the fridge. If you’ve never made one before, prepare to add this to your permanent dessert rotation.
What You’ll Need (It’s a Short List!)
One of the best things about this banana toffee pie? The ingredient list is wonderfully simple.
| Ingredient | Amount |
|---|---|
| Graham cracker crumbs | 1 1/2 cups (180g) — about 12 full sheets |
| Granulated sugar | 1/4 cup (50g) |
| Unsalted butter, melted | 6 tbsp (85g) |
| Dulce de leche | 1 1/4 cups |
| Large ripe bananas | 2, sliced |
| For the Whipped Cream: | |
| Cold heavy whipping cream | 2 cups (480ml) |
| Confectioners’ sugar | 1/4 cup |
| Pure vanilla extract | 1 tsp |
| Optional Toppings: | |
| Chocolate shavings, chopped nuts, or toffee bits | To taste |

How Long From Start to Fork?
- Prep Time: 20 minutes
- Bake Time: 15 minutes (crust only)
- Chill Time: 2 hours minimum (up to 24 hours)
- Total Time: ~2 hours 35 minutes
- Servings: 8 slices
Most of that time is the pie sitting pretty in the fridge. Your actual kitchen time? About 20 minutes. That’s less time than it takes to watch a single episode of your favorite show.
Let’s Build This Layer by Layer
Step 1: Fire Up the Oven
Preheat your oven to 350°F (177°C). That’s it for heat — after the crust bakes, the oven goes off for good!
Step 2: Crush and Mix the Graham Cracker Crust
If you’re starting with whole graham crackers, blitz them in a food processor or blender until you have fine, sandy crumbs. Stir the crumbs and granulated sugar together in a medium bowl, then pour in the melted butter and mix until everything is coated. The mixture should feel thick, coarse, and slightly sandy.
Tip: Break up any large chunks with a fork. You want an even, fine texture for a crust that holds together beautifully.
Step 3: Shape the Crust Into the Pie Dish
Pour the mixture into an ungreased 9-inch pie dish. Pat the crumbs down into the bottom and up the sides using medium pressure — firm enough to compact, but don’t press like your life depends on it. A crust packed too hard becomes rock-solid and tough to cut.
Tip: Use a small flat-bottomed measuring cup to smooth out the base, and run a spoon around the bottom corner where the edge meets the base. This creates a rounded seam that prevents the crust from cracking apart when you serve.
Step 4: Bake and Cool the Crust
Bake for 15 minutes until the crust is lightly golden and fragrant. Remove from the oven and let it cool on a wire rack for at least 15 minutes before adding any fillings.
Tip: A warm crust will melt the dulce de leche unevenly and make the bananas go soft too fast. Patience here pays off!
Step 5: Whip Up That Dreamy Cream
While the crust cools, whip the cold heavy cream, confectioners’ sugar, and vanilla extract together using a hand mixer or stand mixer fitted with a whisk attachment. Beat on medium-high speed for about 3–4 minutes until you reach medium peaks — that’s the sweet spot between floppy and stiff where the cream holds its shape but still looks soft and pillowy.
Tip: Make sure your cream is ice-cold straight from the fridge. Warm cream won’t whip properly and you’ll end up with a soupy mess instead of fluffy clouds.
Step 6: Assemble Your Banoffee Masterpiece
Now for the fun part! Spread the dulce de leche in an even layer over the cooled crust. Arrange your banana slices on top in one or two neat layers. Then spoon (or pipe!) that gorgeous whipped cream generously over everything.
Tip: Slice bananas right before assembling to prevent browning. If you’re making this a few hours ahead, a tiny squeeze of lemon juice on the slices keeps them looking fresh.
Step 7: Chill, Garnish, and Serve
Refrigerate the pie uncovered for at least 2 hours — this firms everything up and lets the flavors meld together. Right before serving, scatter chocolate shavings, toffee bits, or chopped nuts over the top for that wow-factor finish.
Tip: The pie can chill for up to 24 hours, making it a perfect make-ahead dessert. Store leftovers covered in the fridge for up to 5 days.

The Sweet Numbers (Nutrition Per Slice)
Per serving (1/8 of the pie):
- Calories: ~420 kcal
- Protein: 4 g
- Carbohydrates: 48 g (Sugar: ~34 g)
- Fat: 25 g (Saturated: 15 g)
- Fiber: 1 g
- Sodium: 180 mg
This is definitely a treat yourself dessert! The bananas do contribute natural potassium and fiber, and you can lighten things up slightly by using a reduced-sugar dulce de leche or swapping in coconut whipped cream for a dairy-free twist.
Ways to Make This Pie Even More Irresistible
Serve each slice with a drizzle of warm caramel sauce and a pinch of flaky sea salt for that salty-sweet contrast that’ll have everyone asking for seconds.
This banoffee pie is an absolute showstopper at dinner parties, summer barbecues, and holiday gatherings. It also makes a stunning birthday dessert — just pipe the whipped cream into rosettes for a bakery-worthy presentation.
Pair it with a strong espresso or a glass of cold milk. The richness of the dulce de leche and cream plays beautifully against a bold, slightly bitter coffee.
Don’t Make These Rookie Mistakes
- Pressing the crust too hard: An over-compacted crust becomes cement-like and impossible to slice. Fix: Use gentle, even pressure — firm enough to hold, soft enough to cut.
- Using unripe bananas: Green or barely yellow bananas taste starchy and bland in this pie. Fix: Use ripe bananas with a few brown spots — they’re sweeter and softer.
- Skipping the chill time: Without at least 2 hours in the fridge, the layers won’t set and the pie will be a sloppy mess when you cut it. Fix: Plan ahead. Make it the morning of or even the night before.
- Whipping warm cream: Cream that isn’t cold enough won’t form peaks and will stay liquid. Fix: Chill your bowl and whisk attachment in the freezer for 10 minutes beforehand for the fluffiest results.
- Slicing bananas too early: They’ll brown and turn mushy. Fix: Slice them right before you assemble the pie and toss lightly with lemon juice if making ahead.
Go Ahead — You Deserve This Pie
This banoffee pie is everything a dessert should be: ridiculously simple, absolutely stunning, and so delicious that people will beg you for the recipe. With layers of buttery crust, sticky-sweet caramel, fresh bananas, and cloud-like whipped cream, it’s a no-bake masterpiece that works for any occasion.
Make it this weekend and let me know what you think! Share your photos and favorite topping combos in the comments — I’d love to see how yours turns out. And if you’re a fan of no-bake treats, don’t miss our no-bake cheesecake recipe next!
Print
Banoffee Pie
A classic no-bake Banoffee Pie with a buttery graham cracker crust, thick dulce de leche caramel, fresh banana slices, and fluffy homemade whipped cream. Only 6 main ingredients and about 20 minutes of hands-on time. Perfect for dinner parties, holidays, or any time you want a showstopping dessert with minimal effort.
- Total Time2 hours 35 minutes
- Yield8 slices 1x
Ingredients
Crust
- 1.5 cups graham cracker crumbs (about 12 full sheet graham crackers (180g))
- 0.25 cup granulated sugar (50g)
- 6 tbsp unsalted butter (melted (85g))
Filling
- 1.25 cups dulce de leche
- 2 large bananas (sliced)
Whipped Cream
- 2 cups cold heavy whipping cream (480ml)
- 0.25 cup confectioners’ sugar (or granulated sugar)
- 1 tsp pure vanilla extract
Optional Toppings
- chocolate shavings, chopped nuts, or toffee bits (for garnish)
Instructions
- Preheat Oven: Preheat oven to 350°F (177°C).
- Make the Crust: Grind graham crackers into fine crumbs using a food processor. Stir crumbs and granulated sugar together, then mix in melted butter until thick and sandy. Pat the mixture into an ungreased 9-inch pie dish, pressing into the bottom and up the sides with medium pressure. Use a flat-bottomed measuring cup to smooth the base and a spoon to round the bottom corners.
- Bake and Cool: Bake the crust for 15 minutes until lightly golden. Cool for 15 minutes on a wire rack.
- Make the Whipped Cream: Whip cold heavy cream, confectioners’ sugar, and vanilla extract on medium-high speed until medium peaks form, about 3-4 minutes.
- Assemble the Pie: Spread dulce de leche evenly over the cooled crust. Arrange banana slices in 1-2 layers on top, then spread or pipe whipped cream generously over the bananas.
- Chill and Serve: Refrigerate uncovered for at least 2 hours (up to 24 hours). Garnish with chocolate shavings, toffee bits, or chopped nuts before serving. Store leftovers covered in the fridge for up to 5 days.
Notes
Do not pack the graham cracker crust down with heavy force — it makes the crust too hard to slice. Use medium, even pressure. Slice bananas right before assembling to prevent browning. For best results, chill the pie for at least 2 hours before serving to allow the layers to set properly.
- Prep Time: 20 minutes
- Cook Time: 15 minutes
- Category: Dessert
- Cuisine: American, British
Nutrition
- Calories: 420
- Sugar: 34
- Sodium: 180
- Fat: 25
- Saturated Fat: 15
- Carbohydrates: 48
- Fiber: 1
- Protein: 4