This Pie Ruined Store-Bought Desserts for Me Forever
I’ll be honest — I used to think banana cream pie was just okay. The kind you grab from the grocery store bakery section, with that weirdly stiff filling and sad, mealy banana slices? Not exactly exciting. Then I made the best banana cream pie from scratch, with real homemade custard and a buttery Nilla Wafer crust, and I finally understood what all the fuss was about.
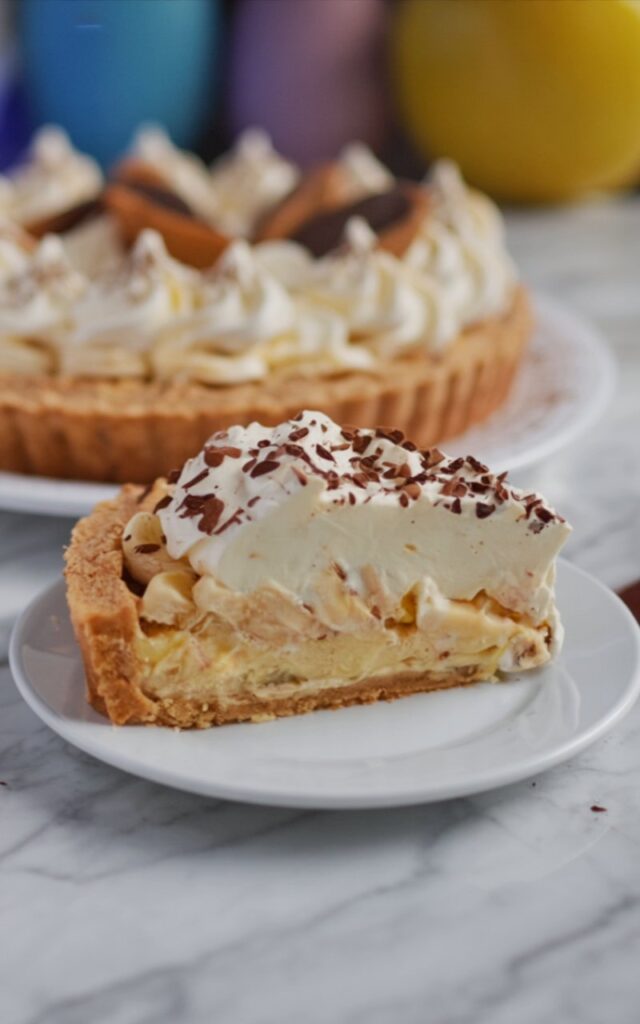
This banana cream pie recipe is the real deal. Silky, vanilla-kissed custard made on the stovetop, layered over fresh bananas nestled in a crispy cookie crust, then topped with pillowy clouds of whipped cream and dark chocolate shavings. Every single layer earns its place. It does take a little patience (the pie chills overnight), but the hands-on work is surprisingly manageable — and the payoff is absolutely worth the wait.
Here’s What Goes Into This Beauty
Three components, one unforgettable pie. Here’s the full lineup:
| Ingredient | Amount |
|---|---|
| For the Nilla Wafer Crust: | |
| Salted butter, melted | 10 tbsp (140g) |
| Nilla Wafers, crushed fine | 2 2/3 cups (310g) — one 11-oz box |
| For the Custard Filling: | |
| Large eggs, room temperature | 2 whole |
| Large egg yolks, room temperature | 2 |
| Cornstarch | 4 tbsp (32g) |
| Granulated sugar | 1/2 cup (100g) |
| Pure vanilla extract | 1 tsp |
| Fine sea salt | A pinch |
| Cold heavy cream | 1 cup (235ml) |
| Whole milk | 1 cup (235ml) |
| Medium ripe bananas | 4–5 total (2 for filling, 2–3 for topping) |
| For the Whipped Cream: | |
| Heavy cream | 1 1/2 cups (355ml) |
| Powdered sugar | 2 tbsp (14g) |
| Vanilla extract | 1/4 tsp |
| Dark chocolate (optional) | For grating on top |

How Much Time Are We Talking?
- Prep Time: 30 minutes
- Bake Time: 30 minutes
- Chill Time: Overnight (at least 8 hours)
- Total Time: ~9 hours (mostly hands-off chilling)
- Servings: 8–10 slices
Don’t let the total time scare you — the actual kitchen work is about 30 minutes. The rest is the oven and fridge doing the heavy lifting while you sleep. This is a plan-ahead dessert, and it rewards every minute of patience.
Let’s Build This Pie From the Bottom Up
Step 1: Preheat and Prep the Pan
Preheat your oven to 275°F (135°C). Choose an 8-inch or 9-inch tart pan with a removable bottom and lightly grease it with cooking spray or a thin layer of butter.
Step 2: Crush Those Nilla Wafers
Pulse the Nilla Wafers in a food processor until you have fine crumbs — think the texture of coarse sand. No food processor? Place them in a zip-top bag and crush with a rolling pin.
Tip: Fine, even crumbs are the secret to a crust that holds together. Big chunks = crumbly slices.
Step 3: Build and Shape the Cookie Crust
Pour the melted butter over the crushed wafers and stir until every crumb is moistened. Press the mixture firmly and evenly into the bottom and up the sides of the tart pan using your fingers. Use a flat-bottomed glass or measuring cup to smooth and compact the base.
Run a spoon along the inside corner where the bottom meets the sides to create a smooth, rounded edge — this prevents cracking when you slice later.
Tip: Firm pressure, but don’t overdo it. A crust packed too hard turns rock-solid and is impossible to cut cleanly.
Step 4: Make the Silky Custard Filling
Whisk together the eggs, egg yolks, sugar, cornstarch, salt, and vanilla in a medium bowl until smooth. In a small saucepan, heat the heavy cream and milk over medium heat until tiny bubbles appear at the edges — a gentle simmer, not a boil.
Slowly drizzle a small amount of the hot cream mixture into the egg bowl while whisking constantly (this is called tempering — it prevents scrambled eggs!). Keep adding gradually until everything is combined. Pour the entire mixture back into the saucepan.
Cook over low heat, whisking continuously, until the custard thickens to a runny-pudding consistency — about 5 minutes.
Tip: If lumps appear, don’t panic! Simply push the custard through a fine mesh strainer for a perfectly smooth result.
Step 5: Layer the Bananas and Pour the Custard
Thinly slice two bananas and arrange them in a single layer across the bottom of your baked crust. Pour the warm custard over the bananas, then gently shake the pan to settle it into every gap.
Step 6: Bake Low and Slow
Slide the pie into the oven and bake at 275°F for 30 minutes. When done, the custard should be slightly jiggly in the center — like a gentle wave. A few surface cracks are totally normal.
Cool completely at room temperature, then cover loosely with plastic wrap and refrigerate overnight.
Step 7: Top It Off the Next Day
Remove the pie from the tart pan and place it on a serving platter. Whip 1 1/2 cups heavy cream with powdered sugar and vanilla until medium peaks form — the tips should barely flop over when you lift the whisk.
Slice two more bananas and arrange them across the top of the custard. Pile the whipped cream on top in generous, billowy swirls. Grate dark chocolate over everything with a fine grater or vegetable peeler.
Tip: Add banana slices and whipped cream right before serving for the freshest look and texture.

What’s In Each Slice? (Nutrition Info)
Per serving (1/10 of the pie, approximate):
- Calories: ~430 kcal
- Protein: 5 g
- Carbohydrates: 42 g (Sugar: ~28 g)
- Fat: 28 g (Saturated: 17 g)
- Cholesterol: 120 mg
- Sodium: 220 mg
Bananas bring natural potassium (about 12% of daily needs per serving), and the eggs contribute protein and B vitamins. This is a celebration pie — rich, indulgent, and worth every single calorie.
How to Serve This Like It Came From a Bakery
Slice it with a sharp knife dipped in hot water for perfectly clean edges. Serve each piece on a dessert plate with an extra grating of dark chocolate and a single vanilla wafer perched on the whipped cream for that bakery-window charm.
This homemade banana cream pie is a showstopper for holiday tables, birthday dinners, and Sunday family gatherings. It pairs beautifully with a strong cup of coffee or a glass of cold milk.
Watch Out for These Common Hiccups
- Using cold eggs for the custard: Cold eggs don’t emulsify properly and can lead to a grainy texture. Fix: Set eggs out 30 minutes before starting.
- Pouring hot cream into eggs too fast: Dump it all at once and you’ll scramble the eggs. Fix: Drizzle slowly while whisking nonstop — patience is everything here.
- Not chilling overnight: A few hours isn’t enough for the custard to fully set. Fix: Make this pie a day ahead. Overnight chilling gives you clean slices and the best creamy texture.
- Adding banana topping too early: Banana slices brown and turn mushy if they sit too long. Fix: Slice and add them right before you top with whipped cream and serve.
- Packing the crust too aggressively: An iron-hard crust shatters instead of slicing. Fix: Use firm, even pressure — compact enough to hold together, gentle enough to cut through.
This Is the Banana Cream Pie You’ve Been Looking For
If you’ve been searching for the best banana cream pie recipe — the kind with real homemade custard, a crispy Nilla Wafer crust, and clouds of fresh whipped cream — this is it. It’s elegant enough for special occasions yet comforting enough for a random weeknight treat.
Make it this weekend and tell me what you think! Drop a comment with your favorite topping twist — I’ve seen people add toasted coconut flakes and it looks incredible. Share this with anyone who loves a good pie, and don’t forget to subscribe for more from-scratch dessert recipes! 🍌
Print
The Best Banana Cream Pie
A from-scratch banana cream pie with a buttery Nilla Wafer cookie crust, silky homemade custard layered over fresh bananas, and topped with billowy whipped cream and dark chocolate shavings. This is the ultimate banana dessert — rich, creamy, and worth every minute of the overnight chill. Perfect for holidays, birthdays, and special family gatherings.
- Total Time9 hours
- Yield10 slices 1x
Ingredients
Nilla Wafer Crust
- 10 tbsp salted butter (melted (140g))
- 2.67 cups Nilla Wafers (crushed into fine crumbs (310g, one 11-oz box))
Custard Filling
- 2 large eggs (at room temperature)
- 2 large egg yolks (at room temperature)
- 4 tbsp cornstarch (32g)
- 0.5 cup granulated sugar (100g)
- 1 tsp vanilla extract (pure)
- 1 pinch fine sea salt
- 1 cup heavy cream (235ml)
- 1 cup whole milk (235ml)
- 4 medium bananas (2 for filling, 2 for topping)
Whipped Cream Topping
- 1.5 cups heavy cream (355ml, cold)
- 2 tbsp powdered sugar (14g)
- 0.25 tsp vanilla extract
- dark chocolate (optional, for grating on top)
Instructions
- Preheat and Prep: Preheat oven to 275°F (135°C). Lightly grease an 8-inch or 9-inch tart pan with a removable bottom.
- Make the Crust: Crush Nilla Wafers into fine crumbs using a food processor. Stir in melted butter until moistened. Press firmly and evenly into the bottom and sides of the tart pan. Smooth the edge where bottom and sides meet with a spoon for a rounded finish.
- Make the Custard: Whisk eggs, egg yolks, sugar, cornstarch, salt, and vanilla until smooth. Heat cream and milk in a saucepan until gently simmering. Slowly drizzle the hot liquid into the egg mixture while whisking constantly (tempering). Pour everything back into the saucepan and cook on low, whisking, until thickened to runny pudding consistency, about 5 minutes. Strain through a mesh sieve if lumpy.
- Assemble and Bake: Thinly slice 2 bananas and arrange on the crust. Pour warm custard over the bananas. Bake for 30 minutes until the center is slightly jiggly. Cool completely at room temperature, then cover loosely and refrigerate overnight.
- Finish the Pie (Next Day): Remove pie from tart pan. Whip 1½ cups heavy cream with powdered sugar and vanilla to medium peaks. Slice 2 more bananas on top of the custard. Cover with whipped cream and grate dark chocolate over top. Serve within 2 days.
Notes
Use room-temperature eggs for the smoothest custard. If lumps form, push the custard through a fine mesh strainer. The pie must chill overnight for the custard to set properly — do not skip this step. Add banana slices and whipped cream topping right before serving for the freshest presentation. Store leftovers in the refrigerator and enjoy within 2 days.
- Prep Time: 30 minutes
- Cook Time: 30 minutes
- Category: Dessert
- Cuisine: American
Nutrition
- Calories: 430
- Sugar: 28
- Sodium: 220
- Fat: 28
- Saturated Fat: 17
- Carbohydrates: 42
- Protein: 5
- Cholesterol: 120